Logic Pro User Guide
- Welcome
-
- What is Logic Pro?
- Workflow overview
- Logic Pro project basics
- Advanced tools and additional options
- Undo and redo edits
- Manage Logic Pro content
- How to get help
-
- Projects overview
- Create projects
- Open projects
- Save projects
- Delete projects
-
- Play a project
- Set the playhead position
- Control playback with the transport buttons
- Use transport shortcut menus
- Use transport keyboard shortcuts
- Customize the control bar
- Change the LCD display mode
- Monitor and reset MIDI events
- Use the cycle area
- Use the Chase Events function
- Control Logic Pro using Apple Remote
- Control Logic Pro projects using Logic Remote
- Preview projects in the Finder
- Close projects
- View project information
-
- Overview
-
- Before recording software instruments
- Play software instruments
- Record software instruments
- Record additional software instrument takes
- Overdub software instrument recordings
- Spot erase software instrument recordings
- Use Note Repeat
- Record to multiple software instrument tracks
- Replace software instrument recordings
- Record multiple MIDI devices to multiple tracks
- Record software instruments and audio simultaneously
- Use step input recording techniques
- Use the metronome
-
- Overview
-
- Regions overview
- Select regions
- Select parts of regions
- Cut, copy, and paste regions
- Move regions
- Add or remove gaps
- Delay region playback
- Loop regions
- Repeat regions
- Resize regions
- Mute and solo regions
- Time stretch regions
- Split regions
- Demix MIDI regions
- Join regions
- Create regions in the Tracks area
- Normalize audio regions in the Tracks area
- Create aliases of MIDI regions
- Clone audio regions
- Convert repeated MIDI regions to loops
- Change the color of regions
- Convert audio regions to Sampler zones
- Rename regions
- Delete regions
-
- Overview
-
- Add notes
- Select notes
- Snap items to the grid
- Move notes
- Copy notes
- Change the pitch of notes
- Resize notes
- Edit note velocity
- Quantize the timing of notes
- Quantize the pitch of notes
- Change note articulations
- Lock the position of events
- Mute notes
- Change note color
- View note labels
- Delete notes
- Time stretch notes
- View multiple MIDI regions
- Split chords
- Automation/MIDI area in the Piano Roll Editor
- Open other editors
-
- Flex Time and Pitch overview
-
- Flex Pitch algorithm and parameters
- Edit the pitch of audio in the Audio Track Editor or a zoomed in track
- Edit the pitch of audio in the Tracks area when the track is not zoomed in
- Correct the timing of audio regions with Flex Pitch
- Quantize the pitch of audio regions
- Create MIDI from audio recordings
- Change the gain of notes in audio regions
- Use Varispeed to alter the speed and pitch of audio
-
- Mixing overview
- Set channel strip input formats
- Set channel strip pan or balance positions
- Mute and solo channel strips
-
- Plug-ins overview
- Add, remove, move, and copy plug-ins
- Insert a plug-in on a track using drag and drop
- Activate plug-ins on inactive channels
- Use the Channel EQ
- Work in the plug-in window
- Work with plug-in settings
- Work with plug-in latencies
- Work with Audio Units plug-ins
- Support for ARA 2 compatible plug-ins
- Use the Plug-in Manager
- Work with channel strip settings
- Surround panning
- Use the I/O Labels window
- Undo and redo Mixer and plug-in adjustments
-
- Smart Controls overview
- Show Smart Controls for master effects
- Choose a Smart Control layout
- Automatic MIDI controller assignment
- Map screen controls automatically
- Map screen controls
- Edit mapping parameters
- Use parameter mapping graphs
- Open the plug-in window for a screen control
- Rename a screen control
- Use articulation IDs to change articulations
- Assign hardware controls to screen controls
- Compare Smart Control edits with saved settings in Logic Pro
- Use the Arpeggiator
- Automate screen control movements
-
- Live Loops overview
- Start and stop cells
- Work with Live Loops cells
- Change loop settings for cells
- How the Live Loops grid and Tracks area interact
- Edit cells
- Edit scenes
- Work in the Cell Editor
- Bounce cells
- Record a Live Loops performance
- Change Live Loops grid settings
- Control Live Loops in Logic Pro with other devices
-
- Overview
- Add notes
-
- Part box overview
- View score symbols
- Select score symbols
- Add notes and rests
- Add notes and symbols to multiple regions
- Add key and time signature changes
- Change the clef sign
- Add dynamic marks, slurs, and crescendi
- Change note heads
- Add symbols to notes
- Add trills, ornaments, and tremolo symbols
- Add sustain pedal markings
- Add chord symbols
- Add chord grids and tablature symbols
- Add bar lines, repeats, and coda signs
- Add page and line break symbols
-
- Select notes
- Move and copy notes
- Change note pitch, duration, and velocity
- Change note articulations
- Quantize the timing of notes
- Restrict note input to the current key
- Control how ties are displayed
- Add and edit tuplets
- Override display quantization using tuplets
- Add grace notes and independent notes
- Delete notes
- Use automation in the Score Editor
-
- Staff styles overview
- Assign staff styles to tracks
- Staff Style window
- Create and duplicate staff styles
- Edit staff styles
- Edit staff, voice, and assign parameters
- Add and delete staffs or voices in the Logic Pro Staff Style window
- Copy staffs or voices in the Logic Pro Staff Style window
- Copy staff styles between projects
- Delete staff styles
- Assign notes to voices and staffs
- Display polyphonic parts on separate staffs
- Change the staff assignment of score symbols
- Beam notes across staffs
- Use mapped staff styles for drum notation
- Predefined staff styles
- Share a score
-
- Environment overview
- Common object parameters
- Customize the Environment
-
-
- Fader objects overview
- Use fader objects
- Play back fader movements
- Work with object groups
- Fader styles
- Fader functions: MIDI events
- Fader functions: range, value as
- Fader functions: filter
- Vector fader
- Special faders overview
- Cable switchers
- Meta event faders
- SysEx faders
- Work with SysEx messages
- Special functions
- Ornament objects
- MMC record buttons
- Keyboard objects
- Monitor objects
- Channel splitter object
- Physical input objects
- Physical input objects
- MIDI click objects
-
-
- Key commands overview
- Browse, import, and save key commands
- Assign key commands
- Copy and print key commands
-
- Global Commands key commands
- Global Control Surfaces Commands
- Various windows
- Windows Showing Audio files
- Main Window Tracks and Various Editors
- Live Loops Grid
- Various Editors
- Views showing Time Ruler
- Main Window Tracks
- Mixer
- MIDI Environment
- Piano Roll
- Score Editor
- Event Editor
- Step Editor
- Step Sequencer
- Project Audio
- Audio File Editor
- Smart Tempo Editor
- Sampler
- Step Input Keyboard
- Tool key commands in Logic Pro
- Touch Bar shortcuts
-
-
- Working with your control surface
- Connect control surfaces
- Add a control surface to Logic Pro
- Automatic assignment for USB MIDI controllers
- Grouping control surfaces
- Control Surfaces preferences overview
- Modal dialog display
- Tips for using your control surface
- Control surfaces supported by Logic Pro
- Software and firmware
-
-
- Learn about Effects
-
- Learn about Amps and Pedals
-
- Bass Amp Designer overview
- Bass amplifier models
- Bass cabinet models
- Build a custom combo
- Amplifier signal flow
- Pre-amp signal flow
- Use the D.I. box
- Amplifier controls
- Bass Amp Designer effects overview
- Bass Amp Designer EQ
- Bass Amp Designer compressor
- Bass Amp Designer Graphic EQ
- Bass Amp Designer Parametric EQ
- Bass Amp Designer microphone controls
-
- Use MIDI plug-ins
-
- Arpeggiator overview
- Arpeggiator control parameters
- Note order parameters overview
- Note order variations
- Note order inversions
- Arpeggiator pattern parameters overview
- Use Live mode
- Use Grid mode
- Arpeggiator options parameters
- Arpeggiator keyboard parameters
- Use keyboard parameters
- Assign controller parameters
- Modifier MIDI plug-in controls
- Note Repeater MIDI plug-in controls
- Randomizer MIDI plug-in controls
-
- Use the Scripter MIDI plug-in
- Use the Script Editor
- Scripter API overview
- MIDI processing functions overview
- HandleMIDI function
- ProcessMIDI function
- GetParameter function
- SetParameter function
- ParameterChanged function
- Reset function
- JavaScript objects overview
- Use the JavaScript Event object
- Use the JavaScript TimingInfo object
- Use the Trace object
- Use the MIDI event beatPos property
- Use the JavaScript MIDI object
- Create Scripter controls
- Transposer MIDI plug-in controls
-
- Learn about included Instruments
-
- Alchemy overview
- Name bar
-
- Alchemy source overview
- Source master controls
- Import browser
- Source subpage controls
- Source filter controls
- Source filter use tips
- Source elements overview
- Additive element controls
- Additive element effects
- Spectral element controls
- Spectral element effects
- Pitch correction controls
- Formant filter controls
- Granular element controls
- Sampler element controls
- VA element controls
- Source modulations
- Morph controls
- Master voice section
- Alchemy extended parameters
-
- Logic Pro Quick Sampler overview
- Add content to Logic Pro Quick Sampler
- Logic Pro Quick Sampler waveform display
- Use Flex in Logic Pro Quick Sampler
- Logic Pro Quick Sampler Pitch controls
- Logic Pro Quick Sampler Filter controls
- Quick Sampler filter types
- Logic Pro Quick Sampler Amp controls
- Logic Pro Quick Sampler extended parameters
-
- Sculpture overview
- Sculpture interface
- Global parameters
- Amplitude envelope parameters
- Use the Waveshaper
- Filter parameters
- Output parameters
- Use surround range and diversity
- Assign MIDI controllers
- Extended parameters
-
-
- Ultrabeat overview
- Ultrabeat interface
- Synthesizer section overview
- Filter section controls
- Distortion circuit controls
- Glossary

Create Logic Pro Alchemy sounds from scratch
Alchemy provides a number of different synthesizer engines that can be used to resynthesize, or reconstruct, imported sampled sounds. It does this by analyzing sonic characteristics of the source, such as level, frequency, phase, and other components. This analysis is then mapped to values that are reconstructed by one or more of the synthesis engines. Details on importing and analysis of source material are covered in Logic Pro Alchemy Import browser and in individual source sections. See Logic Pro Alchemy source elements overview.
Alchemy also allows you to use several of the built-in synthesizer engines to create sounds without sample importing and analysis. This section explores these pure synthesis options and other approaches to creating the basic building blocks of your sounds.
Once you have added the raw material to your sources, Alchemy’s filters, modulation, and effects sections are available to further refine your sound. See the information and tasks outlined in these sections: Logic Pro Alchemy main filter controls, Logic Pro Alchemy modulation overview, and Logic Pro Alchemy effects overview. Also look at the Logic Pro Alchemy performance controls and Logic Pro Alchemy arpeggiator overview sections.
Note: Images shown in tutorials are not specific to presets used in tasks. They are included as a guide to help you find areas and parameters in the Alchemy interface.
Explore pure additive synthesis in Alchemy
Pure additive synthesis allows you to create sounds by combining sine wave harmonics and overtones (or partials) of different levels, phase, pitch, and pan position. If you’re unfamiliar with this method of synthesis, see Logic Pro Alchemy additive edit window overview and Additive synthesis.
In Logic Pro, from the Name bar, click the File button and choose Initialize Preset from the pop-up menu to reset all Alchemy parameters to default settings.
Click the A button (below Global) to view source A parameters.
This defaults to the VA (Virtual Analog) synthesis engine. Play a few notes to hear the sound.
Click the Additive button, just below the File button in the Name bar, then click the Additive On button to enable the additive engine.
Double-click the Additive Vol knob to reset the level, then play a few notes to hear the sound.

Click the Edit button to the left of the Realtime Spectrogram (waveform) display.
The main edit window opens.
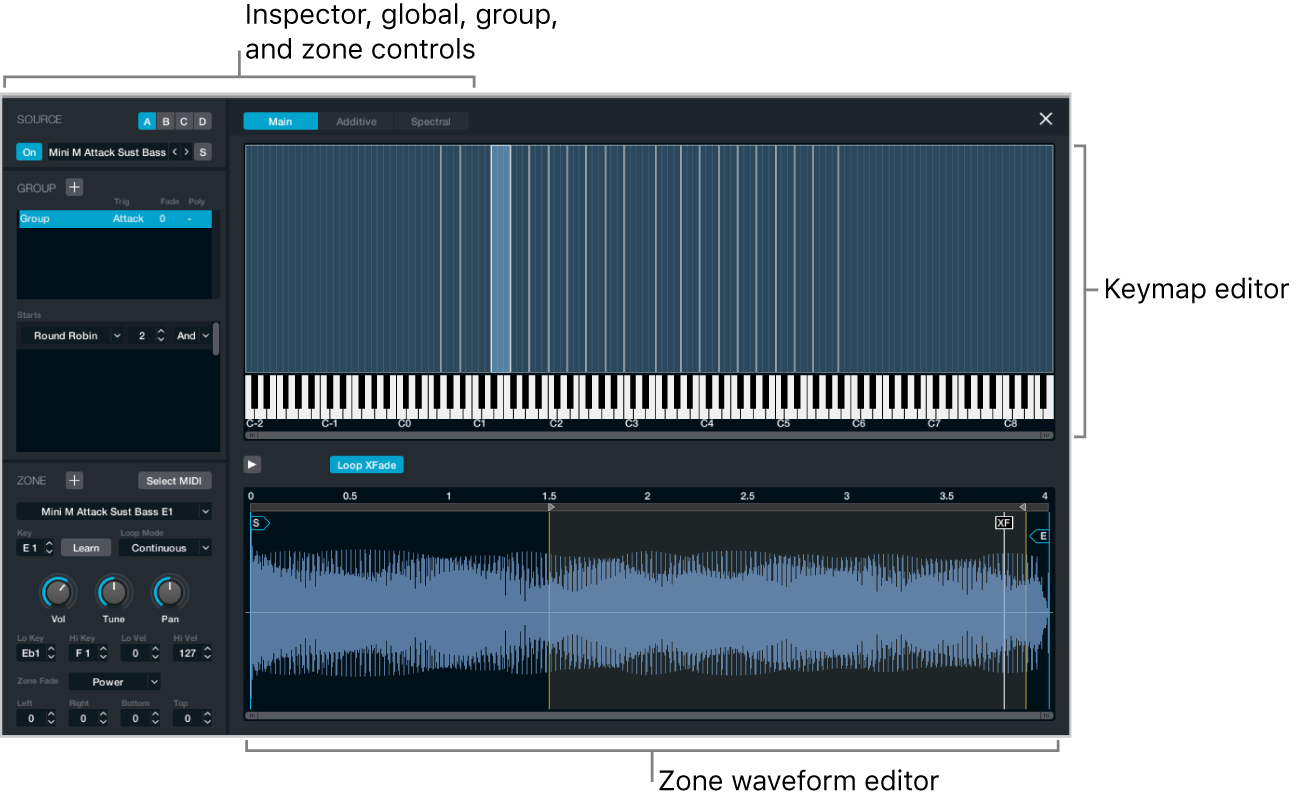
Click the Additive button to view the additive edit window, where the Vol button should be active and a single column is shown at the left of the Partial bar display.
This is the first (and only) harmonic of your sound.
Drag vertically and horizontally across the Partial bar display to create a series of new harmonics of different levels. Create a pseudo waveform shape.
Play your keyboard to hear how this sounds. Depending on what you’ve drawn, you should hear a harsh and edgy digital sound.
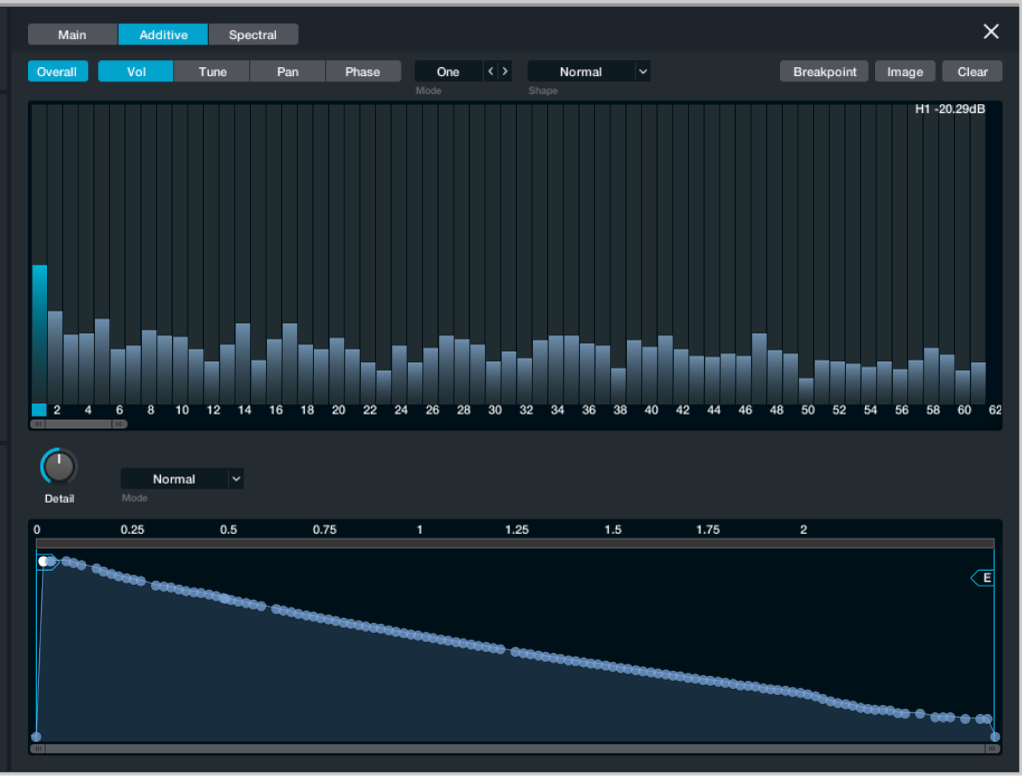
Click the Mode pop-up menu, and choose Fifth (harmonics).
Drag the first harmonic vertically to see how the fifth harmonics only are changed, noting that the change is relative to the first harmonic.
This is how you adjust grouped harmonics. Adjusting groups of, rather than individual, harmonics is the best approach to take when creating additive sounds. Creating and adjusting individual harmonics is possible (using One in the Mode pop-up menu), but it is tedious and not an efficient approach. In general terms, even harmonics sound more musical and odd harmonics sound noisy or dissonant.
Click the Tune button, choose One (single harmonics) from the Mode pop-up menu, then draw horizontally and vertically (creating another pseudo waveform shape) in the Partial bar display.
Play the keyboard to hear a deranged metallic sort of sound.
Choose Fifth from the Mode pop-up menu, then drag some points vertically and horizontally in the Partial envelope display.
Play the keyboard to hear the fifth harmonics bend in pitch, controlled by the envelope associated with this group of harmonics.
Harmonic envelopes control the level, pitch, pan, and phase of harmonics over time. This level of control over each harmonic (if required) enables you to recreate almost any type of sound, but as mentioned, it is far more efficient to work with groups of harmonics. Individual editing of harmonics or their associated envelopes is only recommended for fixes to unwanted partials or for more impactful edits to the lower harmonics, such as the fundamental, second, fourth, and so on. Edits of upper harmonics are unlikely to be audible in many cases.
Close the edit window, and experiment with the Fundamental, Octaves, Odd/Even, and Fifths knobs in the additive effects section. Also adjust the PVar and Sym knobs to hear their impact.
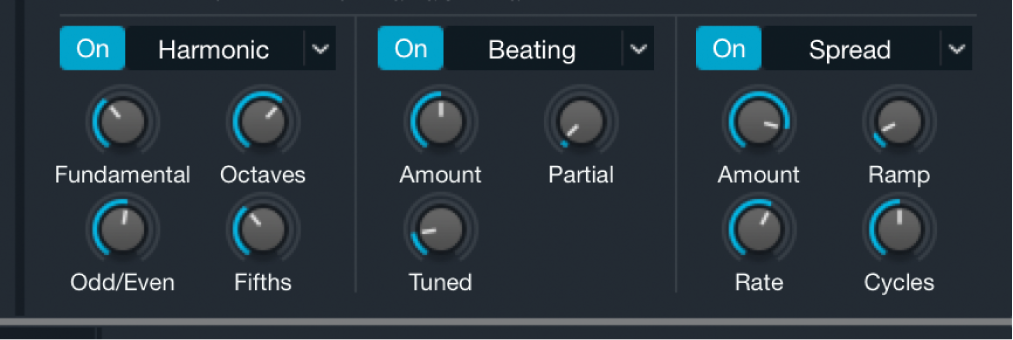
Choose Stretch from the second additive effects pop-up menu, and experiment with the Stretch and String knobs.
As further steps, you may also want to Control-click different Additive controls to assign modulation routings. Try assigning a modulation sequencer to the String parameter in the additive effects section to create a stepped sample-and-hold type of sound. You can use a File menu preset for the sequencer or create your own sequence.
If you want to take the modulation sequence concept further, you could create a sequence of individual harmonic pitches, resulting in a melody. Similarly, you could sweep a comb filter across the harmonic series, again resulting in a melody.
Explore VA synthesis in Alchemy
In Logic Pro, from the Name bar, click the File button and choose Initialize Preset from the pop-up menu to reset all Alchemy parameters to default settings.
Click the A button (below Global) to view source A parameters.
This defaults to the VA (Virtual Analog) synthesis engine. Play a few notes to hear the sound.
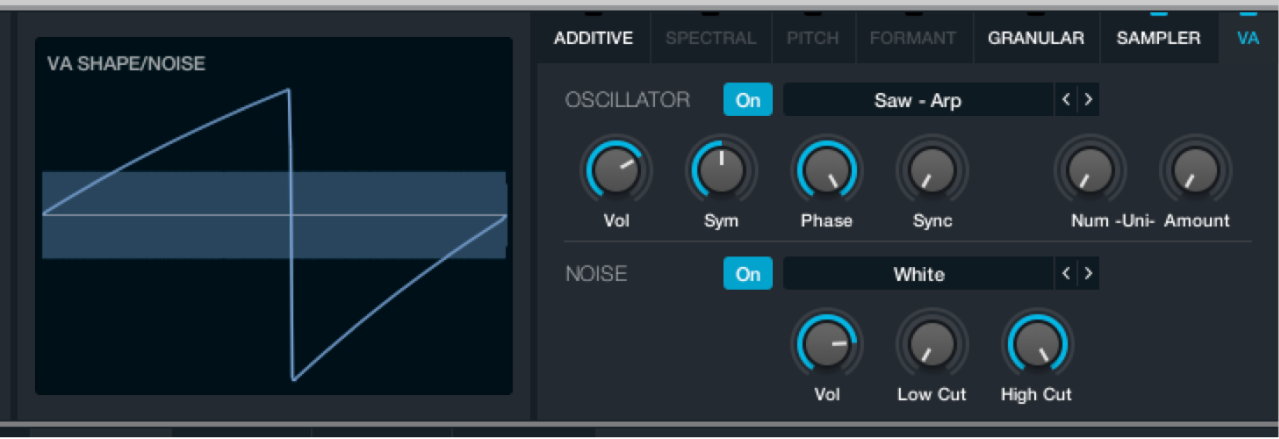
Choose several waveforms from each category in the source select field, and play the keyboard each time to hear the sound.
Alchemy has dozens of waveforms to choose from, providing a wealth of raw source material. Once you’ve explored the options, choose Complex > Soft Edge. This resembles a cheap electronic keyboard piano sound.
Turn on filter 1 in the source parameters at the left, and double-click the Cutoff knob.
Play to hear a much mellower, more electric piano-like sound. Feel free to try different filters, but LP 12dB Smooth is a good option.
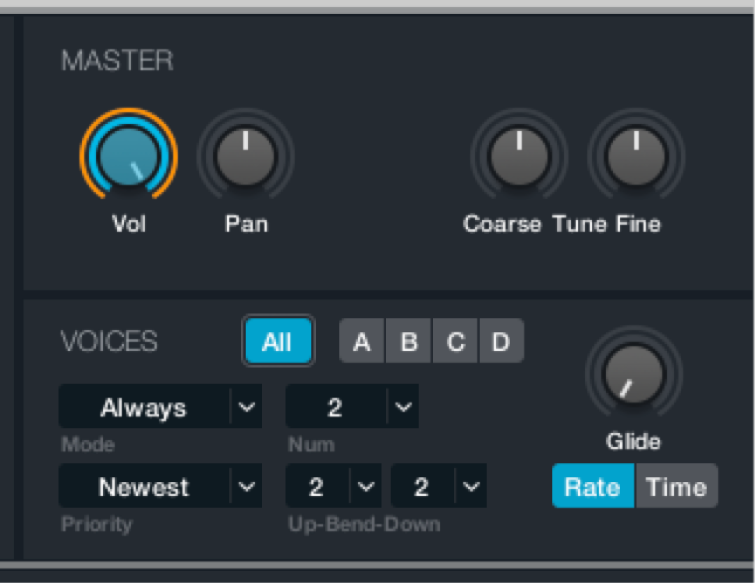
Click the Global button at the top left, then click the Master Vol knob.
Adjust the Release knob to a value around 1.00 in the central AHDSR envelope section.
Click the Effects button at the lower left to view the effects section.

Choose Mod FX in the top effects slot, then click the Mod FX File button and choose Preset > Big Chorus.
You may want to adjust the Rate to around 2.8 Hz.
Choose Phaser in the second effects slot, then click the Phaser File button and choose Preset > Subtle Vibrato.
Turn on the Sync button, then play to hear a simple, effected electric piano sound that is created from a single source. It goes without saying that this sound could be improved in many ways, but this primer should give you a feel for how quickly a basic preset can be created in Alchemy’s VA engine. Keep the sound you’ve created for the next task.
Combine synthesis methods to create sounds in Alchemy
Alchemy provides up to four sources in a preset. Each source has a full set of synthesis parameters associated with the chosen synthesis engine. This allows you to combine multiple synthesis types, such as virtual analog, additive, resynthesis, granular, or straight sample playback in a single preset. Because each synthesis method has different strengths and weaknesses, it is both easier and will deliver better results if you choose the most appropriate engine for the task.
Though there are areas of crossover between synthesis engines, the VA engine is strong for synthesizer type sounds, the additive engine is strong for digital and bell-like sounds, and the sampler/granular engines are best suited for sample manipulation, with the latter being particularly useful for loop mangling.
Alchemy also offers resynthesis which uses the additive or spectral synthesis engines, or a combination of the two, along with optional formant control. Resynthesis, put simply, analyzes a source audio file and reconstructs a facsimile of this sound using sine waves and noise signals. You can then manipulate these reconstructed elements to create new presets. The additive engine is well suited for single notes with a strong harmonic character. The spectral engine is suitable for chordal material and other complex signals. In many cases, you will achieve the best results by combining the two synthesis engines. This lets you manipulate the resynthesized source more precisely, playing to the strengths of each synthesis method.
In Logic Pro, choose advanced view and click the source B select field, then choose Import Audio from the pop-up menu to open the Import browser window.
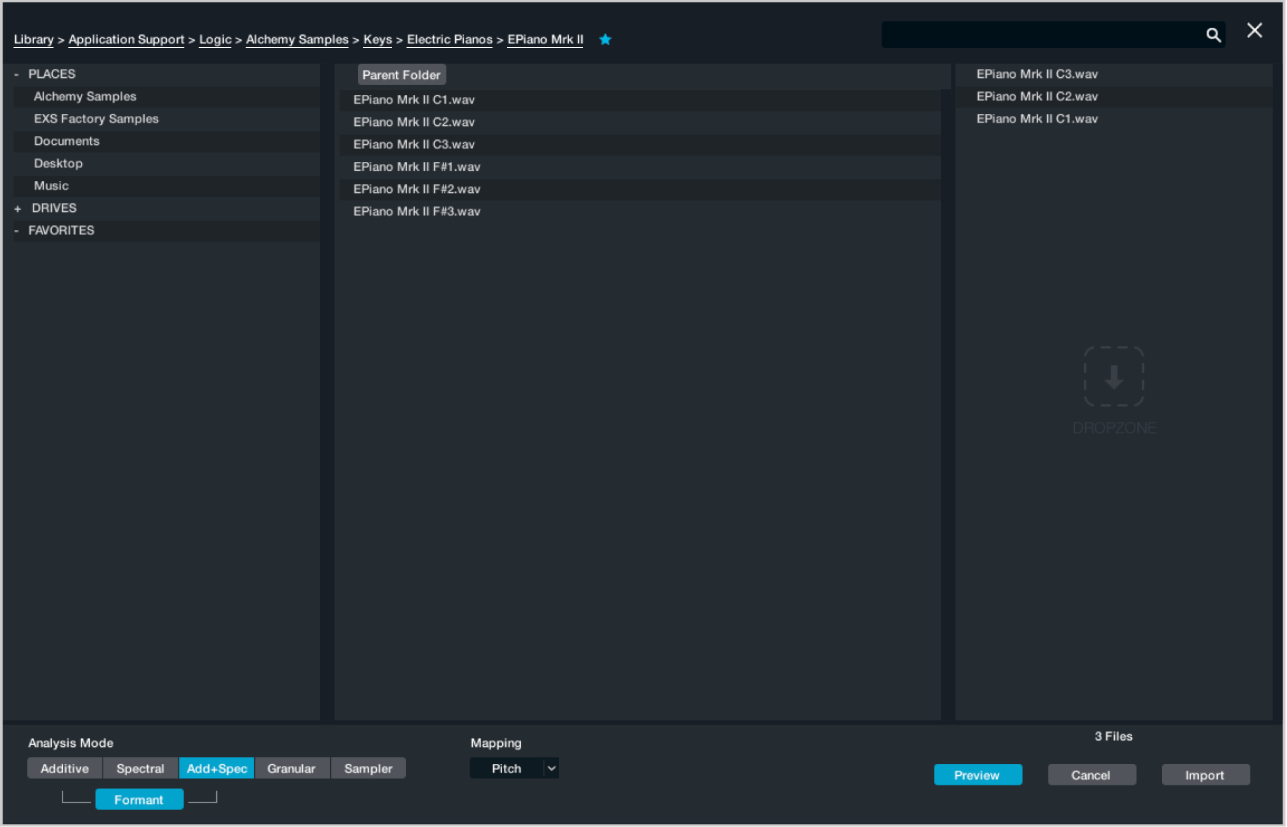
Click the Preview button to enable or disable automatic preview of selected files.
Click the Sampler button to choose the import analysis mode.
If the audio data is imported to the additive, spectral, add+spectral, or granular elements, analysis may take a moment or two. No analysis occurs when the Sampler analysis mode button is active.
Choose Alchemy Samples > Strings > Single Samples > Strings Mid, then click the Import button.
The Import browser closes when the import is complete, and the previous window is displayed.
Click the Global button (if not active), then adjust the Vol knobs of source A and B to hear an electric piano/string layer.
Repeat for sources C and D, using different analysis modes and the same or different samples.
An import progress dialog is shown when import methods other than Sample are used. The Import browser automatically closes when the import is complete.
Click the source select buttons at the left for sources B, C, and D, then click the Additive, Spectral, Pitch, Formant, Granular, and Sampler buttons at the upper right to view the parameters of each synthesis engine.

Listen to each source in isolation, and experiment with these synthesizer engine parameters to get a feel for what each engine provides for imported material.
The use of different synthesis engines enables different kinds of manipulation options for each source, providing different sonic characteristics. Beyond the comparatively simple combining of sources and synthesis engines in this way, you can perform a sophisticated form of cross-synthesis with Alchemy morphing features. See Logic Pro Alchemy elemental morphs overview.