Create, delete and use Smart Playlists in iTunes on PC
You can create a Smart Playlist that automatically organises songs and other media into playlists based on criteria you specify. Whenever you add or remove items from your iTunes library that meet the criteria of a Smart Playlist, the Smart Playlist is automatically updated to include them.
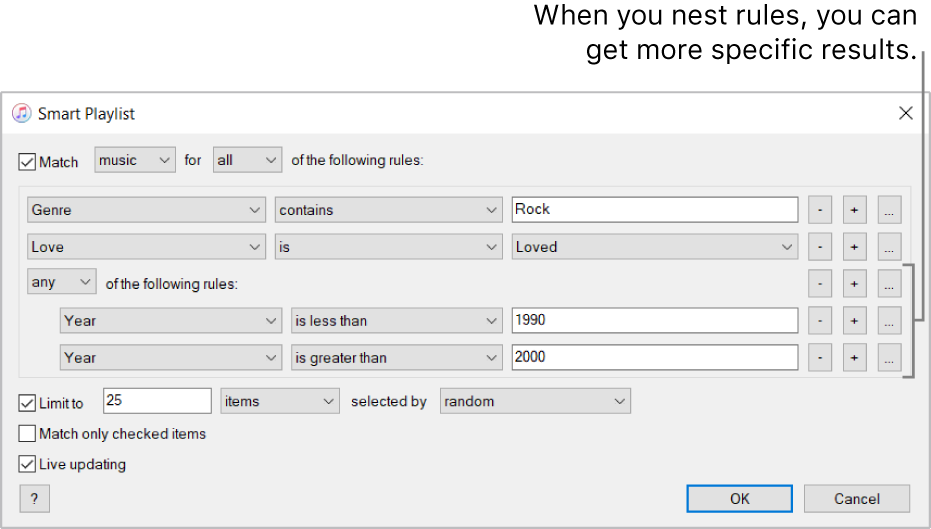
For example, you could create a Smart Playlist that includes your most loved rock songs that were released before 1990 or after 2000. When you import songs from a CD, they’re automatically added to the Smart Playlist if they meet the criteria.
Smart Playlists you create have this icon ![]() next to them.
next to them.

Create Smart Playlists
In the iTunes app
 on your PC, choose File > New > Smart Playlist.
Specify the criteria.
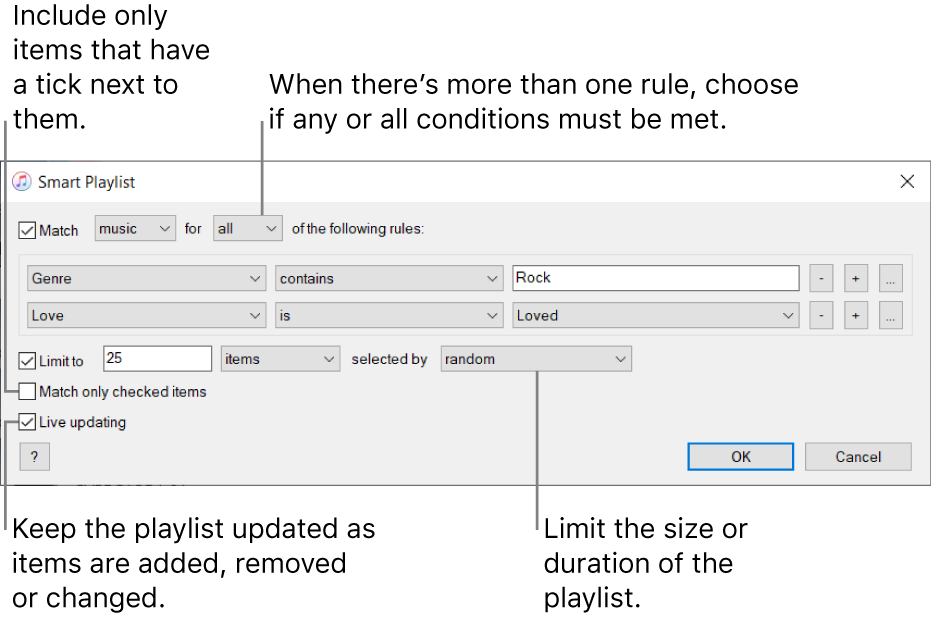
Set the first rule: Click the first pop-up menu, choose an option (such as Genre, Love or Year), then complete the rule using the other available menus or fields (they vary depending on your choice in the first pop-up menu).
For example, to include rock songs, choose “Genre” from the first pop-up menu and “contains” from the second one, then type “Rock” in the text field. Any rock song is automatically included.
Add or remove rules: To set additional rules, click the Add button
 . To remove a rule, click the Remove button
  .
. Nest rules: To set another set of criteria within a rule, click the Next button
 .
. For example, to include your most loved rock songs released before 1990 or after 2000, you can add two nested rules.

Set the scope of multiple rules: If you have at least two rules, a pop-up menu appears at the top of the Smart Playlist window that lets you choose whether an item must meet any or all of the criteria to be included in the Smart Playlist.
For additional control over the Smart Playlist, do any of the following:
Limits: To limit the size and contents of the Smart Playlist, select the Limit tickbox and choose options. For example, limit the Smart Playlist to two hours, with songs that were most recently added.
Match only ticked items: Select the “Match only ticked items” tickbox to include only items that have a tick next to them in the library. See Prevent a song from playing.
Live updating: Select the “Live updating” tickbox to have iTunes update this Smart Playlist as items in your library are added, removed or changed.
Click OK.
Your new Smart Playlist appears with your other playlists in the sidebar on the left. Whenever you select your Smart Playlist in the sidebar, items that match its criteria are listed.
At the top of the main window, enter a name for the Smart Playlist.
Edit Smart Playlists
You can’t add or remove items directly from a Smart Playlist. To change which items are included in the playlist, you must change its criteria.
In the iTunes app
 on your PC, select a Smart Playlist in the sidebar on the left.
Note: If you want to change the order of the items in a Smart Playlist, choose View > Sort By. When you choose View > Sort By > Playlist Order, you can drag items into the order you want.
Click Edit Rules, then change, add or remove rules or controls.
Click OK.
Rename Smart Playlists
In the iTunes app
 on your PC, select a Smart Playlist in the sidebar on the left.
Select the Smart Playlist name at the top of the window, then enter the new name.
Delete Smart Playlists
In the iTunes app
 on your PC, select a Smart Playlist in the sidebar on the left, then press the Delete key.
Only the Smart Playlist is deleted; items that were included in the Smart Playlist remain in your iTunes library and on your computer.