Final Cut Pro User Guide for Mac
- Welcome
- What’s new
-
- Intro to effects
-
- Intro to transitions
- How transitions are created
- Add transitions and fades
- Quickly add a transition with a keyboard shortcut
- Set the default duration for transitions
- Delete transitions
- Adjust transitions in the timeline
- Adjust transitions in the inspector and viewer
- Merge jump cuts with the Flow transition
- Adjust transitions with multiple images
- Modify transitions in Motion
-
- Add storylines
- Use the precision editor
- Conform frame sizes and rates
- Use XML to transfer projects
- Glossary
- Copyright

General settings in Final Cut Pro for Mac
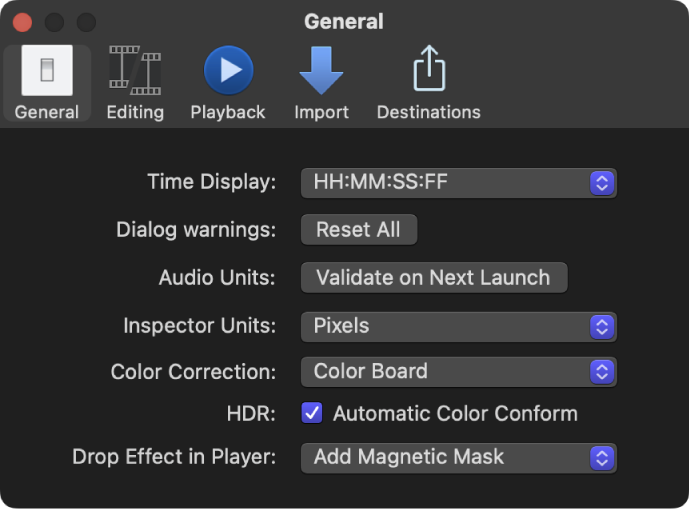
General settings are basic settings in Final Cut Pro.

Time Display
Time Display: Use this pop-up menu to choose the time mode for Final Cut Pro. Changes to this setting affect the timecode display below the viewer (for the position of the skimmer or the playhead), as well as trimming and navigation operations in Final Cut Pro. You have the following options:
Timecode display
Timecode display including subframes
Duration in frames
Duration in seconds
Dialog warnings
Reset All: Click this button to reset all warning dialogs that you dismissed by selecting the “Do not remind me again” checkbox.
Audio Units
Validate on Next Launch: If you encounter issues with third-party Audio Units effects, click this button to have Final Cut Pro validate all installed third-party Audio Units effects the next time you open the app. Final Cut Pro performs a series of tests to verify that each Audio Units effect is operating correctly, and notifies you of any Audio Units effects that fail. Validation is performed automatically the first time Final Cut Pro is opened and whenever Audio Units effects are installed or reinstalled, so you don’t normally need to click this button.
Inspector Units
Inspector Units: Use this pop-up menu to choose how values are displayed in inspector controls for the Transform, Crop, and Distort effects.
Pixels: Choose this setting to display values as pixels.
Percentages: Choose this setting to display values as percentages.
Color Correction
Color Correction: Use this pop-up menu to choose the default color correction effect. The controls for the default color correction effect appear when you open the Color inspector. You can choose the following color correction effects:
Color Board
Color Wheels
Color Curves
Hue/Saturation Curves
Color Adjustments
HDR
Automatic Color Conform: Select this checkbox to set the Color Conform effect to Auto when importing a clip. Or deselect the checkbox to set the Color Conform effect to None when importing a clip. See Use automatic color management and Color Conform in Final Cut Pro for Mac.
Drop Effect in Player
Drop Effect in Player: Use this pop-up menu to choose what happens when you drag a video effect from the Effects browser to the viewer. You can choose one of the following options:
Add Magnetic Mask: As you drag the effect over the viewer, objects and shapes in the image are highlighted to indicate where the Magnetic Mask will be applied. See Add a Magnetic Mask to isolate a subject from its background and Add a Magnetic Mask to a video effect in Final Cut Pro for Mac.
Add Tracker: As you drag the effect over the viewer, rectangles appear over objects in the video clip and oval shapes appear over faces, indicating items whose motion can be tracked. See Track an effect to a moving object.
Tip: To apply a video effect to the entire clip, overriding the Drop Effect in Player setting, press and hold the Shift key while you drag an effect to the viewer. To temporarily switch from one option to the other, press and hold the Command key while dragging.
Download this guide: PDF