
Use the Luma Keyer effect in Final Cut Pro for Mac
Luma keys provide a way to composite a foreground clip over a background clip based on the luma levels in the video. This is most often useful for still images, such as a picture of a logo over a black background, or computer-generated graphics. You create a luma key with the Luma Keyer effect.
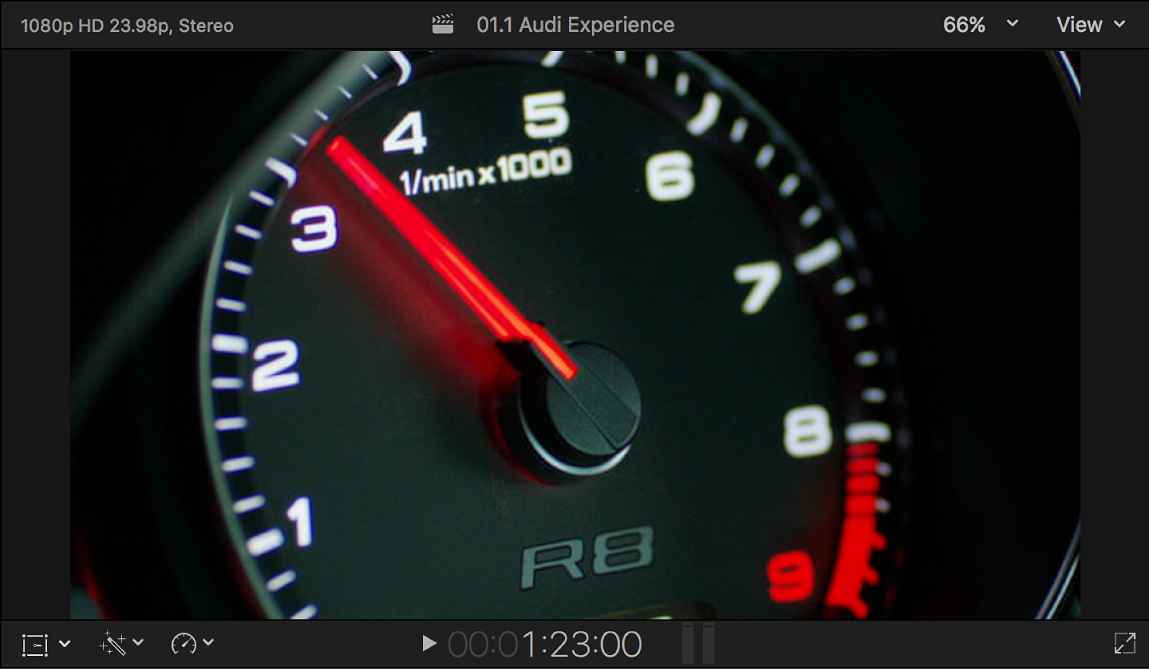
In the following examples, the speedometer image below is keyed over an outdoor car scene, creating a reflected look.
Apply the Luma Keyer effect
In the Final Cut Pro timeline, move the playhead to the point in the background clip (the clip you want to superimpose the luma key clip over) where you want the key to start.
In the browser, select the part of the foreground clip (the luma key clip) that you want to key over the background, then choose Edit > Connect to Primary Storyline (or press Q).
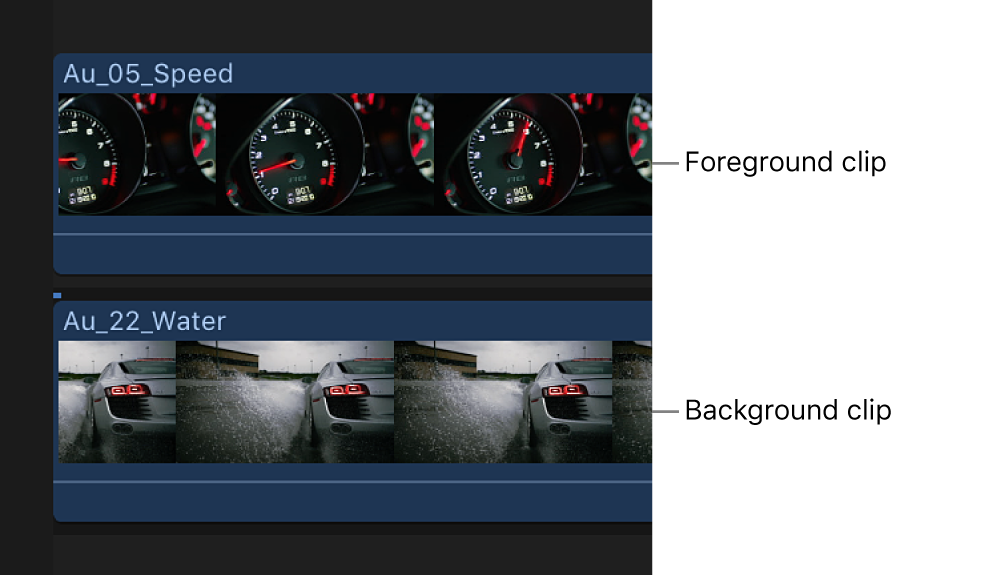
For details about connecting clips in this way, see Connect clips in Final Cut Pro for Mac.
Select the foreground clip in the timeline, then click the Effects button in the top-right corner of the timeline (or press Command-5).

In the Effects browser, select the Luma Keyer effect.
Tip: Type “keyer” in the Effects browser search field to quickly find the Luma Keyer effect.
Do one of the following:
Drag the effect to the timeline foreground clip you want to apply the effect to.
Double-click the effect thumbnail to apply the effect to the selected clip.
The Luma Keyer effect automatically removes the black video. If the resulting key isn’t right or you want to improve it, you can adjust the luma key effect.
Adjust the Luma Keyer effect
In the Final Cut Pro timeline, select the clip with the Luma Keyer effect.
Open the Video inspector.
The Effects section of the Video inspector shows the parameters available for adjusting the Luma Keyer effect.
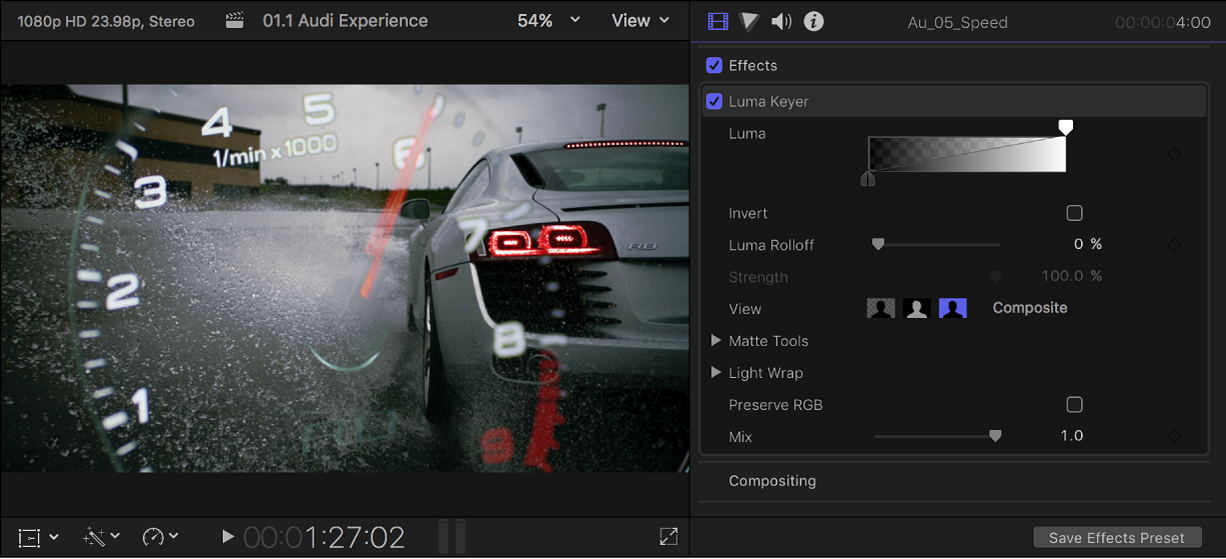
To reverse the key and remove white instead of black areas of the foreground clip, select Invert.
To adjust the white and black clip values, drag the handles at either end of the gradient thumbnail image.
By default, these handles are set to provide a key where the luma level linearly controls the transparency of the foreground—100% white is fully opaque, 0% black is completely transparent, and 25% gray retains 25% of the foreground image. Dragging the white and black controls changes the values that result in fully opaque or fully transparent foreground video.
To adjust the softness of the edges, adjust the Luma Rolloff control.
Higher values make the edges harder, removing any partial transparency; lower values take advantage of any anti-aliasing or softness the edges might have.
To help fine-tune the key, use the View options:
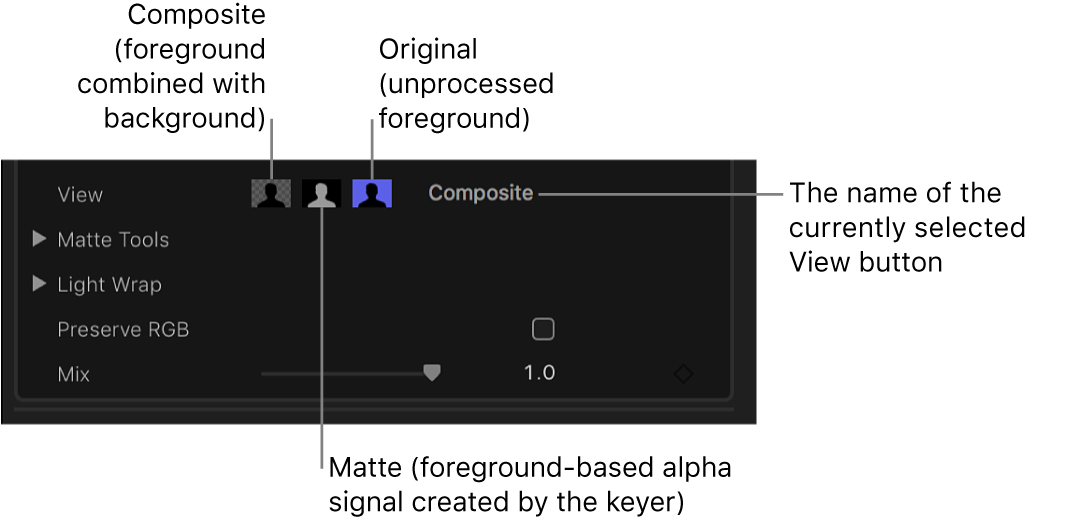
Composite: Shows the final composited image, with the keyed foreground subject over the background clip. This is the default view.
Matte: Shows the grayscale matte, or alpha channel, that’s being generated by the keying operation. White areas are solid, black areas are transparent, and shades of gray indicate varying levels of transparency. Viewing the alpha channel makes it easier to spot unwanted holes in the key or areas that aren’t transparent enough.
Original: Shows the original, unkeyed image.
To leave smoothly aliased text or graphics in the image visually intact, which can improve the edges, select Preserve RGB.
To mix the keyed effect with the unkeyed effect, adjust the Mix control.
If you’re still having trouble getting a clean luma key, see the following instructions.
Make advanced Luma Keyer adjustments
The following controls are available for use in difficult keying situations or for fine-tuning specific problems:
Matte Tools: These controls refine the transparency matte generated by the previous sets of parameters. These parameters don’t alter the range of values sampled to create the keyed matte. Instead, they alter the matte generated by the Keyer effect’s basic and advanced controls, letting you shrink, expand, soften, or invert the matte to achieve a better composite.
Light Wrap: These controls blend color and lightness values from the background layer of your composite with the keyed foreground layer. Using these controls, you can simulate the interaction of environmental lighting with the keyed subject, making it appear as if background light wraps around the edges of a subject.
In the Final Cut Pro timeline, select the clip with the Luma Keyer effect.
Open the Video inspector.
The Effects section of the Video inspector shows the parameters available for adjusting the Luma Keyer effect.

Click Matte Tools to reveal the following controls:
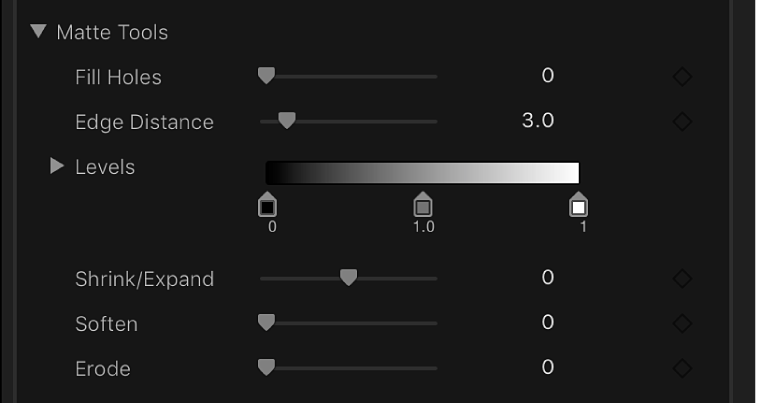
Fill Holes: Increasing this parameter value adds solidity to regions of marginal transparency within a key. This control is useful when you’re satisfied with the edges of your key, but you have unwanted holes in the interior that you can’t eliminate using the Luma Rolloff parameter without ruining your edges.
Edge Distance: Lets you adjust how close to the edge of your keyed subject the effect of the Fill Holes parameter gets. Reducing this parameter value brings the filled area of the matte closer to the edge of the subject, sacrificing translucency at the edges. Raising this parameter value pushes the filled area of the matte farther from the edge, potentially introducing regions of unwanted translucency within parts of the subject that should be solid.
Levels: Use this grayscale gradient to alter the contrast of the keyed matte, by dragging three handles that set the black point, white point, and bias (distribution of gray values between the black point and white point). Adjusting the contrast of a matte can be useful for manipulating translucent areas of the key to make them more solid (by lowering the white point) or more translucent (by raising the black point). Dragging the Bias handle right erodes translucent regions of the key, and dragging the Bias handle left makes translucent regions of the key more solid.
Black, White, Bias: Click the Levels disclosure triangle to reveal sliders for the Black, White, and Bias parameters. These sliders, which mirror the settings of the Levels handles described above, allow you to keyframe the three Levels parameters (using the Add Keyframe button to the right of each slider). Keyframing the Black, White, and Bias parameters may yield a better key, one that adapts to changing blue-screen or green-screen conditions.
Shrink/Expand: Use this slider to manipulate the contrast of the matte to affect matte translucence and matte size simultaneously. Drag the slider left to make translucent regions more translucent while simultaneously shrinking the matte. Drag the slider right to make translucent regions more solid while simultaneously expanding the matte.
Soften: Use this slider to blur the keyed matte, feathering the edges by a uniform amount.
Erode: Drag this slider right to gradually increase transparency from the edge of the solid portion of the key inward.
Click Light Wrap to reveal the following controls:
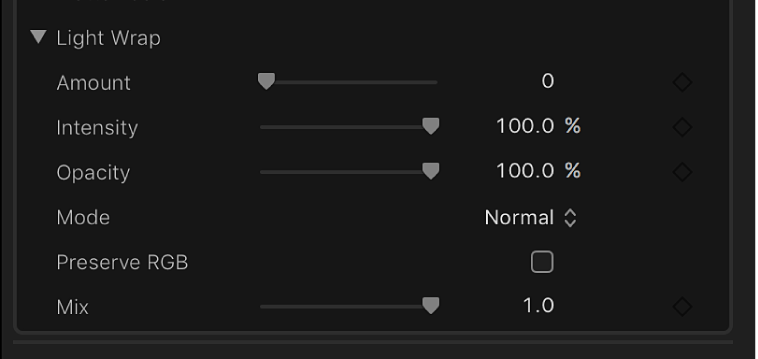
Amount: Use this slider to control the overall light wrap effect, setting how far into the foreground the light wrap extends.
Intensity: Use this slider to adjust gamma levels to lighten or darken the interaction of wrapped edge values with the keyed foreground subject.
Opacity: Use this slider to fade the light wrap effect up or down.
Mode: Use this pop-up menu to choose the compositing method that blends the sampled background values with the edges of the keyed subject. There are five modes:
Normal: Evenly blends light and dark values from the background layer with the edges of the keyed foreground layer.
Lighten: Compares overlapping pixels from the foreground and background layers, and then preserves the lighter of the two. This method is good for creating a selective light wrap effect.
Screen: Superimposes lighter portions of the background layer over wrapped areas of the keyed foreground layer. This method is good for creating an aggressive light wrap effect.
Overlay: Combines the background layer with the wrapped areas of the keyed foreground layer so that overlapping dark portions become darker, light portions become lighter, and colors become intensified.
Hard Light: Similar to the Overlay composite mode, except that colors become muted.
Download this guide: PDF