Import spanned clips into Final Cut Pro
Some file-based camcorders or devices that have more than one memory card slot can record one shot over multiple memory cards. The resulting shot is called a spanned clip.
A good way to import a spanned clip is to connect your camera or card reader to your Mac and create a camera archive for each memory card. You can store the camera archives on your Mac or on an external storage device until you’re ready to import the spanned clip. (Even if you’re importing the spanned clip immediately, it’s useful to make a camera archive so that you have a backup of the spanned clip’s footage.) When you’re ready to import, you can mount all of the camera archives and import the spanned clip.
Create a camera archive for each memory card
Connect your camcorder or camera to your Mac and turn on the device, or connect your card reader and memory card to your Mac. If you’ll be saving the camera archives to an external storage device, connect that as well.
Note: Some cameras require that you download and install an additional software plug-in. See the documentation that came with your camera.
In Final Cut Pro, do one of the following:
Choose File > Import > Media (or press Command-I).
Click the Import Media button on the left side of the toolbar.

In the Media Import window, select a memory card to archive from the list of cameras on the left.
Click the Create Archive button at the bottom-left corner of the window.
In the “Create Camera Archive as” field, type a name for the archive.
Click the Destination pop-up menu, choose a location to save the archive, then click OK.
Note: To protect your media, it’s recommended that you save your archive to a storage device or partition different from the one where you store the media files used with Final Cut Pro.
To create camera archives for each of the memory cards that contain a portion of the spanned clip, repeat steps 3 through 6.
Import a spanned clip
If the media you want to import is on an external storage device or a memory card, connect the device to your Mac and turn on the device.
In Final Cut Pro, do one of the following:
Choose File > Import > Media (or press Command-I).
Click the Import Media button on the left side of the toolbar.

In the Devices section on the left side of the Media Import window, select the storage device (internal or external) or memory card that contains the spanned clip camera archives.
Use list view at the bottom of the window to navigate to and open the camera archives.
Important: If the camera archives that make up the spanned clip are not all available, you can import each camera archive separately. Each portion of the spanned clip is imported as a separate clip.
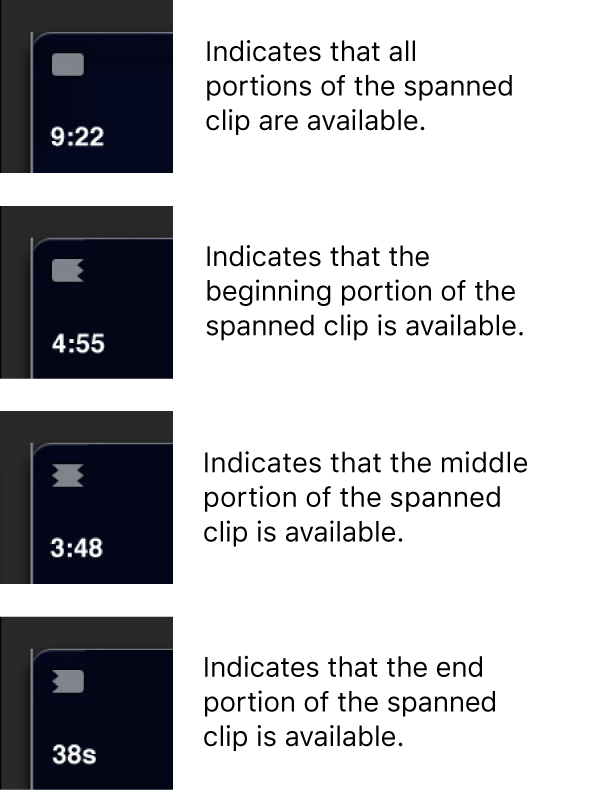
If all portions of the spanned clip are available, all the mounted camera archives show a clip with the same duration. An icon indicating that the spanned clip is complete appears on the spanned clip.
If one or more camera archives are missing, an icon appears on the spanned clip to indicate which part of the spanned clip is available—the beginning, middle, or end. You can select each camera archive to see the different icons.

Use the settings on the right side of the Media Import window to choose how you want to organize the imported media in your library:
Add the imported media to an existing event: Select “Add to existing event,” then choose the event from the pop-up menu.
Create a new event: Select “Create new event in,” use the pop-up menu to choose the library in which you want to create the event, then type a name (for example, “Chris and Kim Wedding”) in the text field.
To learn more about events, see Intro to libraries in Final Cut Pro. If you want to import media int o a new library, you must create the new library before importing your media.
Note: You can set storage locations for each of your libraries. See Set storage locations in Final Cut Pro.
If you want to override automatic role assignment, create optimized or proxy media, analyze the video, or analyze the audio, select the relevant settings in the Audio Roles, Transcoding, and Analyze sections.
If you don’t set Final Cut Pro to analyze your media during the import process, you can analyze it later in the browser.
Note: Some import options are available only when you import files from a storage device. See Organize files during import into Final Cut Pro and Import into Final Cut Pro from your Mac or storage device.
To import the spanned clip, click Import All.
By default, the Media Import window closes when you click Import. You can begin working with your clips in the browser. The media is imported in the background.
If you selected any options in the previous step, the files are transcoded and optimized after the import is complete. You can view the progress of the import and other background tasks in the Background Tasks window.