Logic Pro User Guide for iPad
- What’s new in Logic Pro 1.1
-
- What is Logic Pro?
- Working areas
- Work with function buttons
- Work with numeric values
-
- Intro to tracks
- Create tracks
- Create tracks using drag and drop
- Choose the default region type for a software instrument track
- Select tracks
- Duplicate tracks
- Reorder tracks
- Rename tracks
- Change track icons
- Change track colors
- Use the tuner on an audio track
- Show the output track in the Tracks area
- Delete tracks
- Edit track parameters
- Start a Logic Pro subscription
- How to get help
-
- Intro to recording
-
- Before recording software instruments
- Record software instruments
- Record additional software instrument takes
- Record to multiple software instrument tracks
- Record multiple MIDI devices to multiple tracks
- Record software instruments and audio simultaneously
- Merge software instrument recordings
- Spot erase software instrument recordings
- Replace software instrument recordings
- Capture your most recent MIDI performance
- Use the metronome
- Use the count-in
-
- Intro to arranging
-
- Intro to regions
- Select regions
- Cut, copy, and paste regions
- Move regions
- Remove gaps between regions
- Delay region playback
- Trim regions
- Loop regions
- Repeat regions
- Mute regions
- Split and join regions
- Stretch regions
- Separate a MIDI region by note pitch
- Bounce regions in place
- Change the gain of audio regions
- Create regions in the Tracks area
- Convert a MIDI region to a Drummer region or a pattern region
- Rename regions
- Change the color of regions
- Delete regions
- Create fades on audio regions
- Access mixing functions using the Fader
-
- Intro to Step Sequencer
- Use Step Sequencer with Drum Machine Designer
- Record Step Sequencer patterns live
- Step record Step Sequencer patterns
- Load and save patterns
- Modify pattern playback
- Edit steps
- Edit rows
- Edit Step Sequencer pattern, row, and step settings in the inspector
- Customize Step Sequencer
-
- Effect plug-ins overview
-
- Instrument plug-ins overview
-
- ES2 overview
- Interface overview
-
- Modulation overview
-
- Vector Envelope overview
- Use Vector Envelope points
- Use Vector Envelope solo and sustain points
- Set Vector Envelope segment times
- Vector Envelope XY pad controls
- Vector Envelope Actions menu
- Vector Envelope loop controls
- Vector Envelope release phase behavior
- Vector Envelope point transition shapes
- Use Vector Envelope time scaling
- Use the Mod Pad
- Modulation source reference
- Via modulation source reference
-
- Sample Alchemy overview
- Interface overview
- Add source material
- Save a preset
- Edit mode
- Play modes
- Source overview
- Synthesis modes
- Granular controls
- Additive effects
- Additive effect controls
- Spectral effect
- Spectral effect controls
- Filter module
- Low and highpass filter
- Comb PM filter
- Downsampler filter
- FM filter
- Envelope generators
- Mod Matrix
- Modulation routing
- Motion mode
- Trim mode
- More menu
- Sampler
- Copyright
Show automation in Logic Pro for iPad
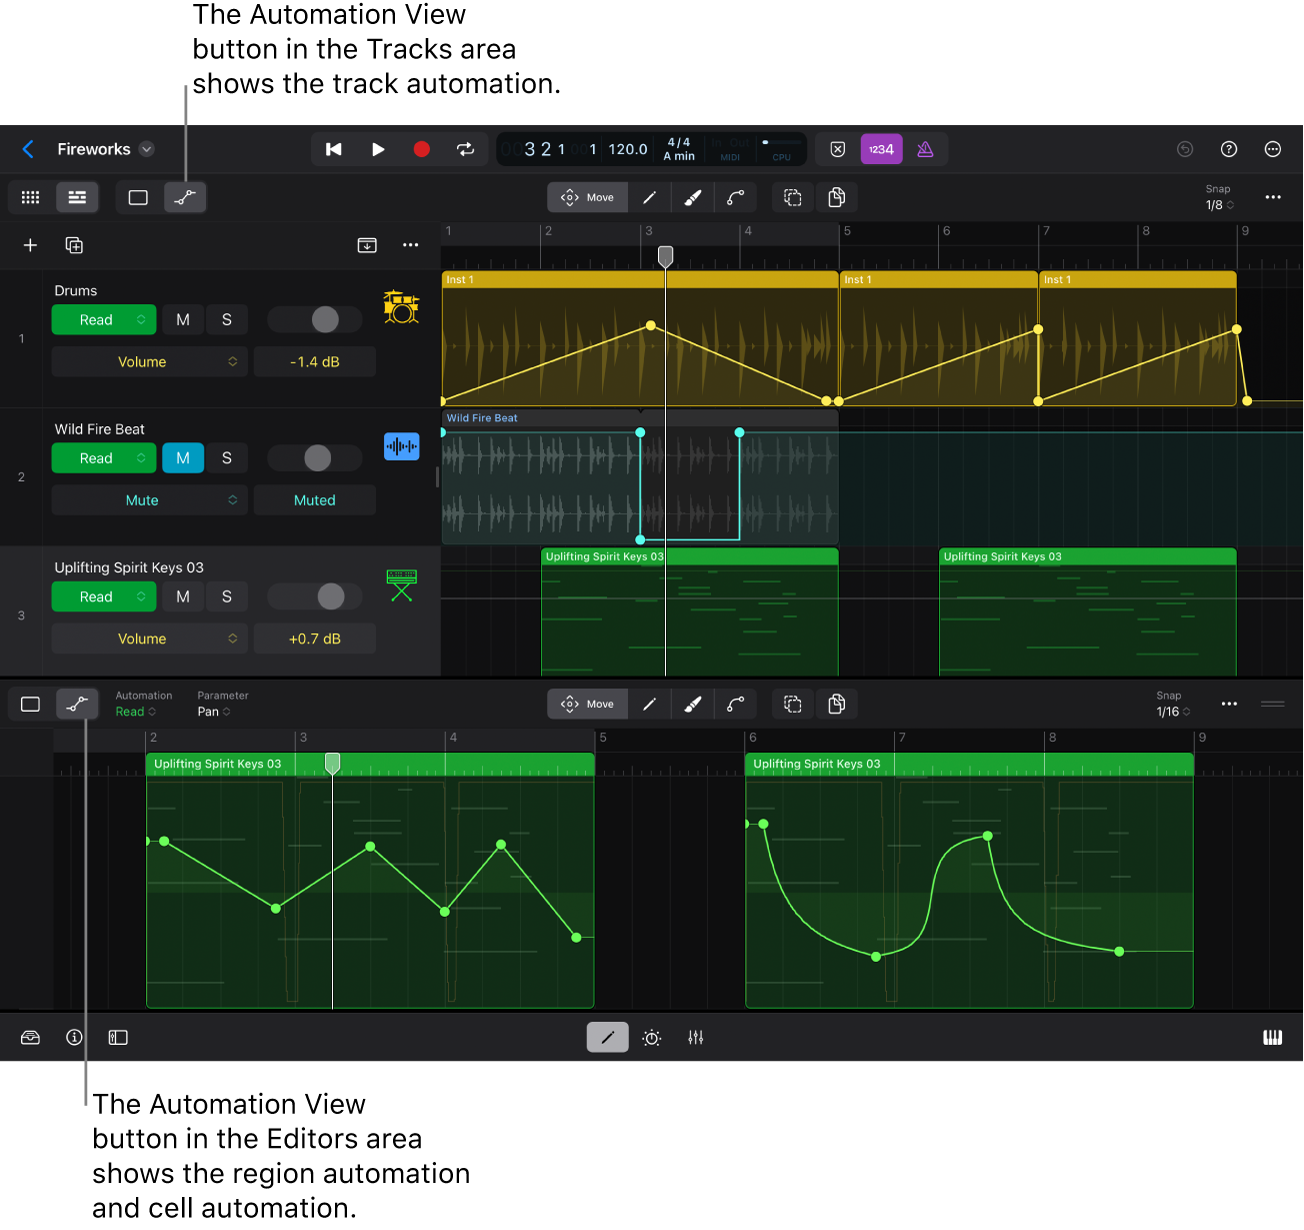
Automation curves are not displayed by default. You have to turn on Automation view to make them visible so you can view and edit them. There are two independent Automation View buttons ![]() , one in the Tracks area that shows the track automation and one in the Editors area (for the Audio Editor, Piano Roll Editor, and Drummer Editor) that shows the region automation or cell automation.
, one in the Tracks area that shows the track automation and one in the Editors area (for the Audio Editor, Piano Roll Editor, and Drummer Editor) that shows the region automation or cell automation.

Show track automation
In the Tracks area menu bar, tap the Tracks View button
 .
.Track automation can’t be displayed in Grid view.
Tap the Automation View button
 .
.
The following changes occur:
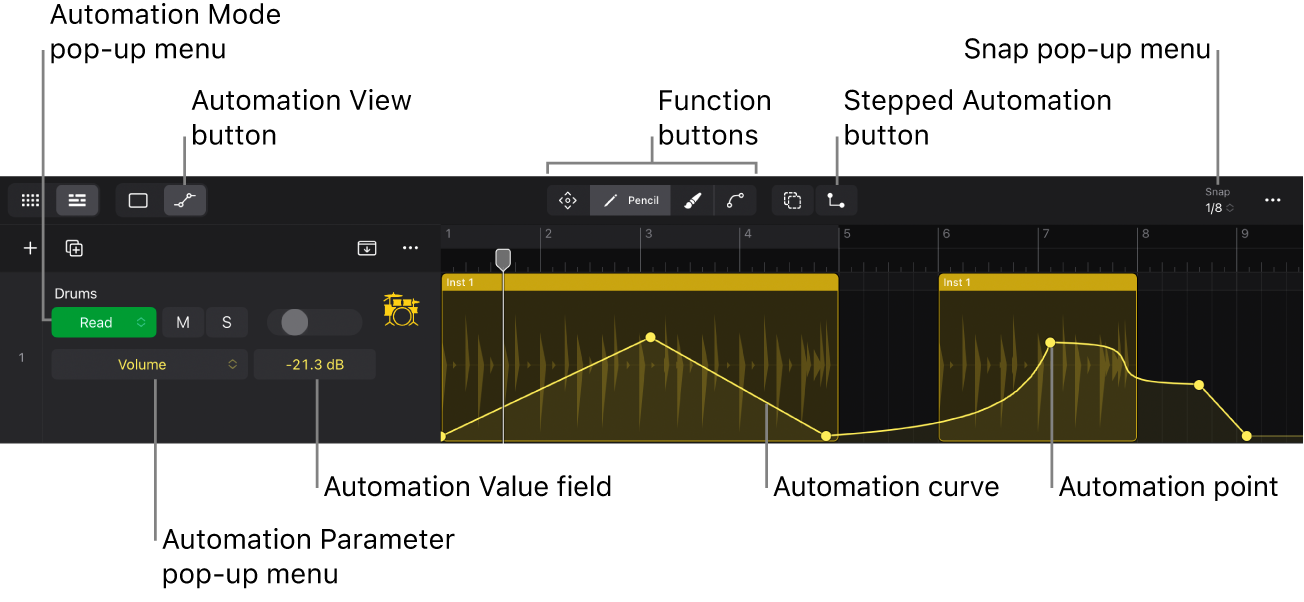
The track lanes show the automation curves.
Any regions on the track lane are still visible but cannot be edited.
The track headers show three new components: the Automation Mode pop-up menu, the Automation Parameter pop-up menu, and the Automation Value field.
The function buttons in the Tracks area menu bar change to a set of four automation-related buttons: Move
 , Pencil
  , Brush
  , and Curve
  .
.The Multiple Select button
 , when activated, temporarily turns off the currently active function button so that you can select multiple automation points.
The Stepped Automation button
 is displayed instead of the Copy Mode button
  when any function button besides the Move button is selected.
The Snap pop-up menu in the menu bar now determines the Snap value when you move or draw automation points. This value is independent of the Snap value set in the Tracks area.

Show region automation
In the Tracks area menu bar, do one of the following:
To view a region’s automation, tap the Tracks View button
 , tap the Default View button
  , then tap the Trim button
  .
.To view the region automation for a cell, tap the Grid View button
 , then tap the Edit button
  .
.
Tap the region for which you want to show region automation.
Tap the Editors button
 in the middle of the view control bar (or press E on your external keyboard), then tap the Automation View button
  in the Editors area menu bar.
The following changes occur in the Editors area when Automation view is selected:
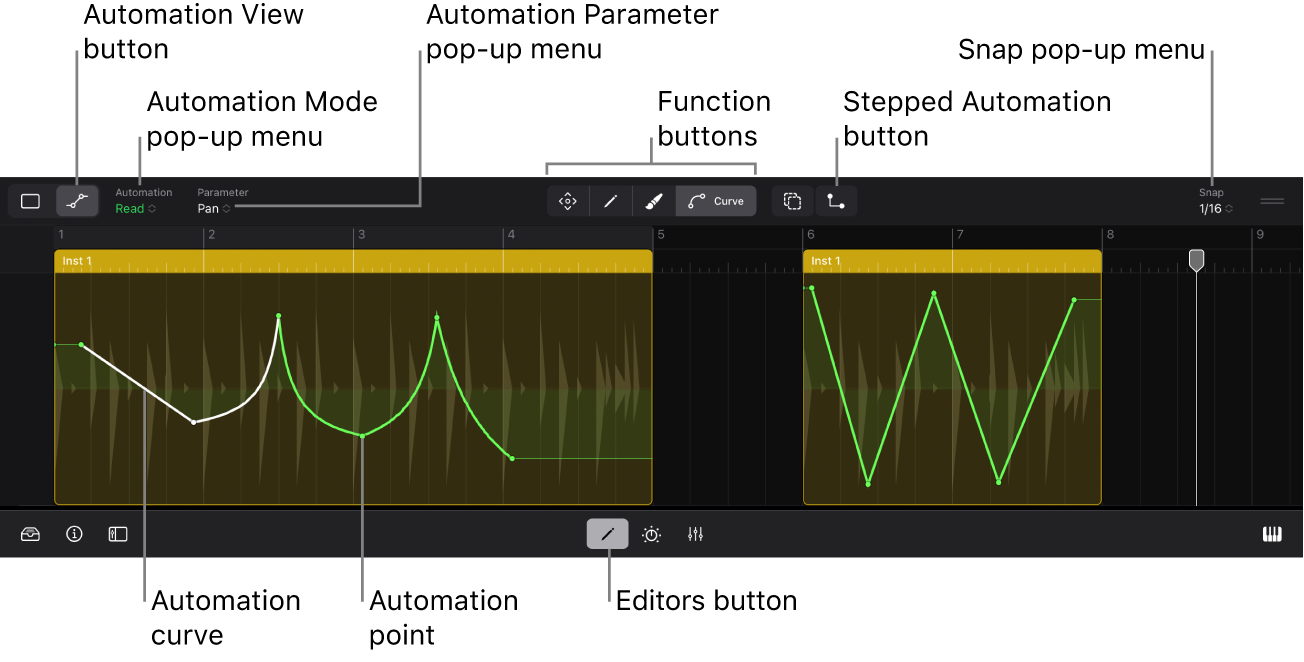
The Automation Parameter pop-up menu and Automation Mode pop-up menu are displayed next to the Automation View button
 .
.Any regions for that track are still displayed in the Editors area, but they cannot be edited.
All regions display their automation curves. Any MIDI events or waveforms are dimmed.
The function buttons change to a set of four automation-related buttons: Move
 , Pencil
  , Brush
  , and Curve
  .
.The Multiple Select button
 , when activated, temporarily turns off the currently active function button so that you can select multiple automation points.
The Stepped Automation button
 is displayed instead of the Copy Mode button
  when any function button besides the Move button is selected.
The Snap pop-up menu in the Editors area menu bar now determines the Snap value when you move or draw automation points. This value is independent of the Snap value selected in Default view.

Download this guide: PDF