Arrange video clips and photos in iMovie on iPad
You can move, trim, duplicate or rotate video clips in movie projects by using simple gestures. Tap a clip to reveal additional controls to duplicate, split or delete it.
Move video clips or photos
In the iMovie app
 on your iPad, open a movie project.
Touch and hold a video clip or photo in the timeline until it pops off the timeline.

Drag the video clip or photo to a new location in the timeline, and release.
Trim a video clip or photo
You can trim a video clip or photo in the timeline to shorten or lengthen it.
Note: By default, a photo appears in the timeline as a clip that remains onscreen for 6 to 12 seconds. When you trim a photo, you change its duration.
To learn more ways to adjust video clips and photos in your movie, see Adjust zoom effects in iMovie on iPad.
In the iMovie app
 on your iPad, open a movie project.
In the timeline, tap the video clip or photo you want to trim.
Drag either yellow trim handle to shorten or lengthen the clip or photo.
If you try to increase the clip’s length but the trim handle won’t move, it means there are no additional frames of video on that end of the clip.

Rotate a clip
You can rotate a video clip in 90-degree increments, clockwise or anticlockwise.
In the iMovie app
 on your iPad, open a movie project.
Scroll the timeline until the clip you want to rotate appears in the viewer.
In the viewer, move your finger and thumb in a clockwise or anticlockwise twisting motion over the video image.
When the white arrow appears, the video clip has been rotated 90 degrees. It may take a moment for the clip to appear rotated in the viewer.
Repeat this gesture as many times as necessary to achieve the orientation you want.

Duplicate a clip
You can duplicate any video clip in the timeline for use in another place in your movie project.
Duplicating a clip doesn’t create another copy of it in the media browser, or in your photo library, nor does it take up additional storage space on your device.
In the iMovie app
 on your iPad, open a movie project.
Tap a video clip in the timeline to reveal the inspector at the bottom of the screen.
Tap the Actions button
 .
.Tap Duplicate.
A duplicate clip is added to the timeline after the original clip. You can then move or edit the duplicate clip separately from the original.
Split a clip
You can split a video clip to adjust the duration of each section, remove unwanted sections or add different titles to each section. Only video clips can be split. To split a photo, make a copy of it.
In the iMovie app
 on your iPad, open a movie project.
Scroll the timeline to position the playhead where you want to split a video clip.
Tip: Make sure the playhead isn’t positioned at the very beginning of the clip.
Do one of the following:
Tap a clip in the timeline to reveal the inspector at the bottom of the screen, tap the Actions button
 , then tap Split.
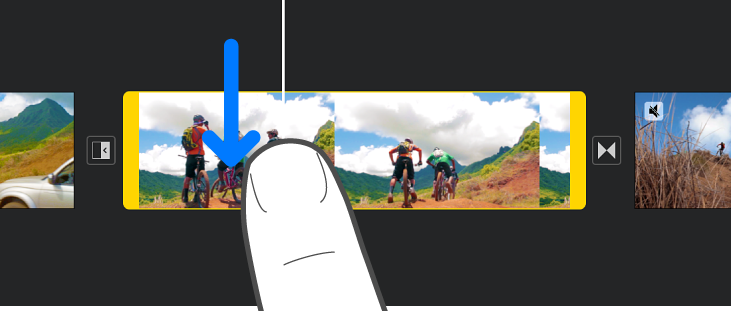
Tap the clip (it becomes outlined in yellow), then swipe down over the playhead to split the clip, as if you were using your finger to slice through it.

iMovie inserts a None transition (also known as a cut and shown by this icon ![]() ) between the two newly created clips. You can change this transition to a cross-dissolve or other transition. To learn how, see Adjust transitions in iMovie on iPad.
) between the two newly created clips. You can change this transition to a cross-dissolve or other transition. To learn how, see Adjust transitions in iMovie on iPad.
Remove a video clip or photo from a project
When you remove a video clip or photo that you added from the media browser, it’s removed from the project but is still available if you want to use it again.
Media embedded as part of an imported project or using AirDrop remains in your media browser (in Videos > iMovie Media) unless you save it to iCloud Drive. Photos added to a project can’t be moved to the photo library.
In the iMovie app
 on your iPad, open a movie project.
Do one of the following:
Touch and hold the video clip or photo in the timeline until it pops off the timeline, then drag it out of the timeline; when you see the puff of smoke in the corner of the clip, release it.

Tap the video clip or photo in the timeline, then tap Delete.