Logic Pro User Guide for iPad
-
- What is Logic Pro?
- Working areas
- Work with function buttons
- Work with numeric values
- Undo and redo edits in Logic Pro for iPad
-
- Intro to tracks
- Create tracks
- Create tracks using drag and drop
- Choose the default region type for a software instrument track
- Select tracks
- Duplicate tracks
- Reorder tracks
- Rename tracks
- Change track icons
- Change track colors
- Use the tuner on an audio track
- Show the output track in the Tracks area
- Delete tracks
- Edit track parameters
- Start a Logic Pro subscription
- How to get help
-
- Intro to recording
-
- Before recording software instruments
- Record software instruments
- Record additional software instrument takes
- Record to multiple software instrument tracks
- Record multiple MIDI devices to multiple tracks
- Record software instruments and audio simultaneously
- Merge software instrument recordings
- Spot erase software instrument recordings
- Replace software instrument recordings
- Capture your most recent MIDI performance
- Route MIDI internally to software instrument tracks
- Record with Low Latency Monitoring mode
- Use the metronome
- Use the count-in
-
- Intro to arranging
-
- Intro to regions
- Select regions
- Cut, copy, and paste regions
- Move regions
- Remove gaps between regions
- Delay region playback
- Trim regions
- Loop regions
- Repeat regions
- Mute regions
- Split and join regions
- Stretch regions
- Separate a MIDI region by note pitch
- Bounce regions in place
- Change the gain of audio regions
- Create regions in the Tracks area
- Convert a MIDI region to a Session Player region or a pattern region
- Replace a MIDI region with a Session Player region in Logic Pro for iPad
- Rename regions
- Change the color of regions
- Delete regions
-
- Intro to chords
- Add and delete chords
- Select chords
- Cut, copy, and paste chords
- Move and resize chords
- Loop chords on the Chord track
- Color chords on the Chord track
- Edit chords
- Work with chord groups
- Use chord progressions
- Change the chord rhythm
- Choose which chords a Session Player region follows
- Analyze the key signature of a range of chords
- Create fades on audio regions
- Extract vocal and instrumental stems with Stem Splitter
- Access mixing functions using the Fader
-
- Intro to Step Sequencer
- Use Step Sequencer with Drum Machine Designer
- Record Step Sequencer patterns live
- Step record Step Sequencer patterns
- Load and save patterns
- Modify pattern playback
- Edit steps
- Edit rows
- Edit Step Sequencer pattern, row, and step settings in the inspector
- Customize Step Sequencer
-
- Intro to mixing
-
- Channel strip types
- Channel strip controls
- Peak level display and clipping
- Set channel strip volume
- Set channel strip input format
- Set the output for a channel strip
- Set channel strip pan position
- Mute and solo channel strips
- Reorder channel strips in the Mixer in Logic Pro for iPad
- Replace a patch on a channel strip using drag and drop
- Work with plug-ins in the Mixer
- Search for plug-ins in the Mixer in Logic Pro for iPad
-
- Effect plug-ins overview
-
- Instrument plug-ins overview
-
- ES2 overview
- Interface overview
-
- Modulation overview
- Use the Mod Pad
-
- Vector Envelope overview
- Use Vector Envelope points
- Use Vector Envelope solo and sustain points
- Set Vector Envelope segment times
- Vector Envelope XY pad controls
- Vector Envelope Actions menu
- Vector Envelope loop controls
- Vector Envelope point transition shapes
- Vector Envelope release phase behavior
- Use Vector Envelope time scaling
- Modulation source reference
- Via modulation source reference
-
- Sample Alchemy overview
- Interface overview
- Add source material
- Save a preset
- Edit mode
- Play modes
- Source overview
- Synthesis modes
- Granular controls
- Additive effects
- Additive effect controls
- Spectral effect
- Spectral effect controls
- Filter module
- Low, bandpass, and highpass filters
- Comb PM filter
- Downsampler filter
- FM filter
- Envelope generators
- Mod Matrix
- Modulation routing
- Motion mode
- Trim mode
- More menu
- Sampler
- Studio Piano
- Copyright
Intro to Step Sequencer in Logic Pro for iPad
Step Sequencer in Logic Pro for iPad is inspired by classic hardware step sequencers with rows of configurable switches or knobs used to generate repeating musical patterns. In Step Sequencer, you create patterns by editing multifunctional steps in the step grid. Each row controls either a sound (which can be a drum kit piece, your own sample, a note on an instrument, or a range of notes) or an automation parameter (letting you create automation changes over time in the pattern). Each step represents a definable length of musical time–by default, steps are of equal length, but you can change the length for individual rows or steps. You can adjust a wide range of parameters for individual steps, including velocity, pitch, gate time, and more; and edit pattern and row settings, including pattern length, row loop start and end points, playback position, and rotation.
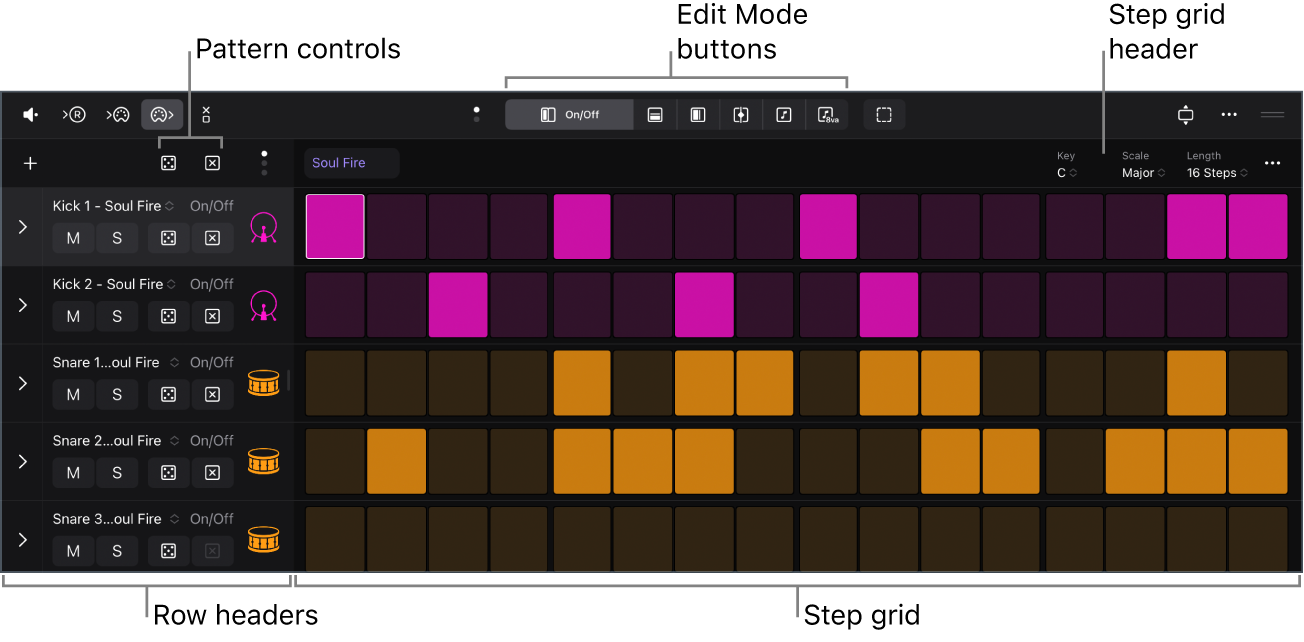
Step Sequencer appears in the Editors working area of Logic Pro. The Step Sequencer interface includes the following:

Step Sequencer menu bar: Contains a Preview button, a Live Record button, MIDI In and MIDI Out buttons, a Mono Mode button, the Edit Mode buttons, a Step Select button, a Vertical Auto Zoom button, and a More button.
Step grid header: Contains a Pattern Key pop-up menu, a Pattern Scale pop-up menu, a Pattern Length pop-up menu, and a More button for changing the pattern in the step grid.
Step grid: The main working area, where you turn steps on and off and graphically edit step settings using edit modes. See Edit Step Sequencer steps.
Pattern controls: Located in the area above the first row header, these consist of a set of controls for the pattern and a Page Switch button that you use to cycle through the sets of controls in the pattern controls, row headers, and subrow headers.
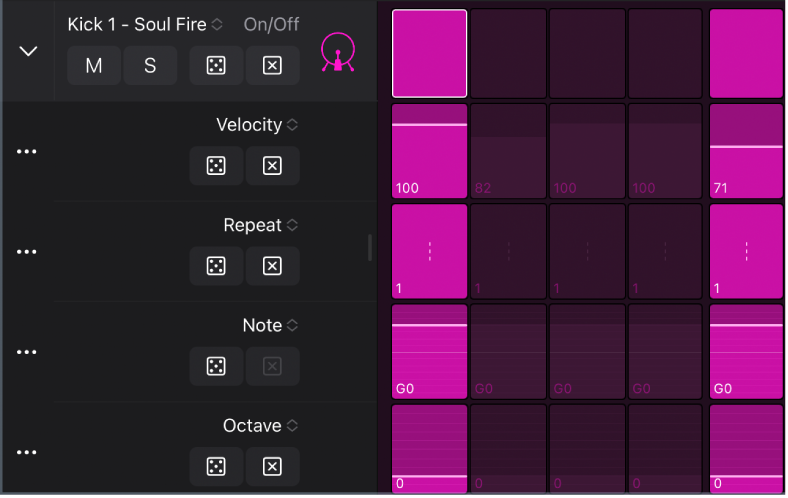
Row headers: Each header contains a subrow disclosure arrow to show subrows and a set of controls for the row that you can cycle through using the Page Switch button in the pattern controls. See Modify Step Sequencer pattern playback and Edit Step Sequencer rows.
Pattern regions and pattern cells
Step Sequencer patterns are contained in pattern regions (in the Tracks area) and pattern cells (in the Live Loops grid). Pattern regions and cells are used primarily in MIDI-based (software instrument and external instrument) tracks. Pattern regions (but not pattern cells) can also be used on audio tracks to automate effect and channel strip parameters. A project can contain any number of pattern regions or cells.
Each pattern region or cell functions as an independent step sequencer, with its own pattern, configuration, and settings. You can copy and move pattern regions like other regions in the Tracks area. Pattern cells can be copied, moved, triggered, and queued like other Live Loops cells. You can modify pattern region and cell parameters in the inspector.
All pattern, row, and step settings, as well as Step Sequencer view settings, are stored with the pattern. You can also save a pattern as a template, which contains all the current settings except for the step values, so you can use it as a starting point for creating new patterns.
Patterns can include two types of rows:
Note rows: Generate MIDI note events (for each active step). By default, all notes in a note row have the same pitch, but you can change the pitch for individual steps using the Note and Octave edit modes.
Automation rows: Generate stepped automation events for an automatable parameter. You can assign an automation row to any automatable parameter, including MIDI continuous controller (CC) parameters, channel strip controls, and plug-in parameters.
Each row can have its own length, step rate, playback mode, start offset, and other settings. Patterns can be from 12 to 64 steps in length, allowing for different time signatures and multiple bar patterns.
You can add rows to a pattern manually or using Learn mode. When Learn mode is active, rows are added when you play notes for which no row exists, or when you manipulate an automation parameter for which no row exists. Using Learn (Assign) mode, you can reassign existing note rows to match incoming note events, or reassign automation rows to match automation parameters. You can also add your own samples or audio files.
See Pattern creation basics and Change the musical length of a pattern.
Edit modes
Using edit modes, you can control different attributes of the note or event triggered by a step. Some edit modes apply to only one row type, while others are common to both types. For note rows, you can change the velocity, pitch, gate time, number of note repetitions in a step, and other attributes. For automation rows, you can change the value of the automated parameter. Edit modes common to both row types include skipping and tying steps, changing the loop start and end point, and changing the step rate.

You select the edit mode for all rows in the pattern using the Edit Mode buttons in the Step Sequencer menu bar. You can also view and edit multiple edit modes per row using subrows. Rows always match the edit mode selected, while you can choose any unused edit mode for a subrow. You can add and delete subrows as needed.

Download this guide: PDF