Final Cut Pro User Guide for Mac
- Welcome
- What’s new
-
- Intro to importing media
- If it’s your first import
- Organize files during import
-
- Import from Image Playground
- Import from iMovie for macOS
- Import from iMovie for iOS or iPadOS
- Import from Final Cut Pro for iPad
- Import from Final Cut Camera
- Import from Photos
- Import from Music
- Import from Apple TV
- Import from Motion
- Import from GarageBand and Logic Pro
- Import using workflow extensions
- Record into Final Cut Pro
- Memory cards and cables
- Supported media formats
-
- Intro to effects
-
- Intro to transitions
- How transitions are created
- Add transitions and fades
- Quickly add a transition with a keyboard shortcut
- Set the default duration for transitions
- Delete transitions
- Adjust transitions in the timeline
- Adjust transitions in the inspector and viewer
- Merge jump cuts with the Flow transition
- Adjust transitions with multiple images
- Modify transitions in Motion
- Add adjustment clips
-
- Add storylines
- Use the precision editor
- Conform frame sizes and rates
- Use XML to transfer projects
- Glossary
- Copyright and trademarks
Edit Magnetic Masks in Final Cut Pro for Mac
In Final Cut Pro, you can make detailed adjustments to the area of a Magnetic Mask using tools in the viewer. You can also use the Magnetic Mask editor in the timeline to view, navigate, or delete reference frames indicating points in the clip where the mask was edited.
Edit a Magnetic Mask selection with control points or the brush tool
Add the clip you want to mask to the Final Cut Pro timeline.
Add the Magnetic Mask effect or add a Magnetic Mask to a video effect.
Position the playhead at a point within the clip that shows the area you want to mask.
To show the Magnetic Mask controls in the viewer, open the Video inspector, then click the mask’s name in the Magnetic Mask section.
To refine the mask area, do any of the following:
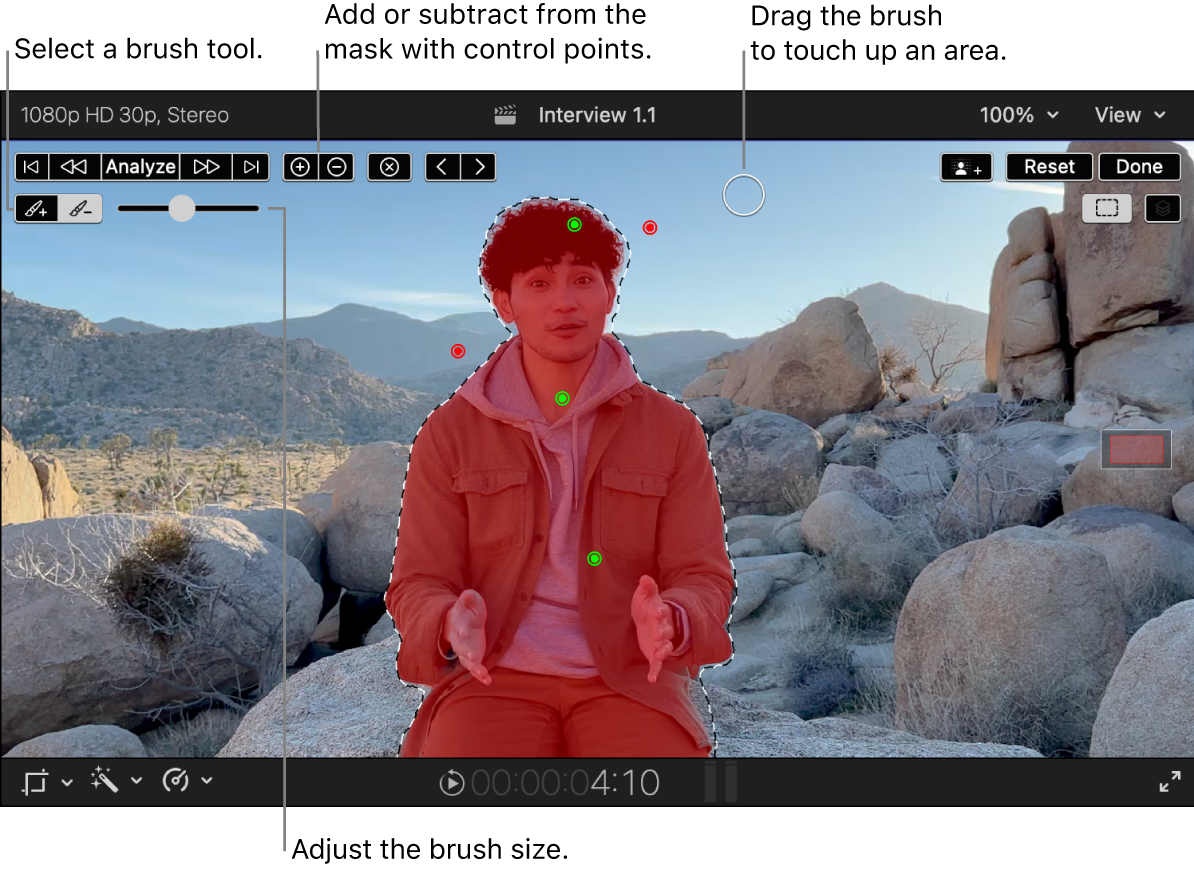
Add to the mask area with a control point: Click the Add button
 , then click an area in the viewer to add it to the mask.
Subtract from the mask area with a control point: Click the Remove button
 , then click an area in the viewer to remove it from the mask.
Tip: To switch between eyedroppers or brushes temporarily, press and hold the Option key. When you release the Option key, the tool reverts to the previously active eyedropper or brush.
Use the brush to add or remove mask areas: Click the Add brush
 or the Remove brush
  , then brush across an area to add or remove it. Drag the slider to adjust the brush size.
Tip: To see the size of the brush tool while you resize it, hold down the Shift key and drag in the viewer.
Show or hide the dashed outline around the mask selection: Click the Mask Contour button
 .
.Reset all control points and brushstrokes for the current frame: Click the Reset button
 .
.

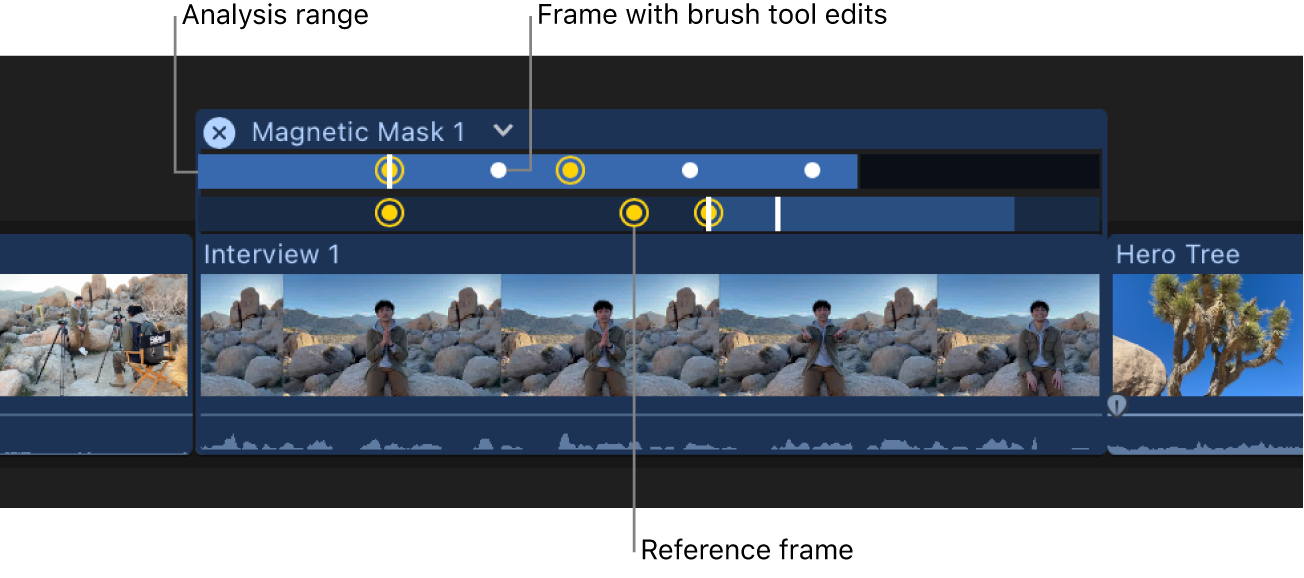
When you add control points or brushstrokes, reference frames are created. To navigate between reference frames, click ![]() or
or ![]() . To view reference frames in the timeline, see Edit Magnetic Masks in the timeline, below.
. To view reference frames in the timeline, see Edit Magnetic Masks in the timeline, below.
Edit Magnetic Masks in the timeline
When you add a Magnetic Mask to a clip, the Magnetic Mask editor appears above the clip in the timeline. The Magnetic Mask editor shows rendered analysis ranges and any reference frames containing control points and edits with the brush tool.

In Final Cut Pro, do any of the following:
Show or hide the Magnetic Mask editor: Select a clip in the timeline that has a Magnetic Mask applied, then choose Clip > Show Magnetic Mask Editor or choose Clip > Hide Magnetic Mask Editor (or press Control-Option-Command-M). You can also Control-click a timeline clip and choose Show Magnetic Mask Editor or Hide Magnetic Mask Editor.
Choose the mask to display in the Magnetic Mask editor: Select a timeline clip that has multiple Magnetic Masks, then click the down arrow to the right of the mask name and choose the mask to display. You can also select the mask in the Video inspector.
Delete reference frames and analysis ranges from the timeline: Drag to select a range in the Magnetic Mask editor, then click Delete.
Duplicate a Magnetic Mask: Select a timeline clip that has a Magnetic Mask applied, copy it, then paste the clip to another part of the timeline. You can also make a copy of the clip by cutting it in two. Any other method of copying removes the Magnetic Mask.
Delete unused Magnetic Mask files
If you’re doing extensive work with the Magnetic Mask on high-resolution media, the analysis files may use a significant amount of storage. You can remove unused Magnetic Mask files.
In the Libraries sidebar in Final Cut Pro, select a library containing projects with Magnetic Masks.
Choose File > Delete Generated Library Files.
In the window that appears, select Delete Unused Magnetic Mask Files, then click OK.
Do one of the following:
Quit and reopen Final Cut Pro.
Tips for refining your Magnetic Mask
In Final Cut Pro, do any of the following:
Use the Feather slider in the Video inspector to soften the edges of a Magnetic Mask. Positive feathering values soften the mask from its edge outward. Negative feathering values soften the mask from its edge inward. Feathering the edge of a mask can make the masked object blend better with the background.
To view the mask as a black-and-white alpha channel image, see View Magnetic Masks and Ways to view masks.
To learn about how masks can interact, see Combine multiple effect masks.
Download this guide: PDF