Logic Pro User Guide for Mac
- Welcome
-
- What’s new in Logic Pro for Mac 11.1
- What’s new in Logic Pro for Mac 11
- What’s new in Logic Pro for Mac 10.8
- What’s new in Logic Pro for Mac 10.7.8
- What’s new in Logic Pro for Mac 10.7.5
- What’s new in Logic Pro 10.7.3
- What’s new in Logic Pro 10.7
- What’s new in Logic Pro 10.6
- What’s new in Logic Pro 10.5
- What’s new in Logic Pro 10.4
- What’s new in Logic Pro 10.3
- What’s new in Logic Pro 10.2
- What’s new in Logic Pro 10.0
-
- What is Logic Pro for Mac?
- Logic Pro project basics
- Use menu commands and key commands
- Use the complete set of Logic Pro features
- Undo and redo edits
- Manage Logic Pro content
- How to get help
-
- Projects overview
- Create projects
- Open projects
- Save projects
- Delete projects
-
- Play a project
- Set the playhead position
- Control playback with the transport buttons
- Use transport shortcut menus
- Use transport key commands
- Customize the control bar
- Change the LCD display mode in Logic Pro for Mac
- Monitor and reset MIDI events
- Use the cycle area
- Use the Chase Events function
- Use Apple Remote to control Logic Pro
- Use Logic Remote to control Logic Pro projects
- Preview projects in the Finder
- Close projects
- View project information
-
- Tracks overview
-
- Create tracks
- Create tracks using drag and drop
- Create tracks using existing channel strips
- Assign tracks to different channel strips
- Choose the default region type for software instrument tracks
- Select tracks
- Duplicate tracks
- Rename tracks
- Change track icons
- Change track colors
- Reorder tracks
- Zoom tracks
- Replace or double drum sounds
- Control timing with the groove track
- Use selection-based processing
- Edit track parameters
-
- Overview
-
- Before recording software instruments
- Play software instruments
- Record software instruments
- Record additional software instrument takes
- Overdub software instrument recordings
- Spot erase software instrument recordings
- Use Note Repeat
- Replace software instrument recordings
- Record to multiple software instrument tracks
- Record multiple MIDI devices to multiple tracks
- Record software instruments and audio simultaneously
- Use step input recording techniques
- Record MIDI messages from another music app
- Route MIDI internally to software instrument tracks
- Use the metronome
-
- Arranging overview
-
- Regions overview
- Select regions
- Select parts of regions
- Cut, copy, and paste regions
- Move regions
- Add or remove gaps
- Delay region playback
- Loop regions
- Repeat regions
- Resize regions
- Mute and solo regions
- Time stretch regions
- Reverse audio regions
- Split regions
- Demix MIDI regions
- Join regions
- Create regions in the Tracks area
- Change the gain of audio regions in the Tracks area
- Normalize audio regions in the Tracks area
- Create aliases of MIDI regions
- Convert repeated MIDI regions to loops
- Change the color of regions
- Convert a MIDI region into a pattern region in Logic Pro for Mac
- Replace a MIDI region with a Session Player region in Logic Pro for Mac
- Convert audio regions to samples for a sampler instrument
- Rename regions
- Delete regions
-
- Chords overview
- Add and delete chords
- Select chords
- Cut, copy, and paste chords
- Move and resize chords
- Loop chords on the Chord track
- Transpose chords
- Edit chords
- Work with chord groups
- Use chord progressions
- Change the chord rhythm
- Choose which chords a Session Player region follows
- Analyze the key signature of a range of chords
- Extract vocal and instrumental stems with Stem Splitter
- Create groove templates
-
- Overview
-
- Add notes
- Select notes
- Snap items to the grid
- Move notes
- Copy notes
- Change the pitch of notes
- Resize notes
- Edit note velocity
- Quantize the timing of notes
- Quantize the pitch of notes
- Change note articulations
- Lock the position of events
- Mute notes
- Change note color
- View note labels
- Delete notes
- Time stretch notes
- View multiple MIDI regions
- Split chords
- Automation/MIDI area in the Piano Roll Editor
- Open other editors
-
- Session Players overview
- The Session Player Editor
- Choose a Session Player type and style
- Chords and Session Players
- Choose Session Player presets
- Regenerate a Session Player performance
- Follow rhythm of chords and other tracks
- Work with Drummer multi-channel kits
- Convert Session Player regions into MIDI or pattern regions
-
- Logic Pro for Mac advanced editors overview
-
- Audio File Editor overview
- Play audio files in the Audio File Editor
- Navigate audio files in the Audio File Editor
-
- Audio File Editor edit commands
- Edit audio files with transient markers
- Use the Audio File Editor Pencil tool
- Trim or silence audio files
- Remove DC offset
- Set audio file levels
- Normalize audio files
- Fade audio files
- Reverse audio and invert phase
- Audio File Editor Loop commands
- Undo Audio File Editor edits
- Backup audio files
- Use an external sample editor
-
- Mixing overview
- Set channel strip input format
- Set channel strip pan or balance positions
- Mute and solo channel strips
- Reorder channel strips in the Mixer
-
- Plug-ins overview
- Add, remove, move, and copy plug-ins
- Search for plug-ins in the Mixer
- Insert a plug-in on a track using drag and drop
- Activate plug-ins on inactive channel strips
- Use the Channel EQ
- Work in the plug-in window
- Work with plug-in settings
- Work with plug-in latencies
- Work with Audio Units in Logic Pro for Mac
- Support for ARA 2 compatible plug-ins
- Use MPE with software instruments
- Use the Plug-in Manager
- Work with channel strip settings
- Surround panning
- Use the I/O Labels window
- Undo and redo Mixer and plug-in adjustments
-
- Smart Controls overview
- Show Smart Controls for master effects
- Choose a Smart Control layout
- Automatic MIDI controller assignment
- Map screen controls automatically
- Map screen controls
- Edit mapping parameters
- Use parameter mapping graphs
- Open the plug-in window for a screen control
- Rename a screen control
- Use articulation IDs to change articulations
- Assign hardware controls to screen controls
- Compare Smart Control edits with saved settings
- Use the Arpeggiator
- Automate screen control movements
-
- Live Loops overview
- Start and stop cells
- Work with Live Loops cells
- Change loop settings for cells
- How the Live Loops grid and Tracks area interact
- Edit cells
- Edit scenes
- Work in the Cell Editor
- Bounce cells
- Record a Live Loops performance
- Change Live Loops grid settings
- Control Live Loops with other devices
-
- Global changes overview
- Control transposition with the Pitch Source parameter
-
- Tempo overview
-
- Smart Tempo overview
- Use free tempo recording
- Choose the Project Tempo mode
- Choose the Flex & Follow setting
- Use Smart Tempo with multitrack audio
- Work in the Smart Tempo Editor
- Improve the tempo analysis using hints
- Correct tempo analysis results using beat markers
- Protect Smart Tempo edits by locking a range
- Match audio recordings to the project tempo
- Match the tempo to an audio region
- Use audio file tempo information
- Record tempo changes
- Use the Tempo Interpreter
- Use the tempo fader
- Control project volume
-
- Overview
- Add notes
-
- Part box overview
- View score symbols
- Select score symbols
- Add notes and rests
- Add notes and symbols to multiple regions
- Add key and time signature changes
- Change the clef sign
- Add dynamic marks, slurs, and crescendi
- Change note heads
- Add symbols to notes
- Add trills, ornaments, and tremolo symbols
- Add sustain pedal markings
- Add chord symbols
- Add chord grids and tablature symbols
- Add bar lines, repeats, and coda signs
- Add page and line break symbols
-
- Select notes
- Move and copy notes
- Change note pitch, duration, and velocity
- Change note articulations
- Quantize the timing of notes
- Restrict note input to the current key
- Control how ties are displayed
- Add and edit tuplets
- Override display quantization using tuplets
- Add grace notes and independent notes
- Delete notes
- Use automation in the Score Editor
-
- Staff styles overview
- Assign staff styles to tracks
- Staff Style window
- Create and duplicate staff styles
- Edit staff styles
- Edit staff, voice, and assign parameters
- Add and delete staffs or voices in the Staff Style window in Logic Pro for Mac
- Copy staffs or voices in the Staff Style window in Logic Pro for Mac
- Copy staff styles between projects
- Delete staff styles
- Assign notes to voices and staffs
- Display polyphonic parts on separate staffs
- Change the staff assignment of score symbols
- Beam notes across staffs
- Use mapped staff styles for drum notation
- Predefined staff styles
- Share a score
-
-
- Key commands overview
- Browse, import, and save key commands
- Assign key commands
- Copy and print key commands
-
- Global Commands
- Global Control Surfaces Commands
- Various Windows
- Windows Showing Audio Files
- Main Window Tracks and Various Editors
- Various Editors
- Views Showing Time Ruler
- Views Showing Automation
- Main Window Tracks
- Live Loops Grid
- Mixer
- MIDI Environment
- Piano Roll
- Score Editor
- Event Editor
- Step Editor
- Step Sequencer
- Project Audio
- Audio File Editor
- Smart Tempo Editor
- Library
- Sampler
- Drum Machine Designer
- Step Input Keyboard
- Smart Controls
- Tool Menu
- Control Surface Install Window
-
- Logic Pro projects
- Various windows
- Controller Assignments window
- Control bar
- Tracks area
- Global tracks
- Automation
- Live Loops grid
- Mixer
- MIDI Environment
- Piano Roll Editor
- Score Editor
- Event List
- Step Editor
- Step Sequencer
- Flex Time
- Audio File Editor
- Smart Tempo Editor
- Surround Panner
- Channel EQ
- Space Designer
- Sampler
- Touch Bar shortcuts
-
-
- Working with your control surface
- Connect control surfaces
- Add a control surface to Logic Pro for Mac
- Automatic assignment for USB MIDI controllers
- Grouping control surfaces
- Control Surfaces settings overview
- Modal dialog display
- Tips for using your control surface
- Supported control surfaces
- Software and firmware for Logic Pro for Mac
-
-
- Environment overview
- Common object parameters
- Customize the Environment
-
-
- Fader objects overview
- Use fader objects
- Play back fader movements
- Work with object groups
- Fader styles
- Fader functions: MIDI events
- Fader functions: range, value as
- Fader functions: filter
- Vector fader
- Special faders overview
- Cable switchers
- Meta event faders
- SysEx faders
- Work with SysEx messages
- Special functions
- Ornament objects
- MMC record buttons
- Keyboard objects
- Monitor objects
- Channel splitter object
- Physical input objects
- Physical input objects
- MIDI click objects
-
-
- Use MIDI plug-ins
-
- Arpeggiator overview
- Arpeggiator control parameters
- Note order parameters overview
- Note order variations
- Note order inversions
- Arpeggiator pattern parameters overview
- Use Live mode
- Use Grid mode
- Arpeggiator options parameters
- Arpeggiator keyboard parameters
- Use keyboard parameters
- Assign controllers
- Modifier controls
- Note Repeater controls
- Randomizer controls
-
- Use Scripter
- Use the Script Editor
- Scripter API overview
- MIDI processing functions overview
- HandleMIDI function
- ProcessMIDI function
- GetParameter function
- SetParameter function
- ParameterChanged function
- Reset function
- JavaScript objects overview
- Use the JavaScript Event object
- Use the JavaScript TimingInfo object
- Use the Trace object
- Use the MIDI event beatPos property
- Use the JavaScript MIDI object
- Create Scripter controls
- Transposer controls
- Record MIDI to Track
-
-
- Alchemy overview
- Alchemy interface overview
- Alchemy Name bar
- Alchemy file locations
-
- Alchemy source overview
- Source master controls
- Import browser
- Source subpage controls
- Source filter controls
- Source filter use tips
- Source elements overview
- Additive element controls
- Additive element effects
- Spectral element controls
- Spectral element effects
- Pitch correction controls
- Formant filter controls
- Granular element controls
- Sampler element controls
- VA element controls
- Wide unison mode
- Source modulations
- Morph controls
- Alchemy master voice section
- Alchemy Extended parameters
-
- ES2 overview
- ES2 interface overview
- ES2 integrated effects processor controls
- Use ES2 in Surround mode
- Extended parameters
-
-
- Sample Alchemy overview
- Interface overview
- Add source material
- Edit mode
- Play modes
- Source overview
- Synthesis modes
- Granular controls
- Additive effects
- Additive effect controls
- Spectral effect
- Spectral effect controls
- Filter module
- Lowpass, bandpass, and highpass filters
- Comb PM filter
- Downsampler filter
- FM filter
- Envelope generators
- Mod Matrix
- Modulation routing
- Motion mode
- Trim mode
- More menu
-
- Sculpture overview
- Sculpture interface
- Global parameters
- Amplitude envelope parameters
- Use the Waveshaper
- Filter parameters
- Output parameters
- Use surround range and diversity
- Define MIDI controllers
- Extended parameters
-
- Studio Piano
-
- Ultrabeat overview
- Ultrabeat interface
- Synthesizer section overview
- Filter section controls
- Distortion circuit controls
- Glossary
- Copyright

Program a sustained synthesizer sound in Sculpture in Logic Pro for Mac
First, load the default setting—the very simple sound consisting of a plucked string that vibrates and fades away. This sound needs some drastic changes to become a sustained or extended pad sound.
Examine the three objects. Notice that only Object 1 is active, and acts on the string with an Impulse object type: the string is briefly excited when the note is played, then the sound decays. A sustained pad sound requires an exciting agent that constantly acts upon the string. The appropriate object types are Bow or Bow wide (the string is played with either short bow strokes or long, extended bow strokes), Noise (excited by a random noise signal), or Blow (excited by being blown—much like a clarinet or flute).
Test the above mentioned object types one after the other. Drag the Object 1 Pickup slider, responsible for the exact position of the exciting agent, up and down the string while you’re playing. You will come to two conclusions: First, the sound is now sustained for as long as you hold down a key. Second, dragging the Object 1 slider with the Bow type selected results in the most pronounced sonic changes. This setting promises the most rewarding possibilities for varying the sound, and that’s why this type has been chosen.
The sonic variations created by the Bow type are very appealing when the virtual bow stroke is moved along the string. You can control this movement by using an envelope, thus creating the foundation of your pad sound.
It makes more sense and is more convenient to record the envelope rather than program it, even if it is easy to program it with the graphic display.
Record an envelope in Sculpture
In Logic Pro, make sure you have loaded the default setting, then drag the Object 1 slider all the way to the left. Starting from this position, where it generates only an overtone-rich scratch, start animating it by using the envelope.
Locate the Envelope section in the lower-right corner of the Sculpture window. Select the first of the two envelopes by clicking the envelope 1 button to select it. In the left part of the Envelope section, notice the two routing possibilities that are used to assign a modulation target to the envelope.
Click the 1 button to activate the first routing link, and choose Object1 Position from the Target pop-up menu as the modulation target. Drag the amt slider all the way to the right to set the modulation intensity to its maximum value.
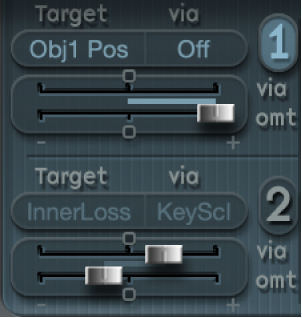
The envelope can now be recorded. It is assumed that your MIDI keyboard has a modulation wheel that outputs the corresponding MIDI controller message (CC number 1) and that option 1 ModWhl is selected for control of Envelope 1 (choose 1 ModWhl from the CtrlEnv 1 pop-up menu in the dark bottom edge of the Sculpture window).
Click the R button near the top of the Envelope section below Record Trigger, to prepare the envelope for recording. Choose Note + Ctrl Movement from the Record Trigger pop-up menu.
This option specifies that the recording of the controller messages from the modulation wheel begins the instant the first note is played.
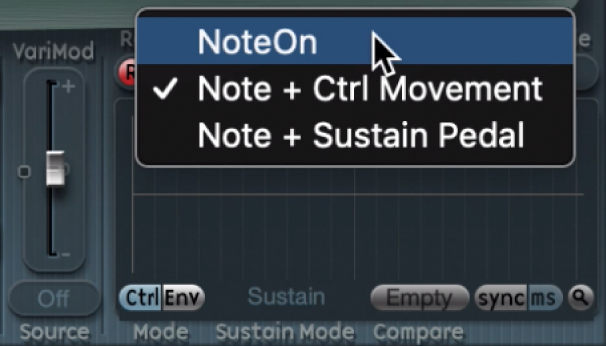
Play a note when you want to start the recording, and move the modulation wheel slowly upward while keeping the key on the keyboard depressed. Notice the sound variations you create while moving the modulation wheel.
At the end of the recording, return the wheel to its initial starting position and, after you release the depressed note, click the R button to deactivate the recording mode.
Increase stereo breadth and chorus in Sculpture
To give the very dry-sounding “0001 raw pad” setting a little more stereo breadth and chorus effect, modulate the Pickup positions, and assign them to the left and right channels.
In Logic Pro, load the “0001 raw pad” setting.
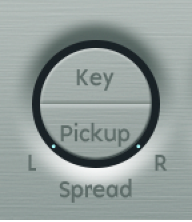
Drag the Spread Pickup semicircle upward until the light blue dots come to rest near the line that separates both semicircles.
This separates the stereo pan positions of the Pickups.
Click the 1 and 2 buttons to activate both of the modulation links in LFO1.
For the first link, choose PickupA Position from the Target pop-up menu, and then drag the amt slider to a small positive value of about 0.03 Hz to modulate the position of Pickup A.
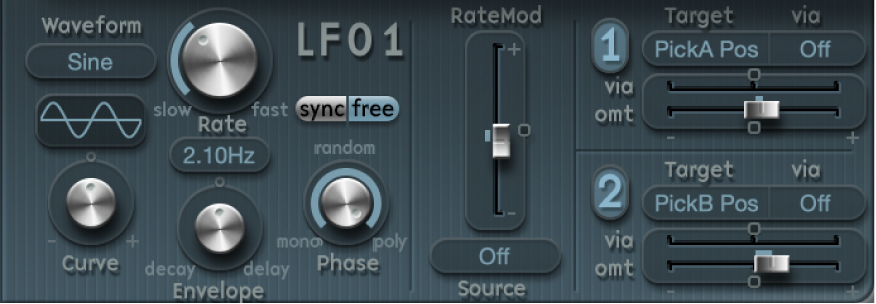
For the second link, choose PickupB Position from the Target pop-up menu, and then drag the amt slider to a small negative value of about −0.03 Hz to modulate the position of Pickup B.
You can hear a pleasant beating or chorus effect in the sound, which makes it broader and more full, alleviating the unpleasant, dry character. Another unpleasant aspect is that the sound is too strong in the mid frequency range and could use some equalization. You can use the Body EQ to correct this.
Activate the Body EQ, and experiment with the Lo Mid Hi model—the standard setting. Try reducing Mid to −0.5 and dragging the Mid Frequency slider to 0.37.

To give the pad a little depth, activate the Delay. Set the Delay Time to 1/4 and adjust the Xfeed knob to 30%.
The pad now has a pleasant and unobtrusive ambience; you can leave the other Delay parameters at their original values.

Make the sound more lively using the jitter modulators in Sculpture
You can make the sound more animated with some subtle modulation, which makes the jitter modulators the perfect tool for the job. The jitter modulators are basically LFOs that use a random waveform.
In Logic Pro, click the Jitter button below the LFO section to activate the display for both of the jitter modulators.
Click the 1 button to turn on the first link in Jitter 1, and choose Object1 Timbre from the Target pop-up menu.
Drag the slider below the Target pop-up menu to −0.40 to adjust the Intensity, and reduce the Rate parameter to 1 Hz. There should be subtle inconsistencies in the pressure applied by the bow to the string. To better recognize this effect, temporarily increase the Intensity level.
You can use the second jitter modulator for random position deviations with the modulation target Pickup Pos A+B (pickup position A and B).
Activate Jitter 2 and choose the Pickup Pos A+B setting from the Target pop-up menu.
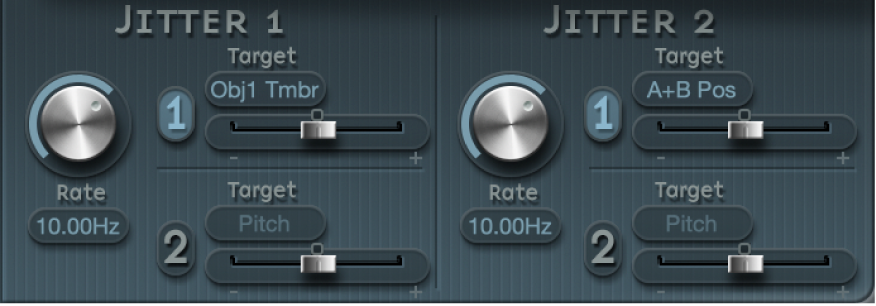
Drag the slider below the Target pop-up menu to an Intensity of about 0.2, and adjust the Rate knob to 1.5 Hz. As you increase the Intensity, the sound develops a distinct clinking or rattling—adjust this effect to taste.
You now have a satisfactory pad sound, which you should leave alone at this point, even though a few Sculpture features such as the Filter and the Waveshaper lie idle—not to mention the two additional Objects—but sometimes it’s a good idea to quit while you’re ahead.