Add borders and rules (lines) in Pages on Mac
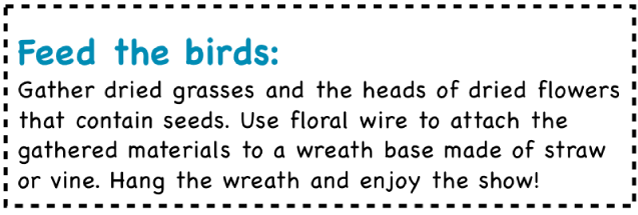
You can add a solid, dashed, or dotted rule above, below, or on the sides of text. You can also add a border around text and create a border effect around part or all of a page.

Add a border or rule to paragraphs
Click the line or paragraph (or select multiple paragraphs) where you want to add the border or rule.
In the Format
 sidebar, click the Layout button near the top.
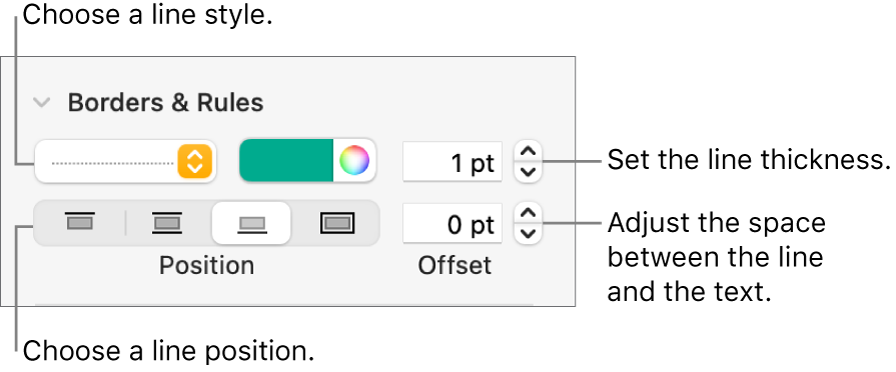
Click the pop-up menu next to Borders & Rules, then choose a line type (solid, dashed, or dotted).
Click the disclosure arrow next to Borders & Rules, then do any of the following:

Set where the line appears: Click a position button.
Adjust the spacing between the line and the text it’s applied to: Click the arrows for the Offset field.
Change the thickness of the line: Click the arrows for the value field next to the line color controls.
Choose a color that goes with your template: Click the color well to the left of the color wheel.
Choose any color: Click the color wheel, then choose a color in the Colors window.
To remove the border or rule, select the text with the border or rule, click the pop-up menu below Borders & Rules, then choose None.
Add a border around a page
To add a border around a page, you first add a square shape to the page, then change its attributes so it behaves like a border. For example, you can change its size, give it no fill (as opposed to a color fill) so that it doesn’t obscure the text on the page, set it to always stay on the page, and so on. You can then set the border as a section layout object so it appears on all pages.
Click
 in the toolbar, then choose the square or rounded rectangle from the Basic category.
Drag the selection handles until the outer edges of the shape create the border size you want.
In the Format
 sidebar, click the pop-up menu next to Fill, then click No Fill or choose a different fill option.
Click the Arrange tab at the top of the sidebar, then click Stay on Page.
Click the Text Wrap pop-up menu and choose None.
Click the Style tab, click the disclosure arrow next to Border, then do any of the following:
Specify a line style: Click the pop-up menu below Border, choose Line, then choose a line style from the pop-up menu below it. Click the color well to change the color of the line, and click the arrows to change the thickness of the line.
Specify a picture frame: Click the pop-up menu below Border, choose Picture Frame, then choose a picture frame style from the pop-up menu below it. Use the Scale slider to adjust the thickness of the frame.
Change the transparency of the border: Drag the opacity slider.
Use the border on every page in a section: Choose Arrange > Section Layouts > Move Objects to Section Layout (from the Arrange menu at the top of your screen).
Lock the border so it doesn’t get moved accidentally: Click the Arrange tab at the top of the sidebar, then click Lock.
If your document has more than one section and you want the border to appear on every page in the document, add the border as a background object for each section.
Remove a border or rule (line)
Borders and rules (lines) can be created in different ways, so if you’re not sure how one was added, you can try these methods to remove it.
Click the line or border to select it.
Do one of the following:
If selection handles appear at the ends of a line: It was added as a shape. Click Delete on the keyboard.
If selection handles appear around the border: It was added as a shape. Click the Style tab at the top of the sidebar on the right, then click the pop-up menu to the right of Border, then choose No Border.
Note: If you see a small x at the corners of a border or at the ends of a line, the shape is locked. You need to unlock it before you can remove it.
If no selection handles appear at the ends of a line: It was added as a rule. Select the text above the rule, then click the Layout button near the top of the sidebar on the right. If the pop-up menu says None, select the text below the rule. Click the pop-up menu, then choose None.
If no selection handles appear around the border: It was added as a border. Select the text inside the border, then click the Layout button near the top of the sidebar on the right. Click the line type pop-up menu, then choose None.
If you can’t select or delete a border or rule using any of the methods above, it may be a section layout object placed on the background of a template. To make it selectable, choose Arrange > Section Layouts > Make Layout Objects Selectable (from the Arrange menu at the top of your screen).