Final Cut Pro User Guide
- Welcome
- What’s new
-
- Intro to effects
-
- Intro to transitions
- How transitions are created
- Add transitions and fades
- Quickly add a transition with a keyboard shortcut
- Set the default duration for transitions
- Delete transitions
- Adjust transitions in the timeline
- Adjust transitions in the inspector and viewer
- Merge jump cuts with the Flow transition
- Adjust transitions with multiple images
- Modify transitions in Motion
-
- Add storylines
- Use the precision editor
- Conform frame sizes and rates
- Use XML to transfer projects
- Glossary
- Copyright

Use the Color Adjustments effect in Final Cut Pro for Mac
The Color Adjustments effect provides controls for adjusting exposure, contrast, brightness, saturation, highlights, shadows, warmth, and tint in your video clips. It’s designed to adjust color in HDR clips, but you can use it to adjust color in SDR clips as well.
In Final Cut Pro, select a clip in the timeline that you want to correct, then position the playhead over the clip (so that its image appears in the viewer).
Open the Color inspector.
Tip: If you frequently add a particular color correction effect, you can speed up your workflow by setting it as the default color correction. Then just select a timeline clip and press Command-6 to start adjusting the effect in the Color inspector.
Optionally, show video scopes to check the clip’s luma and chroma levels while you’re making color adjustments.
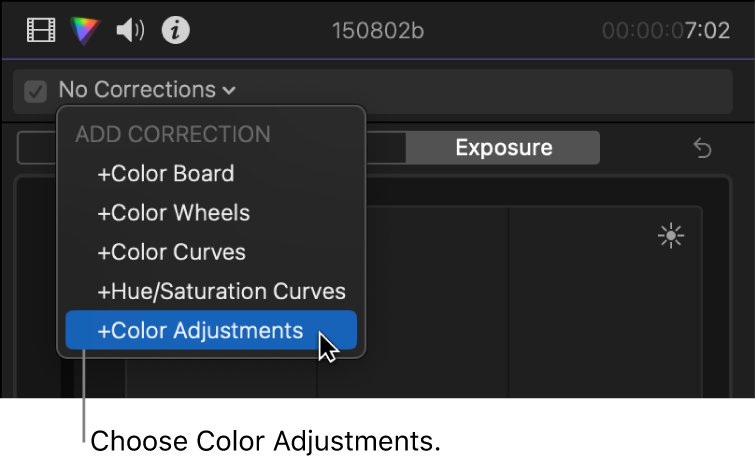
Click the pop-up menu at the top of the Color inspector, then do one of the following:
Add a new instance of the Color Adjustments effect: Choose Color Adjustments from the Add Correction section at the bottom of the menu.

For more details and methods, see Add color correction effects in Final Cut Pro for Mac.
Correct a Color Adjustments effect already applied to the clip: Choose the Color Adjustments effect you want to correct from the Corrections section at the top of the menu.
Controls for the Color Adjustments effect appear in the Color inspector. The effect also appears in the Effects section of the Video inspector.

In the Color inspector, use the Control Range pop-up menu (at the top of the Color Adjustments controls) to confirm the correct brightness (luminance) range.
This setting allows for proper scaling of the color adjustment sliders, so that when you adjust the Shadows, Midtones, or Highlights sliders, they affect those ranges in the image. Final Cut Pro generally chooses the correct setting automatically (based on your project settings).
Note: If automatic color management is turned off, choose the Control Range option that most closely matches the luminance range of the clip selected in the timeline. See Use automatic color management and Color Conform in Final Cut Pro for Mac.
Use the color adjustment sliders and value sliders to adjust any of the following:
Exposure: Lightens or darkens the image, with a bias toward affecting the highlights more than the other tones.
Contrast: Sets the relative amount of contrast between light and dark areas.
Brightness: Adjusts the overall brightness of the image.
Saturation: Adjusts the color (chroma) intensity.
Highlights: Adjusts the detail in the lightest areas of the image.
Black Point: Adjusts the point at which black areas become completely black (no detail can be seen).
Shadows: Adjusts the detail that appears in the darkest areas of the image.
Highlights Warmth: Adjusts the color temperature of the lightest areas of the image. Drag the slider to the right to add warm (orange) tones to the image, or to the left to add cool (blue) tones.
Highlights Tint: Fine-tunes the white-balance adjustment by neutralizing a remaining green or magenta tint. Drag the slider to the right to add a magenta tint to the image, or to the left to add a green tint.
Midtones Warmth: Adjusts the color temperature for the midtone areas of the image. Drag the slider to the right to add warm (orange) tones to the image, or to the left to add cool (blue) tones.
Midtones Tint: Fine-tunes the white-balance adjustment for the midtones only by neutralizing a remaining green or magenta tint. Drag the slider to the right to add a magenta tint to the image, or to the left to add a green tint.
Shadows Warmth: Adjusts the color temperature in the darkest areas of the image. Drag the slider to the right to add warm (orange) tones to the image, or to the left to add cool (blue) tones.
Shadows Tint: Fine-tunes the white-balance adjustment in the darkest areas of the image by neutralizing a remaining green or magenta tint. Drag the slider to the right to add a magenta tint to the image, or to the left to add a green tint.
Mix: Sets the amount of the original image to be blended with the adjusted image.
Tip: If you want to color correct the next or previous clip in the timeline, press Command-Right Arrow or Command-Left Arrow to move the playhead to the next or previous clip and select it. These shortcuts select clips in the same role only, so you can quickly move between video clips and skip over clips not suited for color correction (such as music or titles).
After you apply a color correction, you can copy it to another clip or group of clips. See Copy effects between clips in Final Cut Pro for Mac.
Download this guide: Apple Books | PDF