Adjust exposure and white balance in Final Cut Camera
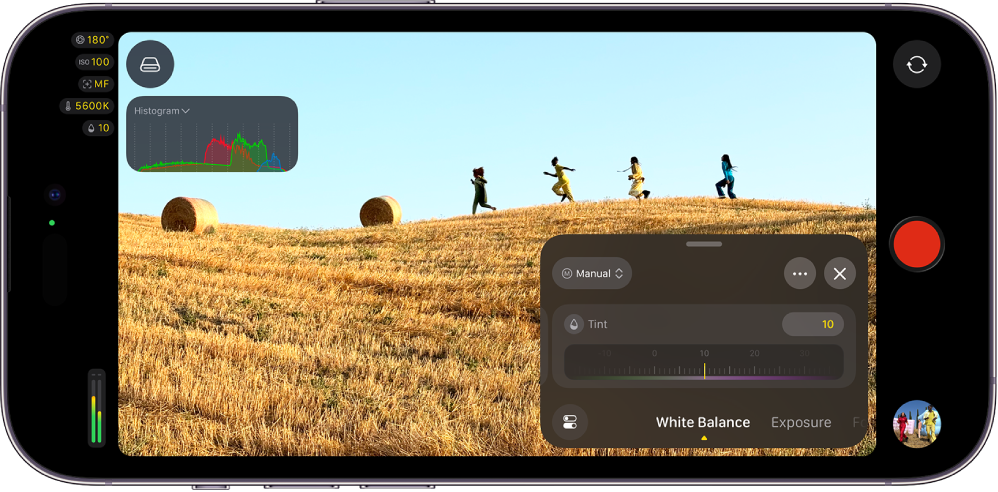
In Final Cut Camera, you can adjust the exposure automatically or manually, including adjustments to shutter angle, shutter speed, and ISO. On supported iPhone models, you can use manual aperture settings, as well as aperture priority and shutter priority modes. You can also make automatic or manual white balance adjustments.
Adjust exposure automatically
By default, Final Cut Camera sets the exposure automatically. You can have Final Cut Camera set the exposure for a particular subject, and you can adjust automatic exposure to be brighter or darker.
Go to the Final Cut Camera app
 on your iPhone or iPad.
In the camera screen, do one of the following:
Set the exposure for a subject: Tap the subject.
Note: This method also sets the focus on the subject.
Adjust the automatic exposure setting: Tap
 , swipe the bottom of the controls until the Exposure controls appear, then drag the EV Compensation dial to adjust the automatic setting to be brighter or darker. Dragging the dial to +1 makes the image one stop brighter than the automatic setting, and dragging the dial to –1 makes the image one stop darker.
To reset the EV Compensation dial, double-tap the dial.
When you’re done, tap
 or swipe down to close the controls.
The camera maintains your exposure setting until you change it or close the camera.
Adjust exposure manually
You can manually adjust the exposure of your image. You can set your exposure with ISO, shutter speed, and shutter angle controls.
Go to the Final Cut Camera app
on your iPhone or iPad.Tap
, swipe the bottom of the controls until the Exposure controls appear, tap Automatic, then tap Manual.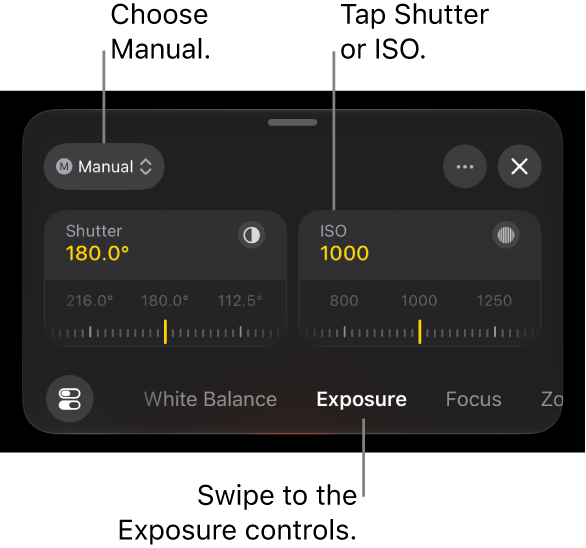
Do any of the following:
Adjust the shutter angle: Tap Shutter, then drag the dial.
To adjust the shutter speed, tap
 , tap Shutter Option, tap Speed, then drag the dial.
Adjusting the shutter angle (or shutter speed) lets you control how motion appears in your video. You can choose the amount of motion blur—from smooth, natural movement to sharp, crisp action—rather than relying on automatic exposure. Keeping the shutter setting fixed also ensures consistent motion throughout a shot.
Adjust the ISO setting: Tap ISO, then drag the dial.
Adjusting the ISO setting lets you control the camera’s sensitivity to light, balancing brightness and image quality. Using the lowest practical ISO setting reduces noise, whereas higher values brighten darker scenes when needed. Locking ISO also prevents unwanted exposure changes during recording.
Note: With iPhone 18 Pro or later and iOS 27 or later, you can also adjust the aperture setting. See Adjust the aperture setting and exposure on iPhone 18 Pro or later and Use aperture priority or shutter priority mode on iPhone 18 Pro or later, below.
When you’re done, tap
or swipe down to close the controls.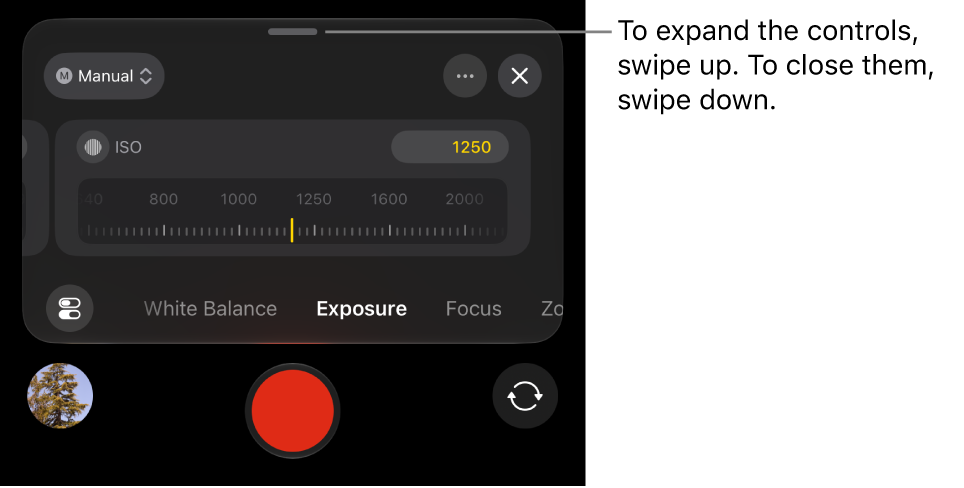
The current setting appears at the top of the camera screen. Yellow indicators reflect manual adjustments. Tap any indicator to open the corresponding controls.
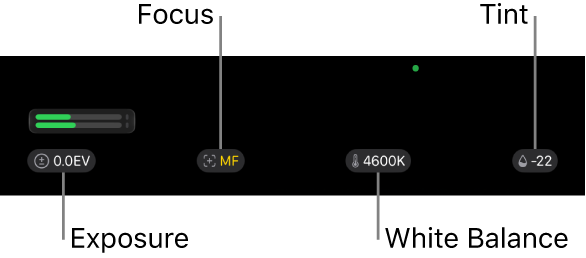
The camera maintains your exposure setting until you change it or close the camera.
Tip: If you’re recording at 24 fps, you can set the shutter speed to 1/48 of a second for a natural motion blur.
Adjust the aperture setting and exposure on iPhone 18 Pro or later
With iPhone 18 Pro or later, you can change the aperture setting, giving you direct control over both exposure and the visual style of your video. Adjusting the aperture setting lets you choose how much of the scene stays in focus and keeps the look of your footage consistent, without the camera making unwanted brightness adjustments during a shot.
Note: Aperture controls require iPhone 18 Pro or later and iOS 27 or later.
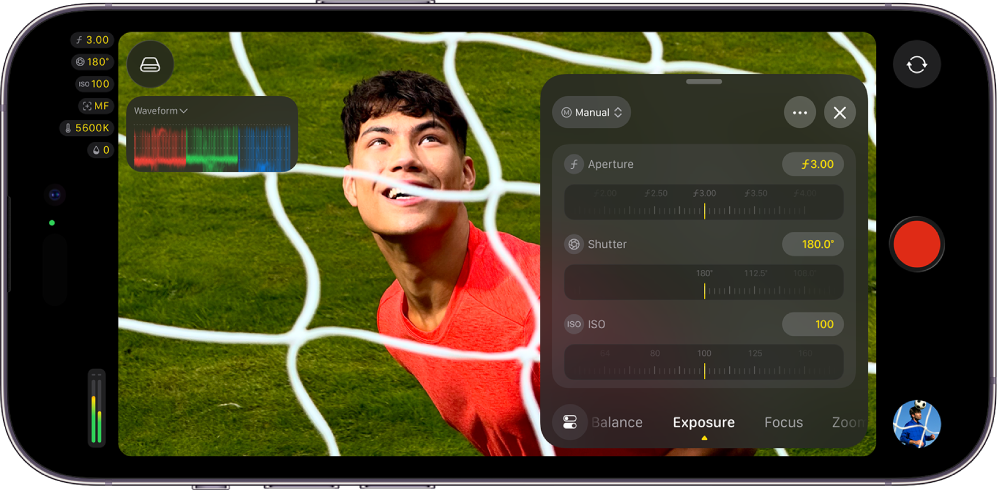
By adjusting aperture, you can:
Maintain total control of the depth of field
Achieve a specific motion blur (and slower shutter speed) without needing to add an ND filter
Create a bokeh effect by opening up the aperture to 1.48
With iPhone 18 Pro and Final Cut Camera, you can also use aperture priority or shutter priority mode. See Use aperture priority or shutter priority mode on iPhone 18 Pro or later, below.
Go to the Final Cut Camera app
on your iPhone.In the camera screen, tap
, swipe the bottom of the controls until the Exposure controls appear, tap Automatic, then tap Manual.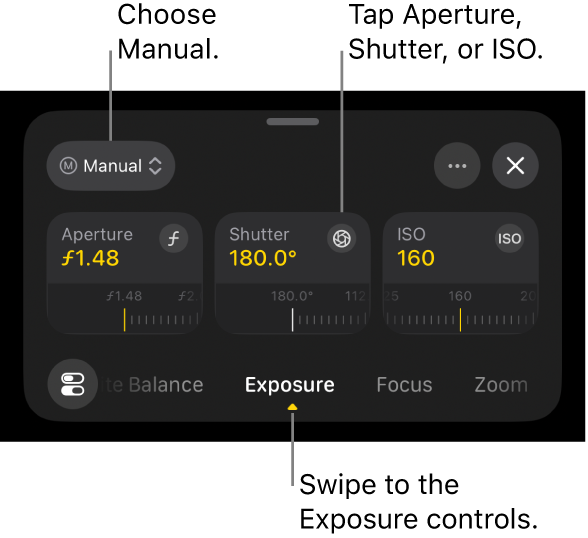
Do any of the following:
Adjust the f-stop: Tap Aperture, then drag the dial.
Adjusting the f-stop affects depth of field and lets you control how much light enters the camera. A wider aperture (a lower f-stop setting) creates a blurred background, whereas a narrower aperture (a higher f-stop setting) keeps more of the scene in focus. Adjusting the aperture setting manually provides a consistent look and exposure throughout your recording.
Adjust the shutter angle: Tap Shutter, then drag the dial.
To adjust the shutter speed, tap
, tap Shutter Option, tap Speed, then drag the dial.Adjusting the shutter angle (or shutter speed) lets you control how motion appears in your video. You can choose the amount of motion blur—from smooth, natural movement to sharp, crisp action—rather than relying on automatic exposure. Keeping the shutter setting fixed also ensures consistent motion throughout a shot.
Adjust the ISO setting: Tap ISO, then drag the dial.
Adjusting the ISO setting lets you control the camera’s sensitivity to light, balancing brightness and image quality. Using the lowest practical ISO setting reduces noise, whereas higher values brighten darker scenes when needed. Locking ISO also prevents unwanted exposure changes during recording.
When you’re done, tap
or swipe down to close the controls.The current setting appears at the top of the camera screen. Yellow indicators reflect manual adjustments. Tap any indicator to open the corresponding controls.
Use aperture priority or shutter priority mode on iPhone 18 Pro or later
With iPhone 18 Pro or later and Final Cut Camera, you can use aperture priority mode or shutter priority mode to adjust either the aperture or shutter setting and have Final Cut Camera maintain exposure automatically.
Note: Aperture priority mode and shutter priority mode require iPhone 18 Pro or later and iOS 27 or later.
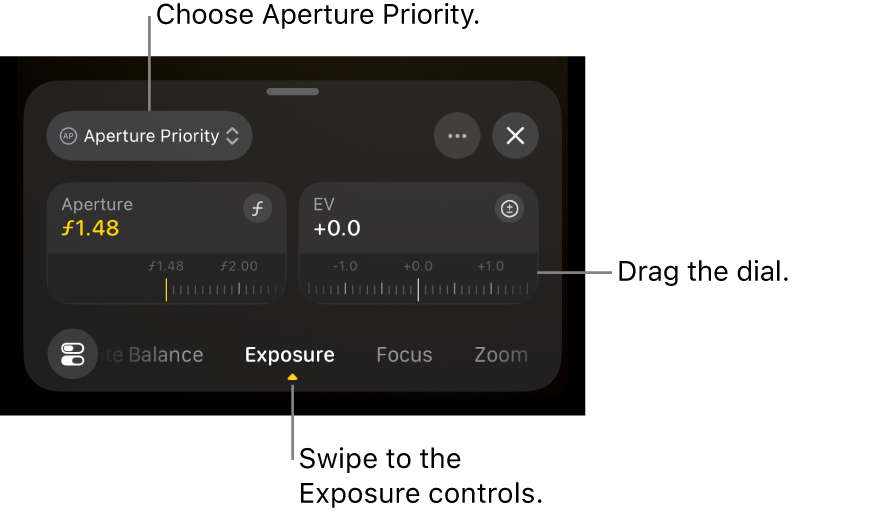
Aperture priority: When you adjust the Aperture dial in aperture priority mode, Final Cut Camera automatically adjusts shutter speed and ISO settings to maintain exposure.
Shutter priority: When you adjust the Shutter dial in shutter priority mode, Final Cut Camera automatically adjusts aperture and ISO settings to maintain exposure.
Go to the Final Cut Camera app
on your iPhone.In the camera screen, tap
, swipe the bottom of the controls until the Exposure controls appear, tap Automatic, then do one of the following:Use aperture priority mode: Tap Aperture Priority, then drag the Aperture dial to adjust the f-stop.
Use shutter priority mode: Tap Shutter Priority, then drag the Shutter dial to adjust the shutter angle.
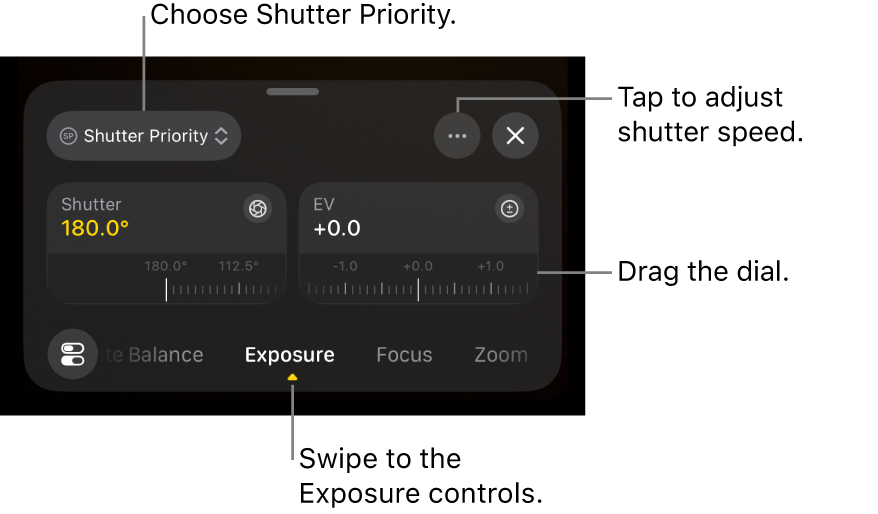
To adjust the shutter speed, tap
, tap Shutter Option, tap Speed, then drag the dial.
Optionally, drag the EV Compensation dial to adjust the automatic exposure setting to be brighter or darker.
When you’re done, tap
or swipe down to close the controls.The current setting appears at the top of the camera screen. Yellow indicators reflect manual adjustments. Tap any indicator to open the corresponding controls.
Set the white balance temperature or tint
White-balancing an image removes color casts and ensures that white objects in the image appear white.
You can adjust the white balance temperature and tint manually to set the mood for a shot. For example, setting the white balance cooler (lower) can give the scene a colder or harsher feel. Setting the white balance warmer (higher) can make the scene feel more inviting.
Note: White balance adjustments are not available while recording Apple ProRes RAW. You can adjust the white balance in Apple ProRes RAW files using Final Cut Pro and other post-production software.
Go to the Final Cut Camera app
on your iPhone or iPad.In the camera screen, tap
, then swipe the bottom of the controls until the White Balance controls appear.By default, the white balance and tint are set automatically to create a neutral white balance for the scene.
Do one of the following:
Set the white balance temperature or tint to a custom level: Tap the Temperature or Tint dial to expand it, then drag the dial. Swipe left or right to switch between dials, or swipe up to view both at once.
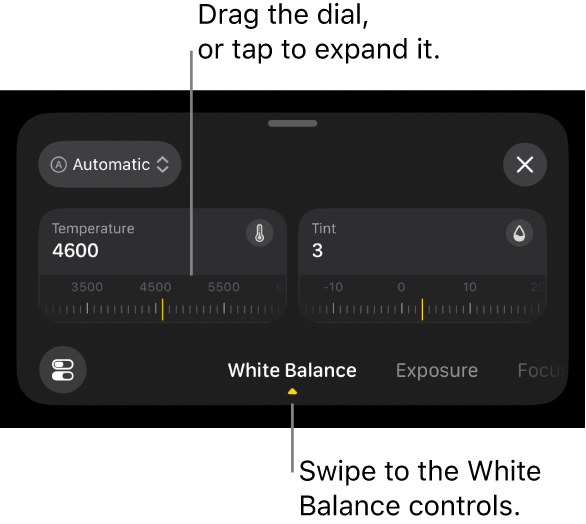
Reset the white balance or tint: Tap Manual, then tap Automatic.
Use a white balance preset: Tap Automatic or Manual, then tap a preset.
White balance presets include the following:
Daylight (5600K)
Shadow (7000K)
Cloudy (6000K)
Tungsten (3200K)
Fluorescent (4000K)
Flash (5500K)
When you’re done, tap
or swipe down to close the controls.The current settings appear at the top of the camera screen.
If you made a manual change to the white balance temperature or tint, its indicator turns yellow. You can tap the indicator to open the corresponding setting.
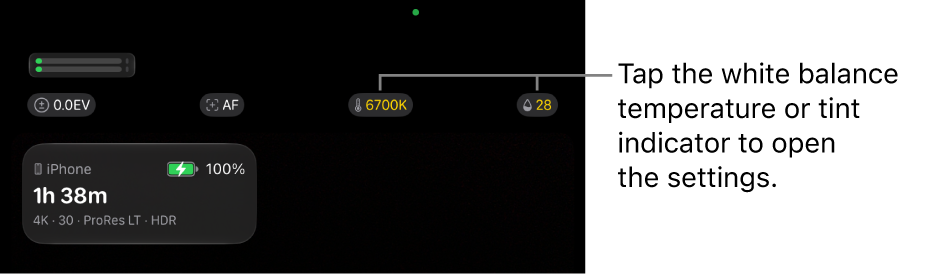
The camera maintains your white balance setting until you set the white balance to Automatic.
You can use video scopes to measure the luma and chroma levels of your clips. See Turn on video scopes.
Tip: To quickly turn on exposure overlays from the Exposure controls, tap , tap Exposure Overlays, then tap an option.