Final Cut Pro User Guide
- Welcome
-
- What’s new in Final Cut Pro 10.6.2
- What’s new in Final Cut Pro 10.6
- What’s new in Final Cut Pro 10.5.3
- What’s new in Final Cut Pro 10.5
- What’s new in Final Cut Pro 10.4.9
- What’s new in Final Cut Pro 10.4.7
- What’s new in Final Cut Pro 10.4.6
- What’s new in Final Cut Pro 10.4.4
- What’s new in Final Cut Pro 10.4.1
- What’s new in Final Cut Pro 10.4
- What’s new in Final Cut Pro 10.3
- What’s new in Final Cut Pro 10.2
- What’s new in Final Cut Pro 10.1.2
- What’s new in Final Cut Pro 10.1
- What’s new in Final Cut Pro 10.0.6
- What’s new in Final Cut Pro 10.0.3
- What’s new in Final Cut Pro 10.0.1
-
- Intro to effects
-
- Intro to transitions
- How transitions are created
- Add transitions
- Set the default transition
- Delete transitions
- Adjust transitions in the timeline
- Adjust transitions in the inspector and viewer
- Merge jump cuts with the Flow transition
- Adjust transitions with multiple images
- Modify transitions in Motion
-
- Add storylines
- Use the precision editor
- Conform frame sizes and rates
- Use XML to transfer projects
-
- Glossary
- Copyright

Gradient editor controls in Final Cut Pro
In Final Cut Pro, use the advanced gradient controls to make precise adjustments to gradients applied to selected items (such as titles and generators).

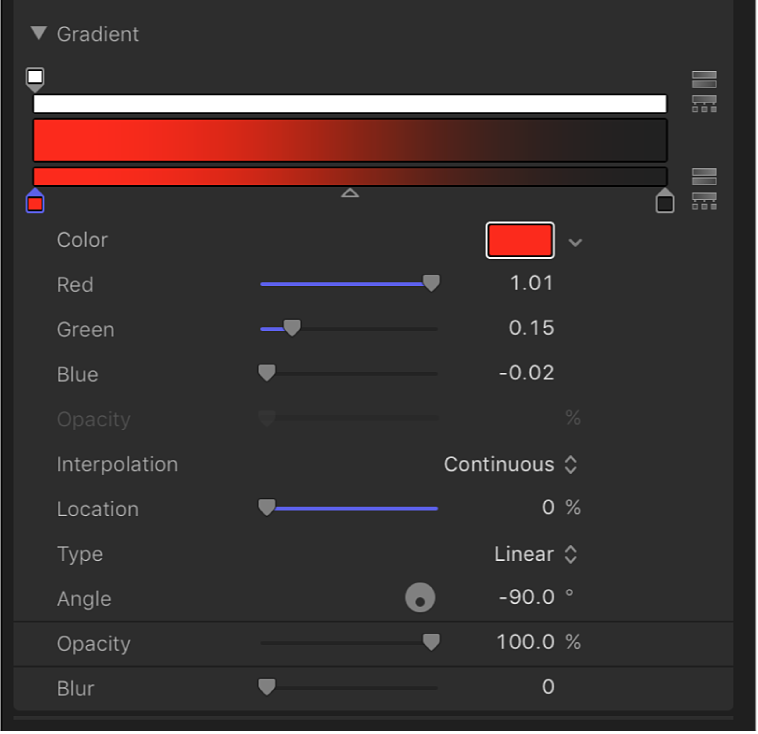
To customize or modify a gradient, click the disclosure triangle in the Gradient row of the inspector to reveal the advanced gradient controls:
Graphical controls: Three horizontal bars that let you set and preview the opacity, color, and spread of a gradient.
The narrow, white top bar (the opacity bar) controls opacity and transparency in the gradient. Adjust the spread of opacity across the gradient by dragging one of the small box-shaped opacity tags horizontally along the bar. Click in the opacity bar to add opacity tags, creating a gradient with varying levels of transparency. Delete an opacity tag by dragging it away from the color bar. Change the value of an opacity tag by selecting it and dragging the Opacity slider (described below).
Opacity tags have a value range of 0% (completely transparent) to 100% (completely opaque). Adjust the transition between two opacity tags by dragging the middle control—a small triangle between adjacent tags, available when Interpolation is set to Continuous (described below). By default, the opacity of a gradient applied to text is 100%.
The wide middle bar shows a preview of the current gradient.
The narrow bottom bar (the gradient bar) controls color in the gradient. Adjust the spread of color across the gradient by dragging one of the small box-shaped color tags horizontally along the bar. Click in the gradient bar to add more color tags. Delete a color tag by dragging it away from the gradient bar. Change the value of a color tag by selecting it and choosing a color from the color well below, or by double-clicking the tag and choosing a color from the Colors window. Adjust the transition between color tags by dragging the middle control—a small triangle between adjacent tags, available when Interpolation is set to Continuous (described below).
Selecting a color tag activates the Color and Location controls (described below). Selecting an opacity tag activates the Opacity slider (described below). Selecting a middle control activates the Middle slider (described below).
Color: A color well and eyedropper that sets the hue of a selected color tag in the gradient bar. For more information about color wells, see Basic color controls in Final Cut Pro.
Opacity: A slider that sets the transparency of a selected opacity tag in the opacity bar. Values range from 0% (completely transparent) to 100% (completely opaque).
Interpolation: A pop-up menu that sets the interpolation of a selected color tag or opacity tag. There are three options:
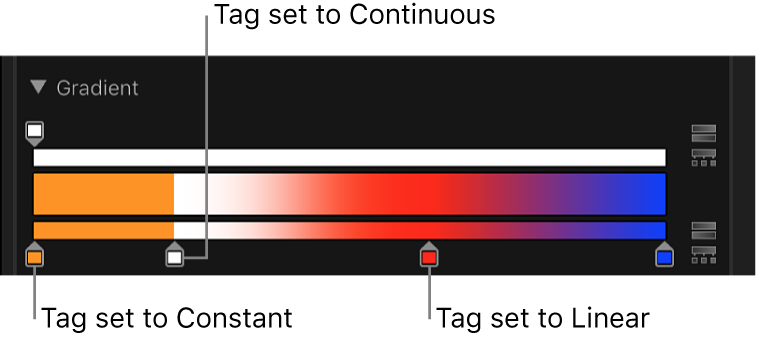
Linear: Creates a uniform distribution of opacity or color between the tags.
Continuous: Sets an adjustable rate of change between adjacent opacity or color tags. Adjust the rate of change by dragging a middle control in the opacity bar or gradient bar, or by dragging the Middle slider (described below).
Constant: Creates a constant color distribution from the color or opacity tag, moving from left to right in the gradient. For example, if the left color tag is set to Constant, the area of the gradient between that tag and the next one to the right is a single, solid color.

Location: A slider that adjusts the location of a selected opacity tag or color tag.
Type: A pop-up menu that lets you choose a linear or radial gradient.
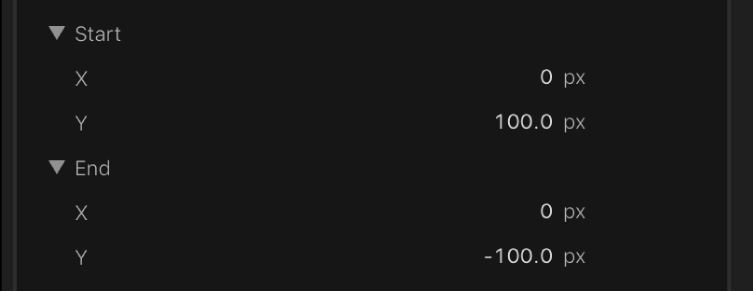
Start: Value sliders that set the start position of the gradient in the selected object. This parameter affects the gradient as a whole—colors and opacity. Clicking the disclosure triangle stacks the X and Y value sliders vertically instead of horizontally.
X: Controls the X start position of the gradient.
Y: Controls the Y start position of the gradient.

End: Value sliders that set the end position of the gradient in the selected object. This parameter affects the gradient as a whole—colors and opacity. Clicking the disclosure triangle stacks the X and Y value sliders vertically instead of horizontally.
X: Controls the X end position of the gradient.
Y: Controls the Y end position of the gradient.
Note: The Start and End parameters do not appear in standard text gradients.
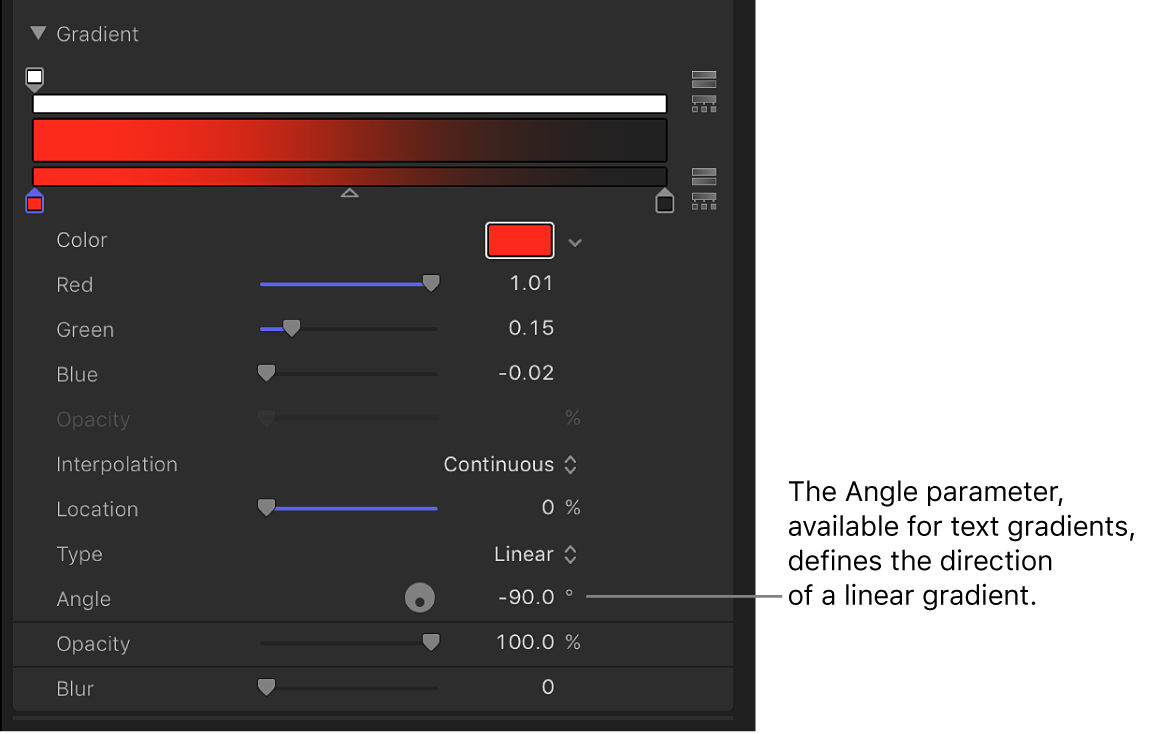
Angle: When the Type pop-up menu is set to Linear, this dial specifies the direction of a linear gradient. This parameter appears only for standard text gradients.

Download this guide: Apple Books | PDF