Use the Color Adjustments effect in Final Cut Pro for Mac
The Color Adjustments effect provides controls for adjusting exposure, contrast, brightness, saturation, highlights, shadows, warmth, and tint in your video clips. It’s designed to adjust color in HDR clips, but you can use it to adjust color in SDR clips as well.
You can also use the Color Adjustments effect to automatically enhance a clip’s light and color. The Enhance Light and Color option uses machine learning to automatically create a more natural appearance in the clip, with better color balance, brightness, and contrast.
Add and adjust the Color Adjustments effect
In Final Cut Pro, select a clip in the timeline that you want to correct, then position the playhead over the clip (so that its image appears in the viewer).
Open the Color inspector.
Optionally, show video scopes to check the clip’s luma and chroma levels while you’re making color adjustments.
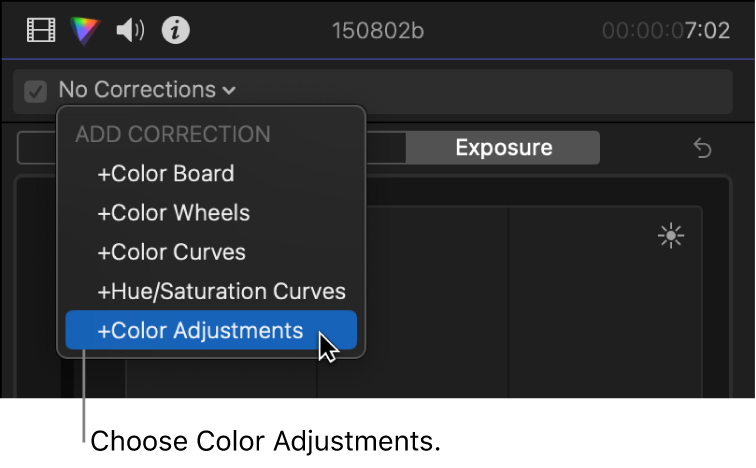
Click the pop-up menu at the top of the Color inspector, then do one of the following:
Add a new instance of the Color Adjustments effect: Choose Color Adjustments from the Add Correction section at the bottom of the menu.

Tip: To quickly add the Color Adjustments effect, choose Edit > Add Color Adjustment (or press Option-Command-O). The Color Adjustments effect is also the default color correction, which you can add to a clip by pressing Command-6. You can change the default color correction to a different effect.
For more details and methods, see Add color correction effects in Final Cut Pro for Mac.
Correct a Color Adjustments effect already applied to the clip: Choose the Color Adjustments effect you want to correct from the Corrections section at the top of the menu.
Controls for the Color Adjustments effect appear in the Color inspector. The effect also appears in the Effects section of the Video inspector.

In the Color inspector, use the Control Range pop-up menu (at the top of the Color Adjustments controls) to confirm the correct brightness (luminance) range.
This setting allows for proper scaling of the color adjustment sliders, so that when you adjust the Shadows, Midtones, or Highlights sliders, they affect those ranges in the image. Final Cut Pro generally chooses the correct setting automatically (based on your project settings).
Note: If automatic color management is turned off, choose the Control Range option that most closely matches the luminance range of the clip selected in the timeline. See Use automatic color management and Color Conform in Final Cut Pro for Mac.
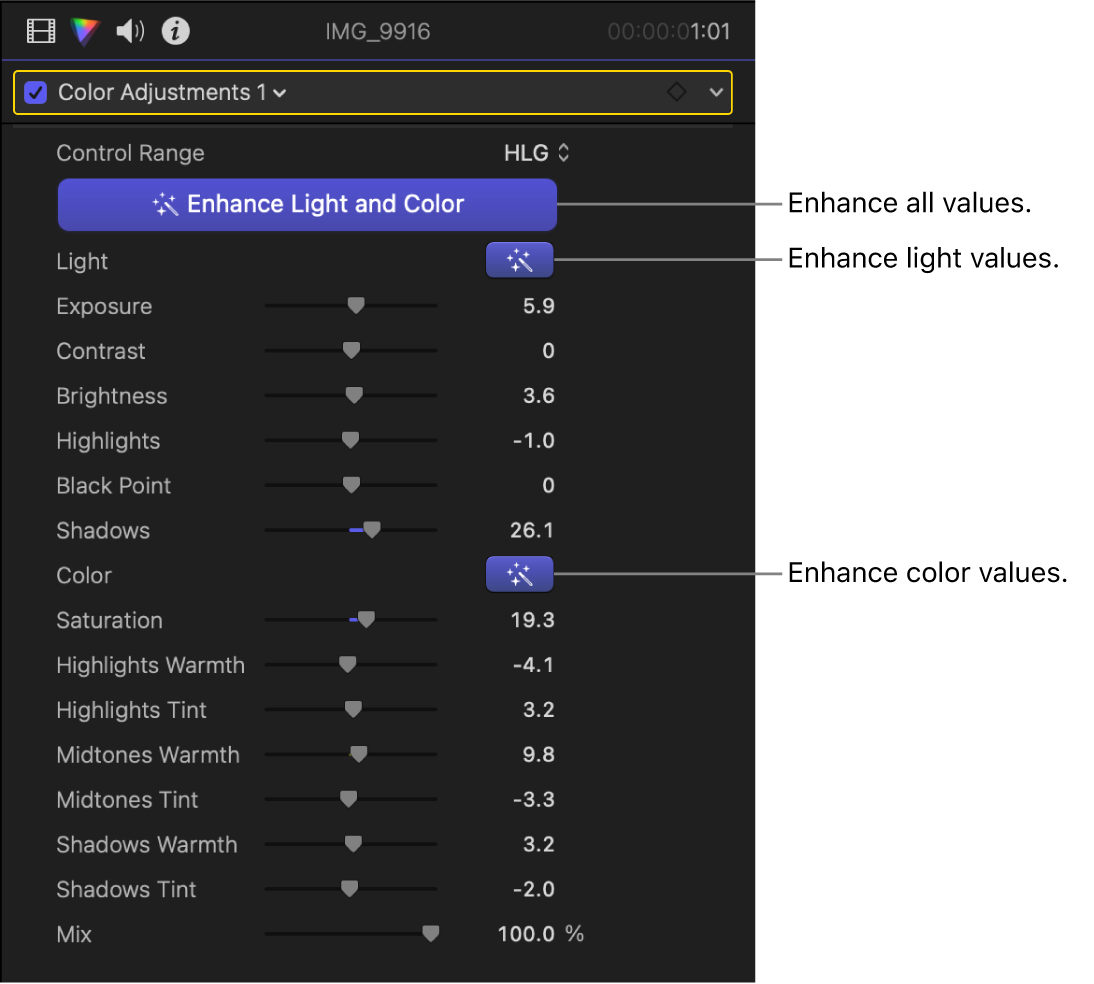
To have Final Cut Pro automatically enhance the tonal range of the image and remove any visible color cast, click Enhance Light and Color.
See Automatically enhance light and color, below.
Use the color adjustment sliders, value sliders, and buttons to adjust any of the following:
Light: Adjusts the tonal range of an image. When the Enhance button
 to the right of Light is selected, the Light parameters are set automatically using machine learning.
Exposure: Lightens or darkens the image, with a bias toward affecting the highlights more than the other tones.
Contrast: Sets the relative amount of contrast between light and dark areas.
Brightness: Adjusts the overall brightness of the image.
Highlights: Adjusts the detail in the lightest areas of the image.
Black Point: Adjusts the point at which black areas become completely black (no detail can be seen). Setting the black point can improve the contrast in a washed-out image.
Shadows: Adjusts the detail that appears in the darkest areas of the image.
Color: Adjusts the color of an image. When the Enhance button
 to the right of Color is selected, the Color parameters are set automatically using machine learning.
Saturation: Adjusts the color (chroma) intensity of the image.
Highlights Warmth: Adjusts the color temperature of the lightest areas of the image. Drag the slider to the right to add warm (orange) tones to the image, or to the left to add cool (blue) tones.
Highlights Tint: Fine-tunes the white-balance in the lightest areas of the image by neutralizing a remaining green or magenta tint. Drag the slider to the right to add a magenta tint to the image, or to the left to add a green tint.
Midtones Warmth: Adjusts the color temperature for the midtone areas of the image. Drag the slider to the right to add warm (orange) tones to the image, or to the left to add cool (blue) tones.
Midtones Tint: Fine-tunes the white-balance adjustment for the midtones only by neutralizing a remaining green or magenta tint. Drag the slider to the right to add a magenta tint to the image, or to the left to add a green tint.
Shadows Warmth: Adjusts the color temperature in the darkest areas of the image. Drag the slider to the right to add warm (orange) tones to the image, or to the left to add cool (blue) tones.
Shadows Tint: Fine-tunes the white-balance adjustment in the darkest areas of the image by neutralizing a remaining green or magenta tint. Drag the slider to the right to add a magenta tint to the image, or to the left to add a green tint.
Note: When Enhance Light and Color (or Color) is selected, any overall color cast is removed.
Mix: Sets the amount of the original image to be blended with the adjusted image.
Automatically enhance light and color
The Enhance Light and Color option in the Color Adjustments effect uses machine learning to analyze video clips and automatically enhance the tonal range of an image, removing any visible color cast.
After applying Enhance Light and Color, you can make further manual adjustments using the Color Adjustments effect. For example, you can separately deselect the Light and Color sections to exclude those parameters from the analysis, or you can manually adjust individual parameters in either section.
Open the Color inspector.
Do one of the following:
Choose Modify > Enhance Light and Color (or press Control-Option-Command-O).
Click the Enhancements pop-up menu below the viewer and choose Enhance Light and Color.

The Color Adjustments effect is applied to the clip, the Enhance Light and Color option is turned on for all parameters, and each parameter is set using machine learning.

Optionally, do any of the following:
Adjust parameters manually: Use the sliders and value sliders to adjust individual Color Adjustments parameters. See Add and adjust the Color Adjustments effect, above.
Reset parameters to zero: Click one or both Enhance buttons
 so that they’re no longer highlighted.
Reset an analysis: Click Enhance Light and Color to turn it off (so that the button is no longer highlighted), then click it again to turn it back on. The parameter values will change if you move the playhead before analysis, change the project color space, or change the Control Range setting.
Tip: If you want to color correct the next or previous clip in the timeline, press Command-Right Arrow or Command-Left Arrow to move the playhead to the next or previous clip and select it. These shortcuts select clips in the same role only, so you can quickly move between video clips and skip over clips not suited for color correction (such as music or titles).
After you apply a color correction, you can copy it to another clip or group of clips. See Copy effects between clips in Final Cut Pro for Mac.
Download this guide: PDF