Final Cut Pro User Guide for Mac
- Welcome
- What’s new
-
- Intro to effects
-
- Intro to transitions
- How transitions are created
- Add transitions and fades
- Quickly add a transition with a keyboard shortcut
- Set the default duration for transitions
- Delete transitions
- Adjust transitions in the timeline
- Adjust transitions in the inspector and viewer
- Merge jump cuts with the Flow transition
- Adjust transitions with multiple images
- Modify transitions in Motion
-
- Add storylines
- Use the precision editor
- Conform frame sizes and rates
- Use XML to transfer projects
- Glossary
- Copyright

Playback settings in Final Cut Pro for Mac
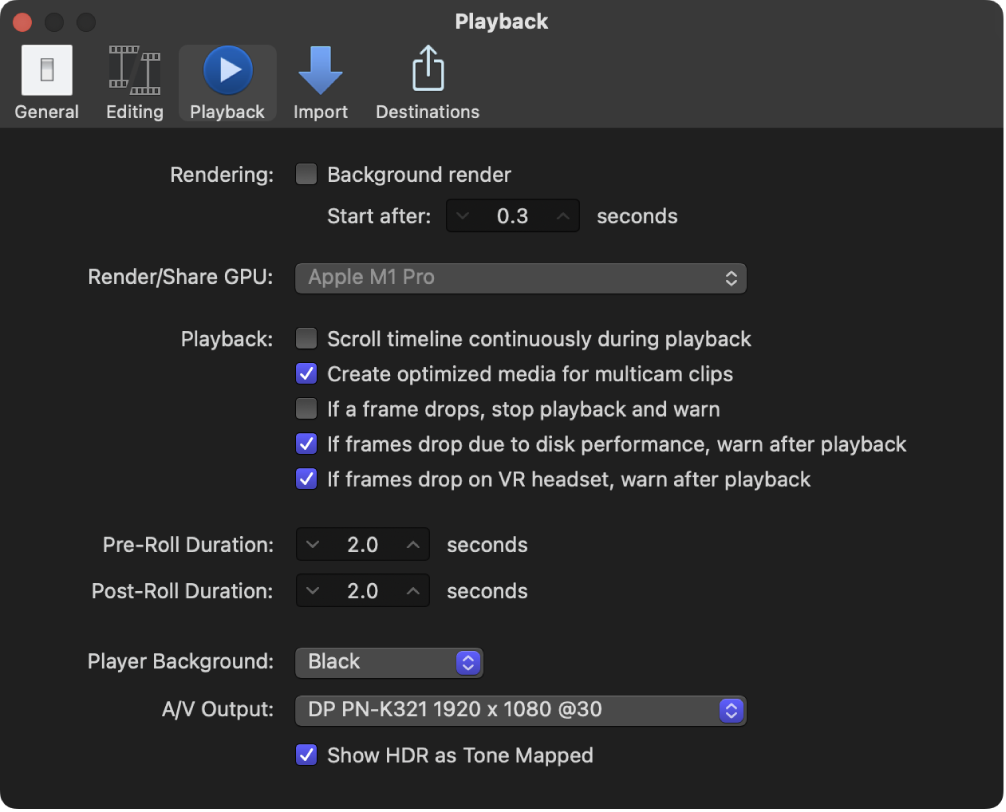
Playback settings affect playback and rendering performance in Final Cut Pro.

Note: For information about controlling playback quality and performance, including switching between original or optimized media and proxy media, see Control playback quality in Final Cut Pro for Mac.
Rendering
Background render: Select this checkbox to turn on Final Cut Pro rendering operations when the system is idle.
Start after x seconds: Use this value slider to set the amount of time your system is idle, in seconds, before Final Cut Pro begins background rendering.
Render/Share GPU
Render/Share GPU: Use this pop-up menu to choose which graphics processing unit (GPU) to use in Final Cut Pro when rendering or sharing. This choice affects only rendering and sharing; real-time effects use the default GPU.
Playback
Scroll timeline continuously during playback: Select this checkbox to set the timeline to scroll during playback, so that the timeline always shows the section of the project playing in the viewer.
Create optimized media for multicam clips: Select this checkbox to automatically transcode multicam clip video to the Apple ProRes 422 codec, which provides better performance during editing and faster render times.
If a frame drops, stop playback and warn: Select this checkbox to have Final Cut Pro warn you when frames are dropped during playback.
If frames drop due to disk performance, warn after playback: Select this checkbox to have Final Cut Pro warn you if frames were dropped because of disk performance.
If frames drop on VR headset, warn after playback: Select this checkbox to have Final Cut Pro warn you if frames were dropped on a connected VR headset display.
Pre-Roll Duration
Post-Roll Duration
Post-Roll Duration: Use this value slider to set the amount of time to play after an audition or after the skimmer or playhead position when using the Play Around command.
Player Background
Player Background: Use this pop-up menu to choose a background for the viewer. The color you choose will be visible in the case of partially or completely transparent clips, or clips that don’t fill the frame completely.
A/V Output
A/V Output: Use this pop-up menu to choose an external audio/video device or monitor for output. See Play media on an external display in Final Cut Pro for Mac.
Show HDR as Tone Mapped: Select this checkbox to compress bright image content and reduce the apparent dynamic range of the video to fit the viewable range of the external video display. This checkbox is available only for external displays connected using an HDMI or Thunderbolt 3 cable on systems with macOS 10.15 or later. This option is disabled if a connected Pro Display XDR is set to a reference mode preset, such as HDR Video, in Displays settings (in macOS System Settings).
Download this guide: PDF