Final Cut Pro User Guide for Mac
- Welcome
- What’s new
-
- Intro to effects
-
- Intro to transitions
- How transitions are created
- Add transitions and fades
- Quickly add a transition with a keyboard shortcut
- Set the default duration for transitions
- Delete transitions
- Adjust transitions in the timeline
- Adjust transitions in the inspector and viewer
- Merge jump cuts with the Flow transition
- Adjust transitions with multiple images
- Modify transitions in Motion
-
- Add storylines
- Use the precision editor
- Conform frame sizes and rates
- Use XML to transfer projects
- Glossary
- Copyright

Create simple shape masks in Final Cut Pro for Mac
The Shape Mask effect allows you to quickly create a mask in any shape on the continuum from ellipse to rectangle.
Note: The Shape Mask is the only simple mask that can be converted to editable control points for making complex custom masks (changing it into a Draw Mask). See Create complex masks in Final Cut Pro for Mac and Intro to editing complex masks in Final Cut Pro for Mac.
Add the clip you want to mask to the Final Cut Pro timeline.
Note: If you want to composite the clip over a background clip, you must use connected clips. See Connect clips in Final Cut Pro for Mac.
Select the clip in the timeline, then position the playhead at a point within the clip that shows the area you want to make transparent.
To open the Effects browser, click the Effects button in the top-right corner of the timeline (or press Command-5).

In the Effects browser, select the Shape Mask effect.
Tip: To quickly find the Shape Mask effect, type “shape” in the Effects browser search field.
To apply the mask effect to the clip selected in the timeline, do one of the following:
Drag the effect to the timeline clip or the viewer.
Double-click the effect thumbnail in the Effects browser.
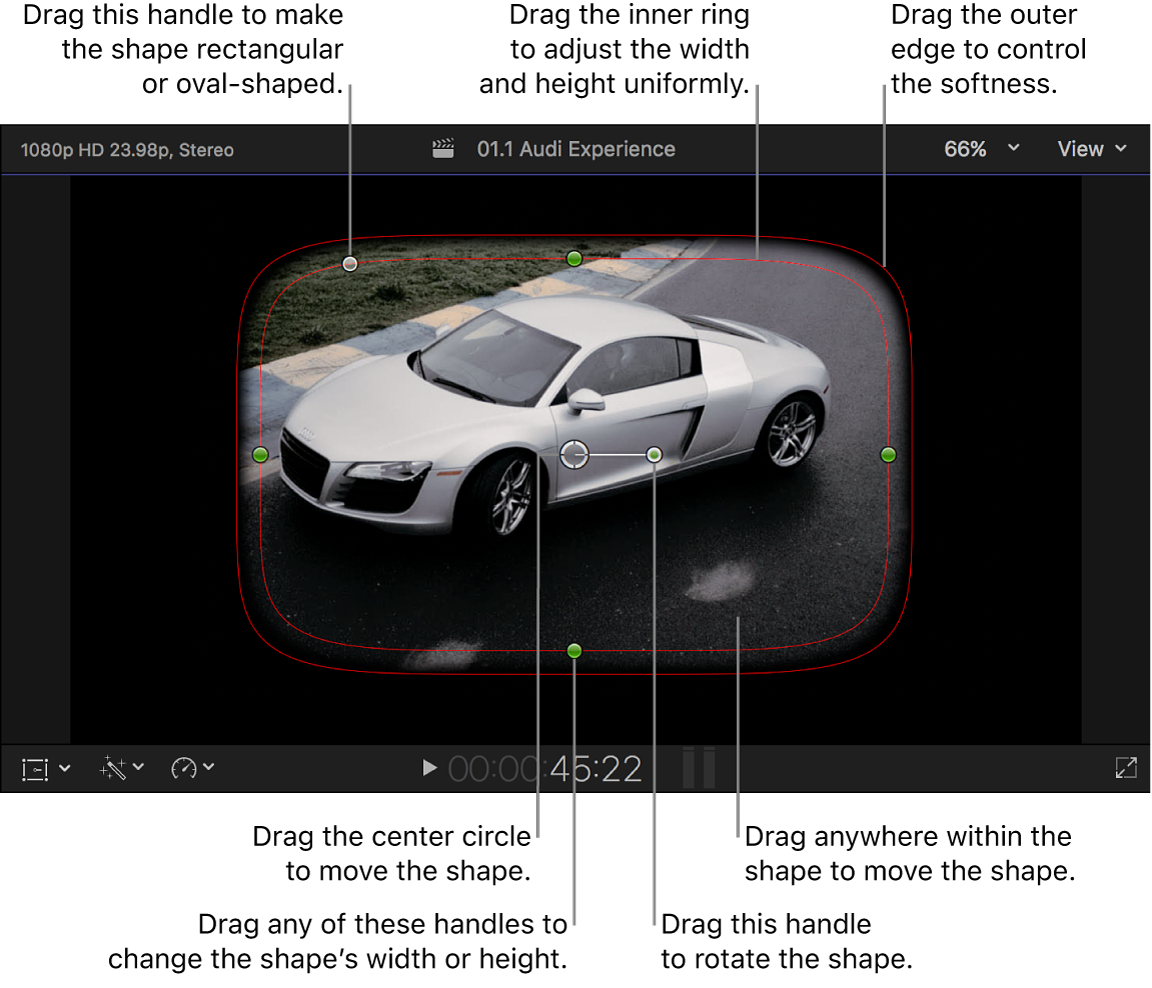
The Shape Mask onscreen controls appear in the viewer, superimposed over the video image. The Shape Mask parameters appear in the Effects section of the Video inspector. By default, the Shape Mask is set to a partially feathered ellipse shape in the center of the frame.
Use the onscreen controls to adjust the shape mask as needed.

Position the shape: Drag the center.
Adjust the shape’s width or height: Drag any of the four handles at the 90-degree points (top, bottom, left, or right) of the inner circle. You can hold down the Shift key while dragging to force all sides to scale proportionally. Or hold down the Option key to adjust one side only.
Control the curvature of the shape: Drag the handle to the left of the inner circle’s top handle. One extreme of the curvature continuum is a perfect rectangle. The other extreme is an oval or a perfect circle.
Rotate the shape: Drag the rotation handle (extending from the center).
Control the softness of the shape’s edge: Drag the outer circle. Setting the outer circle close to the inner circle creates a hard edge and an abrupt transition to the background, and dragging the outer circle away from the inner circle creates a softer edge and a more gradual transition.
Hide the mask’s controls: Click the Shape Mask Onscreen Controls button
 in the Shape Mask area of the Color section of the Video inspector.
Note: The Shape Mask is just one of several simple mask effects. For the complete list of Effects browser mask effects, see Intro to masking in Final Cut Pro for Mac.
Download this guide: PDF