Change permissions for files, folders, or disks on Mac
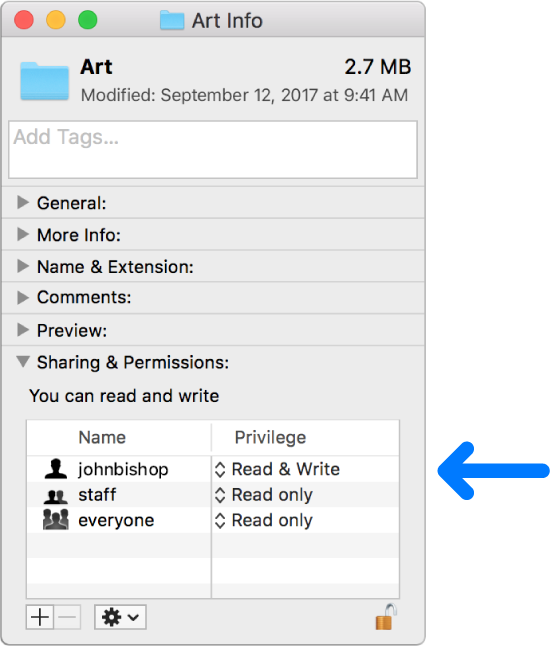
Permission settings determine who can view and alter files on the computer. You change permission settings at the bottom of the Info window for a file, folder, or disk in the Finder. For example, you can change permission settings for a folder so that other users who log in to your Mac, or connect to it for file sharing, can view but not change files in a folder.

Assign permissions to users and groups
On your Mac, select a disk, folder, or file, then choose File > Get Info.
If the information in Sharing & Permissions isn’t visible, click the disclosure triangle.
If necessary, click the lock icon
 to unlock it, then enter an administrator name and password (or, if your Mac has Touch ID, use Touch ID).
Click a user or group in the Name column, then choose a privilege setting from the pop-up menu.
Read & Write: Allows a user to open the item and change it.
Read Only: Allows a user to open the item, but not change its contents.
Write Only: Makes a folder into a drop box. Users can copy items to the drop box, but can’t open it. Only the owner of the drop box can open it.
No Access: Blocks all access to the item.
You can undo any changes to privilege settings for a user or group in the Sharing & Permissions section since opening the Info window. Before closing the Info window, click the Action pop-up menu ![]() , then choose “Revert changes.”
, then choose “Revert changes.”
Apply permissions to all items in a folder or a disk
On your Mac, select a folder or a disk, then choose File > Get Info.
Click the lock icon
 to unlock it, then enter an administrator name and password (or, if your Mac has Touch ID, use Touch ID).
Click the Action pop-up menu
 , then choose “Apply to enclosed items.”
Change an item’s owner
On your Mac, select the item, then choose File > Get Info.
Click the lock icon
 to unlock it, then enter an administrator name and password (or, if your Mac has Touch ID, use Touch ID).
If the new owner’s name isn’t listed in the Name column in the Sharing & Permissions section, click the Add button
 to add the new owner.
Select the new owner in the Name column, click the Action pop-up menu
 , then choose “Make __ the owner.”
You can undo any changes to an item’s owner in the Sharing & Permissions section since opening the Info window. Before closing the Info window, click the Action pop-up menu ![]() , then choose “Revert changes.”
, then choose “Revert changes.”
Add or remove a user or group in the Name column
On your Mac, select an item, then choose File > Get Info.
If you don’t own the item, click the lock icon
 to unlock it, then enter an administrator name and password (or, if your Mac has Touch ID, use Touch ID).
In the Sharing & Permissions section, do any of the following:
Add a user or group: Click the Add button
 below the list, select a user or group, then click Select.
Remove a user or group: Select the user or group, then click the Remove button
 below the list.
You can undo adding or removing a user or group in the Sharing & Permissions section since opening the Info window. Before closing the Info window, click the Action pop-up menu ![]() , then choose “Revert changes.”
, then choose “Revert changes.”