Logic Pro User Guide for Mac
- Welcome
-
- What’s new in Logic Pro for Mac 11.1
- What’s new in Logic Pro for Mac 11
- What’s new in Logic Pro for Mac 10.8
- What’s new in Logic Pro for Mac 10.7.8
- What’s new in Logic Pro for Mac 10.7.5
- What’s new in Logic Pro 10.7.3
- What’s new in Logic Pro 10.7
- What’s new in Logic Pro 10.6
- What’s new in Logic Pro 10.5
- What’s new in Logic Pro 10.4
- What’s new in Logic Pro 10.3
- What’s new in Logic Pro 10.2
- What’s new in Logic Pro 10.0
-
- What is Logic Pro for Mac?
- Logic Pro project basics
- Use menu commands and key commands
- Use the complete set of Logic Pro features
- Undo and redo edits
- Manage Logic Pro content
- How to get help
-
- Projects overview
- Create projects
- Open projects
- Save projects
- Delete projects
-
- Play a project
- Set the playhead position
- Control playback with the transport buttons
- Use transport shortcut menus
- Use transport key commands
- Customize the control bar
- Change the LCD display mode in Logic Pro for Mac
- Monitor and reset MIDI events
- Use the cycle area
- Use the Chase Events function
- Use Apple Remote to control Logic Pro
- Use Logic Remote to control Logic Pro projects
- Preview projects in the Finder
- Close projects
- View project information
-
- Tracks overview
-
- Create tracks
- Create tracks using drag and drop
- Create tracks using existing channel strips
- Assign tracks to different channel strips
- Choose the default region type for software instrument tracks
- Select tracks
- Duplicate tracks
- Rename tracks
- Change track icons
- Change track colors
- Reorder tracks
- Zoom tracks
- Replace or double drum sounds
- Control timing with the groove track
- Use selection-based processing
- Edit track parameters
-
- Overview
-
- Before recording software instruments
- Play software instruments
- Record software instruments
- Record additional software instrument takes
- Overdub software instrument recordings
- Spot erase software instrument recordings
- Use Note Repeat
- Replace software instrument recordings
- Record to multiple software instrument tracks
- Record multiple MIDI devices to multiple tracks
- Record software instruments and audio simultaneously
- Use step input recording techniques
- Record MIDI messages from another music app
- Route MIDI internally to software instrument tracks
- Use the metronome
-
- Arranging overview
-
- Regions overview
- Select regions
- Select parts of regions
- Cut, copy, and paste regions
- Move regions
- Add or remove gaps
- Delay region playback
- Loop regions
- Repeat regions
- Resize regions
- Mute and solo regions
- Time stretch regions
- Reverse audio regions
- Split regions
- Demix MIDI regions
- Join regions
- Create regions in the Tracks area
- Change the gain of audio regions in the Tracks area
- Normalize audio regions in the Tracks area
- Create aliases of MIDI regions
- Convert repeated MIDI regions to loops
- Change the color of regions
- Convert a MIDI region into a pattern region in Logic Pro for Mac
- Replace a MIDI region with a Session Player region in Logic Pro for Mac
- Convert audio regions to samples for a sampler instrument
- Rename regions
- Delete regions
-
- Chords overview
- Add and delete chords
- Select chords
- Cut, copy, and paste chords
- Move and resize chords
- Loop chords on the Chord track
- Transpose chords
- Edit chords
- Work with chord groups
- Use chord progressions
- Change the chord rhythm
- Choose which chords a Session Player region follows
- Analyze the key signature of a range of chords
- Extract vocal and instrumental stems with Stem Splitter
- Create groove templates
-
- Overview
-
- Add notes
- Select notes
- Snap items to the grid
- Move notes
- Copy notes
- Change the pitch of notes
- Resize notes
- Edit note velocity
- Quantize the timing of notes
- Quantize the pitch of notes
- Change note articulations
- Lock the position of events
- Mute notes
- Change note color
- View note labels
- Delete notes
- Time stretch notes
- View multiple MIDI regions
- Split chords
- Automation/MIDI area in the Piano Roll Editor
- Open other editors
-
- Session Players overview
- The Session Player Editor
- Choose a Session Player type and style
- Chords and Session Players
- Choose Session Player presets
- Regenerate a Session Player performance
- Follow rhythm of chords and other tracks
- Work with Drummer multi-channel kits
- Convert Session Player regions into MIDI or pattern regions
-
- Logic Pro for Mac advanced editors overview
-
- Audio File Editor overview
- Play audio files in the Audio File Editor
- Navigate audio files in the Audio File Editor
-
- Audio File Editor edit commands
- Edit audio files with transient markers
- Use the Audio File Editor Pencil tool
- Trim or silence audio files
- Remove DC offset
- Set audio file levels
- Normalize audio files
- Fade audio files
- Reverse audio and invert phase
- Audio File Editor Loop commands
- Undo Audio File Editor edits
- Backup audio files
- Use an external sample editor
-
- Mixing overview
- Set channel strip input format
- Set channel strip pan or balance positions
- Mute and solo channel strips
- Reorder channel strips in the Mixer
-
- Plug-ins overview
- Add, remove, move, and copy plug-ins
- Search for plug-ins in the Mixer
- Insert a plug-in on a track using drag and drop
- Activate plug-ins on inactive channel strips
- Use the Channel EQ
- Work in the plug-in window
- Work with plug-in settings
- Work with plug-in latencies
- Work with Audio Units in Logic Pro for Mac
- Support for ARA 2 compatible plug-ins
- Use MPE with software instruments
- Use the Plug-in Manager
- Work with channel strip settings
- Surround panning
- Use the I/O Labels window
- Undo and redo Mixer and plug-in adjustments
-
- Smart Controls overview
- Show Smart Controls for master effects
- Choose a Smart Control layout
- Automatic MIDI controller assignment
- Map screen controls automatically
- Map screen controls
- Edit mapping parameters
- Use parameter mapping graphs
- Open the plug-in window for a screen control
- Rename a screen control
- Use articulation IDs to change articulations
- Assign hardware controls to screen controls
- Compare Smart Control edits with saved settings
- Use the Arpeggiator
- Automate screen control movements
-
- Live Loops overview
- Start and stop cells
- Work with Live Loops cells
- Change loop settings for cells
- How the Live Loops grid and Tracks area interact
- Edit cells
- Edit scenes
- Work in the Cell Editor
- Bounce cells
- Record a Live Loops performance
- Change Live Loops grid settings
- Control Live Loops with other devices
-
- Global changes overview
- Control transposition with the Pitch Source parameter
-
- Tempo overview
-
- Smart Tempo overview
- Use free tempo recording
- Choose the Project Tempo mode
- Choose the Flex & Follow setting
- Use Smart Tempo with multitrack audio
- Work in the Smart Tempo Editor
- Improve the tempo analysis using hints
- Correct tempo analysis results using beat markers
- Protect Smart Tempo edits by locking a range
- Match audio recordings to the project tempo
- Match the tempo to an audio region
- Use audio file tempo information
- Record tempo changes
- Use the Tempo Interpreter
- Use the tempo fader
- Control project volume
-
- Overview
- Add notes
-
- Part box overview
- View score symbols
- Select score symbols
- Add notes and rests
- Add notes and symbols to multiple regions
- Add key and time signature changes
- Change the clef sign
- Add dynamic marks, slurs, and crescendi
- Change note heads
- Add symbols to notes
- Add trills, ornaments, and tremolo symbols
- Add sustain pedal markings
- Add chord symbols
- Add chord grids and tablature symbols
- Add bar lines, repeats, and coda signs
- Add page and line break symbols
-
- Select notes
- Move and copy notes
- Change note pitch, duration, and velocity
- Change note articulations
- Quantize the timing of notes
- Restrict note input to the current key
- Control how ties are displayed
- Add and edit tuplets
- Override display quantization using tuplets
- Add grace notes and independent notes
- Delete notes
- Use automation in the Score Editor
-
- Staff styles overview
- Assign staff styles to tracks
- Staff Style window
- Create and duplicate staff styles
- Edit staff styles
- Edit staff, voice, and assign parameters
- Add and delete staffs or voices in the Staff Style window in Logic Pro for Mac
- Copy staffs or voices in the Staff Style window in Logic Pro for Mac
- Copy staff styles between projects
- Delete staff styles
- Assign notes to voices and staffs
- Display polyphonic parts on separate staffs
- Change the staff assignment of score symbols
- Beam notes across staffs
- Use mapped staff styles for drum notation
- Predefined staff styles
- Share a score
-
-
- Key commands overview
- Browse, import, and save key commands
- Assign key commands
- Copy and print key commands
-
- Global Commands
- Global Control Surfaces Commands
- Various Windows
- Windows Showing Audio Files
- Main Window Tracks and Various Editors
- Various Editors
- Views Showing Time Ruler
- Views Showing Automation
- Main Window Tracks
- Live Loops Grid
- Mixer
- MIDI Environment
- Piano Roll
- Score Editor
- Event Editor
- Step Editor
- Step Sequencer
- Project Audio
- Audio File Editor
- Smart Tempo Editor
- Library
- Sampler
- Drum Machine Designer
- Step Input Keyboard
- Smart Controls
- Tool Menu
- Control Surface Install Window
-
- Logic Pro projects
- Various windows
- Controller Assignments window
- Control bar
- Tracks area
- Global tracks
- Automation
- Live Loops grid
- Mixer
- MIDI Environment
- Piano Roll Editor
- Score Editor
- Event List
- Step Editor
- Step Sequencer
- Flex Time
- Audio File Editor
- Smart Tempo Editor
- Surround Panner
- Channel EQ
- Space Designer
- Sampler
- Touch Bar shortcuts
-
-
- Working with your control surface
- Connect control surfaces
- Add a control surface to Logic Pro for Mac
- Automatic assignment for USB MIDI controllers
- Grouping control surfaces
- Control Surfaces settings overview
- Modal dialog display
- Tips for using your control surface
- Supported control surfaces
- Software and firmware for Logic Pro for Mac
-
-
- Environment overview
- Common object parameters
- Customize the Environment
-
-
- Fader objects overview
- Use fader objects
- Play back fader movements
- Work with object groups
- Fader styles
- Fader functions: MIDI events
- Fader functions: range, value as
- Fader functions: filter
- Vector fader
- Special faders overview
- Cable switchers
- Meta event faders
- SysEx faders
- Work with SysEx messages
- Special functions
- Ornament objects
- MMC record buttons
- Keyboard objects
- Monitor objects
- Channel splitter object
- Physical input objects
- Physical input objects
- MIDI click objects
-
-
- Use MIDI plug-ins
-
- Arpeggiator overview
- Arpeggiator control parameters
- Note order parameters overview
- Note order variations
- Note order inversions
- Arpeggiator pattern parameters overview
- Use Live mode
- Use Grid mode
- Arpeggiator options parameters
- Arpeggiator keyboard parameters
- Use keyboard parameters
- Assign controllers
- Modifier controls
- Note Repeater controls
- Randomizer controls
-
- Use Scripter
- Use the Script Editor
- Scripter API overview
- MIDI processing functions overview
- HandleMIDI function
- ProcessMIDI function
- GetParameter function
- SetParameter function
- ParameterChanged function
- Reset function
- JavaScript objects overview
- Use the JavaScript Event object
- Use the JavaScript TimingInfo object
- Use the Trace object
- Use the MIDI event beatPos property
- Use the JavaScript MIDI object
- Create Scripter controls
- Transposer controls
- Record MIDI to Track
-
-
- Alchemy overview
- Alchemy interface overview
- Alchemy Name bar
- Alchemy file locations
-
- Alchemy source overview
- Source master controls
- Import browser
- Source subpage controls
- Source filter controls
- Source filter use tips
- Source elements overview
- Additive element controls
- Additive element effects
- Spectral element controls
- Spectral element effects
- Pitch correction controls
- Formant filter controls
- Granular element controls
- Sampler element controls
- VA element controls
- Wide unison mode
- Source modulations
- Morph controls
- Alchemy master voice section
- Alchemy Extended parameters
-
- ES2 overview
- ES2 interface overview
- ES2 integrated effects processor controls
- Use ES2 in Surround mode
- Extended parameters
-
-
- Sample Alchemy overview
- Interface overview
- Add source material
- Edit mode
- Play modes
- Source overview
- Synthesis modes
- Granular controls
- Additive effects
- Additive effect controls
- Spectral effect
- Spectral effect controls
- Filter module
- Lowpass, bandpass, and highpass filters
- Comb PM filter
- Downsampler filter
- FM filter
- Envelope generators
- Mod Matrix
- Modulation routing
- Motion mode
- Trim mode
- More menu
-
- Sculpture overview
- Sculpture interface
- Global parameters
- Amplitude envelope parameters
- Use the Waveshaper
- Filter parameters
- Output parameters
- Use surround range and diversity
- Define MIDI controllers
- Extended parameters
-
- Studio Piano
-
- Ultrabeat overview
- Ultrabeat interface
- Synthesizer section overview
- Filter section controls
- Distortion circuit controls
- Glossary
- Copyright

Create Ultrabeat kick drums in Logic Pro for Mac
Electronically produced kick drum sounds are based primarily on the sound of a deeply tuned sine wave. Follow the tutorials sequentially to get the most from these examples.
Program a basic kick drum in Ultrabeat
In Logic Pro, choose Settings > Tutorial Settings > Tutorial Kit, and select Standard Tut from the Assignment section.
Note that oscillator 1 is in Phase Oscillator mode.
Find a suitably tuned pitch in the lower octaves by soloing the bass drum along with other important tonal elements of the song (a bass or pad sound, for example). Drag the Osc 1 Pitch slider to adjust the pitch until appropriate.
Use Env 4 to shape the volume of the bass drum.
For slower beats you may want a longer decay phase, whereas at faster tempos a shorter decay time is more appropriate. The attack time of Env 4 should be very short (zero, in most cases) or the sound loses its percussiveness and its ability to be clearly heard in the mix.
Give your drum more kick by controlling the pitch with an envelope
The kick drum still sounds very soft and is somewhat reminiscent of the famous TR-808 bass drum. It’s still missing a clearly defined attack.
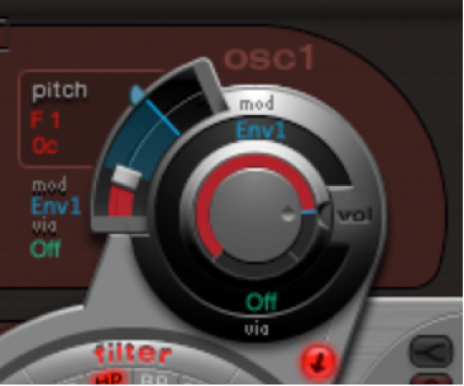
In Logic Pro, make sure that Env 1 is chosen from the mod pop-up menu of the oscillator 1 Pitch parameter.
Set the degree of modulation by dragging the blue Mod slider approximately 3 to 4 octaves above the original pitch.

Set the attack time in Env 1 to 0 by dragging the leftmost of the two junction points on the x-axis all the way to the left.

Experiment with the decay time by dragging the rightmost of the two junction points on the x-axis. You’ll discover that higher decay values (shifting the Bezier handle to the right) result in sounds similar to synth toms, whereas shorter decay values (shifting to the left) provide the kick character.
Change the Mod amount (the blue slider) of Osc 1 Pitch again (see step 2).
The interaction of this parameter with the envelope decay time provides numerous possibilities for shaping the kick or punch of the bass drum sound.
Note: This simple bass drum sound is listed as Kick 1 in the Tutorial Kit, at a pitch of C1.
Reduce kick drum tonality using the 2 Band EQ
One advantage of bass drums based on sine waves is that their sound can be precisely tuned to match the song. The disadvantage is that a recognizable pitch is not always desirable. Ultrabeat offers several methods to reduce the tonality of the sound. A very effective tool is the 2 Band EQ.
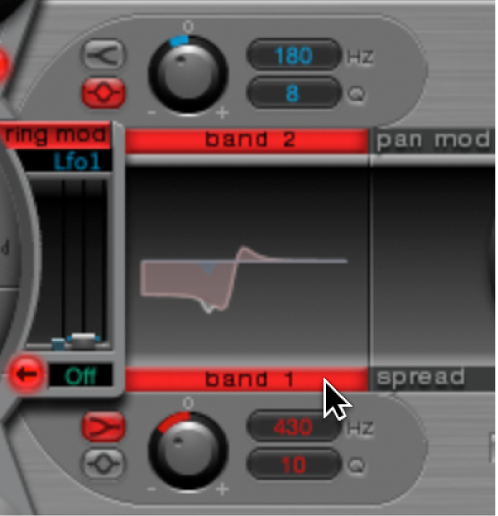
In Logic Pro, for band 1, select the Shelving mode at a frequency of about 80 Hz, a high Q value, and a negative Gain value.
For band 2, select the Peak mode at a frequency of around 180 Hz, a medium Q value, and also a negative Gain value.
On the EQ graph, notice how the frequencies around 80 Hz are boosted, while the surrounding frequencies are reduced.

Vary the frequency of band 2 (easily recognizable in the blue part of the EQ graph) to influence the extent of bass drum tonality.
Reduce kick drum tonality with a lowpass filter
A further method for reducing the tonality of a drum sound that is rich with overtones is to use a lowpass filter. In this example, you will control the cutoff frequency of the filter with an envelope.
In Logic Pro, reload the Standard Tutorial sound, choose A#0 as the basic pitch in oscillator 1, and modulate it with Env 1.
Increase the Saturation parameter value to enhance the overtones of the drum sound.
Note that the output of Osc 1 is directed to the filter, because the filter bypass button (the arrow between Osc 1 and the filter) is activated.
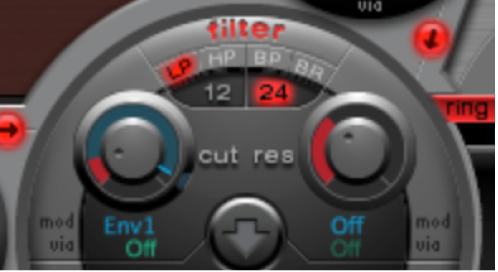
Set Filter type to LP 24.
Set Cutoff value to 0.10.
Set Mod Source for Cut to Env 3.
Set Mod Amount for Cut to 0.60.
Set Resonance to 0.30.

Set the Attack time of Env 3 to 0. Use the Decay time of Env 3 to shape the sound of the filtered bass drum.
You may also choose to control the filter resonance with an envelope. Make sure you dedicate a single envelope to this function (in this case, use Env 2 as a Mod source for Res). Choose a Mod amount for Res of about 0.80. Select a longer decay time in Env 2 than in Env 3 and listen carefully to the fatter and more atonal bass drum sound achieved through this Res modulation (due to the higher filter resonance).
Note: The bass drum described in the above example is listed as Kick 2 in the Tutorial Kit, at a pitch of C#1. It also features an interesting EQ setting, as described in “Add body and bite to your kick drum”.
Add body and bite to your kick drum
In Logic Pro, do any of the following:
Add some bass to your sound:
Use the Kick 2 filtered bass drum sound as a starting point, and try out the remaining parameters in the phase oscillator. You will discover that high saturation values make the sound rounder and add more bass, for example. The character of the example is beginning to head in the direction of a TR-909.
Enhance the attack transients of your sound:
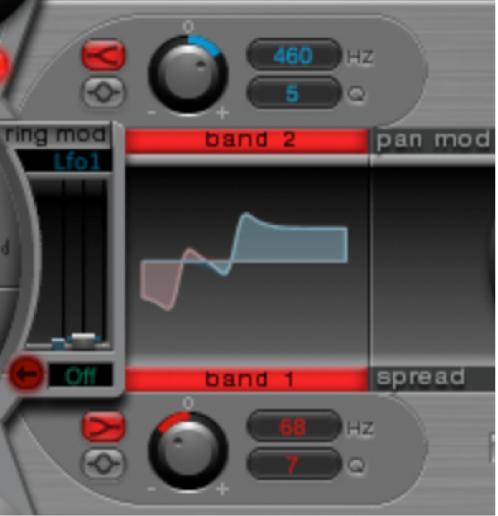
To get even closer to the TR-909, use an EQ setting as shown in the following figure. Note that the low frequency pressure point around 60 Hz (in the red area on the EQ graph) as well as the assertive punch or kick (the blue area starting at 460 Hz and up) of a 909 bass drum are strengthened. (This EQ setting is already part of the Kick 2 setting.)

Use envelopes to change the color of your sound:
In the example, all four envelope are being used. Take some time to play with the shapes of the envelopes, while maintaining the attack and decay settings. Experiment with the junction points of the decay phase in the different envelopes to familiarize yourself with the sound-shaping options available. Start with the decay phase of Env 4, which controls both the volume of oscillator 1 and filter resonance, and observe how reshaping the belly of the envelope can change the character of the sound from crisp and short to round and full.
Create an LFO-modulated “Ultrabeat” kick drum
You can create bass drum sounds that are uniquely “Ultrabeat.” Try modulating pitch with an LFO instead of an envelope, for example.
In Logic Pro, start with the Standard Tutorial sound at a pitch of A#0 (Osc 1 Pitch), and choose LFO 1 as the Mod source in the Osc 1 Pitch section.
Set the degree of modulation by dragging the blue Mod slider to a value of A3.
Set LFO 1 to a low number of Cycles (25 to 35), a high Rate (starting with 70 Hz and higher) and a medium value for Decay (set the Ramp knob to about −190).
Experiment with the LFO waveform and you’ll discover that you can attain different nuances in the character of the bass drum attack.
Modulate the Asym(metry) parameter with the same LFO, and also vary the Slope and Saturation values.
This method enables you to create very different bass drum sounds with a single oscillator, one LFO, and one envelope (for volume). The character of the sounds can range from soft to punchy, and the degree of tonality in the sound can be adjusted to taste.
Note: The bass drum sound described is listed as Kick 3 in the Tutorial Kit, at a pitch of D1.
Use the second oscillator (with similar settings or with a sample), or use the filter and the ring modulator—the sky’s the limit as far as your imagination is concerned, so go ahead and create that next “gotta have it” drum sound.
Note: You can find an “emulation” of the legendary 808 bass drum in Kick 4 in the Tutorial Kit, at a pitch of D#1.