Get driving directions in Maps on iPad
In the Maps app ![]() , you can get detailed driving directions to your destination.
, you can get detailed driving directions to your destination.
When you drive in select cities, you see enhanced details for crosswalks, bike lanes, buildings, and a street-level perspective that helps you find the right lane as you approach complex interchanges (supported models). See the iOS and iPadOS Feature Availability website.
Note: Features for Wi-Fi + Cellular models require a cellular data plan and Cellular Data turned on in Settings ![]() > Maps.
> Maps.
Note: Turn-by-turn spoken directions are not available in all countries or regions. See the iOS and iPadOS Feature Availability website.
Get directions for driving
Do one of the following:
Say something like “Hey Siri, give me driving directions home.” Learn how to ask Siri.
Tap your destination (such as a search result in Maps or a landmark on a map), or touch and hold anywhere on the map, then tap the directions button.
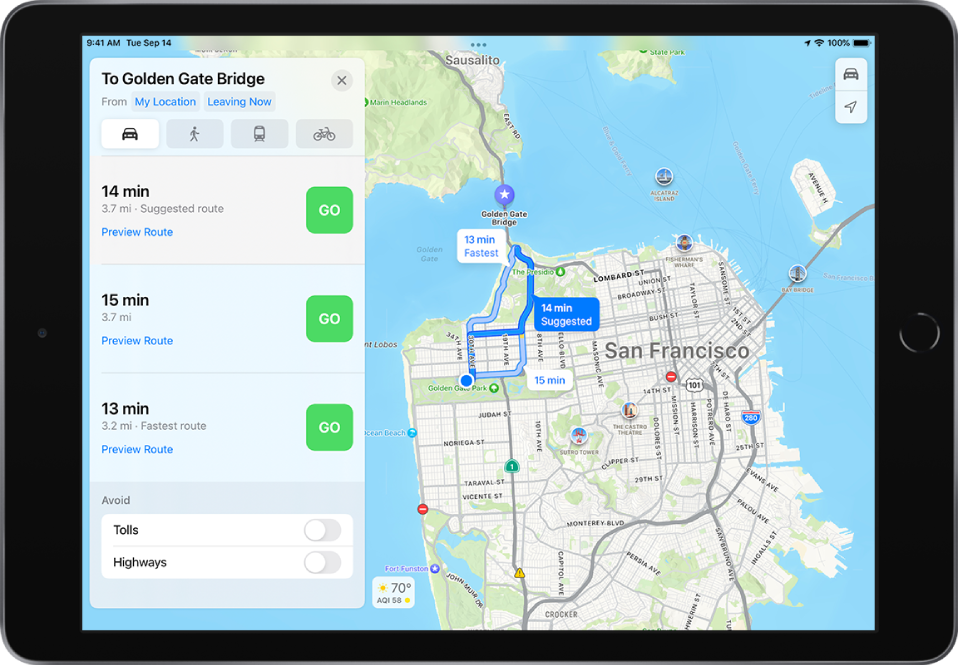
When a suggested route appears, you can do any of the following:
Switch to driving directions: If driving isn’t your default mode of travel or if you’re viewing a transit map, tap
 to see a suggested driving route.
View a route’s directions in a list: On the route card, tap the route’s estimated travel time so that the route appears at the top of the card, then tap the estimated travel time again. This list is especially helpful if you know you’ll lose your internet connection on your route, because you can refer to these directions even after you lose your connection.
To share the directions, scroll to the bottom of the card, then tap Share.
Choose a future departure or arrival time: Tap Leaving Now (near the top of the route card), select a time or date for departure or arrival, then tap Done. The estimated travel time may change based on predicted traffic.
Avoid tolls or highways: Scroll to the bottom of the route card, then turn on an option.
Choose other route options: You can reverse the starting point and destination, select a different starting point or destination, and more. See Select other route options in Maps on iPad.
Tap Go for the route you want.
On Wi-Fi only models, Maps shows turn directions in a banner at the top left. To see the next direction, swipe the banner left. To view a list of upcoming directions or to end directions, tap the route card at the bottom of the screen, then tap Details or End Route.
On Wi-Fi + Cellular models, Maps speaks turn-by-turn directions to your destination. While following the route, you can share your ETA, turn off spoken directions, find a place to stop, and more. See Things you can do while following a route in Maps on iPad. When Driving Focus is turned on, or if iPad locks automatically, Maps remains onscreen and continues to speak directions. Even if you open another app, you continue to receive turn-by-turn directions. (To return to Maps from another app, tap the directions banner at the top of the screen or the navigation indicator
 in the status bar.)
Show or hide the compass or the speed limit (Wi-Fi + Cellular models)
Go to Settings ![]() > Maps, tap Driving (below Directions), then turn Compass or Speed Limit on or off.
> Maps, tap Driving (below Directions), then turn Compass or Speed Limit on or off.