Final Cut Pro User Guide for Mac
- Welcome
- What’s new
-
- Intro to effects
-
- Intro to transitions
- How transitions are created
- Add transitions and fades
- Quickly add a transition with a keyboard shortcut
- Set the default duration for transitions
- Delete transitions
- Adjust transitions in the timeline
- Adjust transitions in the inspector and viewer
- Merge jump cuts with the Flow transition
- Adjust transitions with multiple images
- Modify transitions in Motion
-
- Add storylines
- Use the precision editor
- Conform frame sizes and rates
- Use XML to transfer projects
- Glossary
- Copyright

Add video transitions and fades in Final Cut Pro for Mac
You can choose from a large selection of video transitions (such as dissolves or wipes) to add between clips, or quickly add a fade-in or fade-out effect. You can also easily copy a transition from one edit point in your project to another.
Tip: Save time by using a keyboard shortcut to add transitions. See Quickly add a transition with a keyboard shortcut in Final Cut Pro for Mac.
Add or change a transition between clips
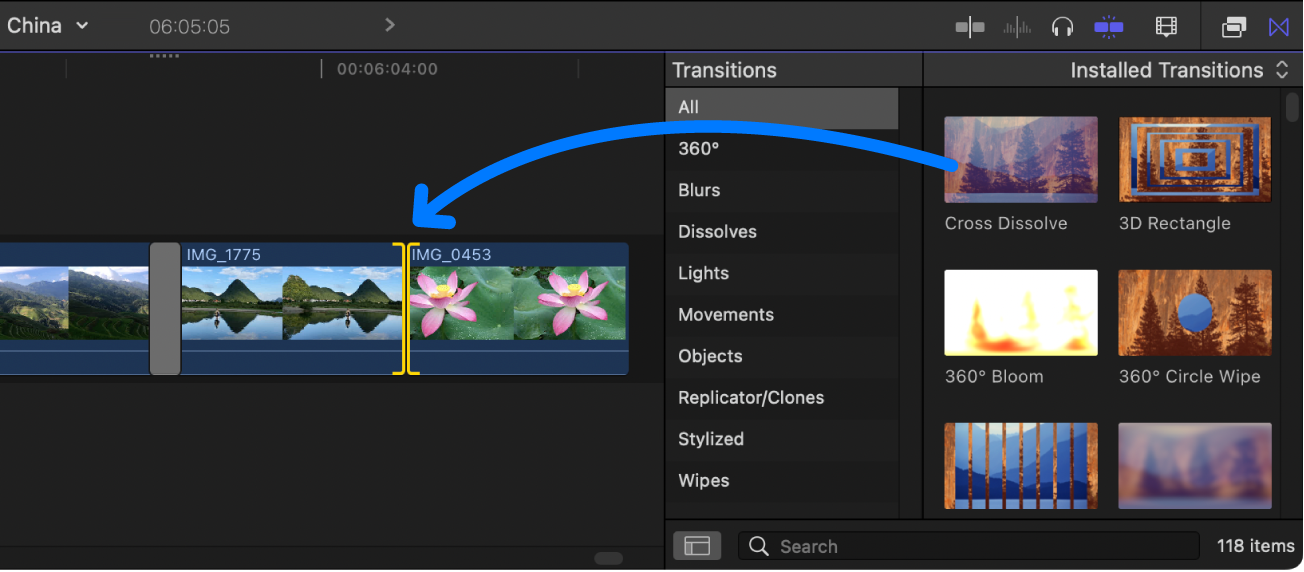
In Final Cut Pro, click the Transitions button in the top-right corner of the timeline (or press Control-Command-5).

In the Transitions browser, select a transition.
Move the pointer over the transition thumbnails to see an example of what the transition looks like. To filter the list of transition names that appear, type text in the search field.
Note: If you don’t see the transition you’re looking for, you can use the Filter pop-up menu at the top of the Transitions browser to check for it in other locations. See Filter Motion content stored in a library.
Do one of the following:
Apply the transition to an edit point: Drag the transition to the edit point.

Replace an existing transition in your project: Drag the transition on top of the existing transition.
Alternatively, you can select the edit point first, then double-click a transition in the Transitions browser to apply the transition.
Final Cut Pro creates the transition at the edit point using media handles. If the video clip has attached audio, a crossfade transition is applied to the audio.
Tip: You can use the Cross Dissolve transition to quickly create a “fade up from black” effect at the beginning of a clip or project or a “fade to black” effect at the end. See Quickly create a fade-in or fade-out effect, below.
Quickly create a fade-in or fade-out effect
You can use the Cross Dissolve transition to quickly create a “fade in from black” effect at the beginning of your project or a “fade to black” effect at the end. (Fade effects commonly appear at the beginning or end of a movie or TV show.)
Note: These instructions describe a quick way to create a fade effect, but this method doesn’t allow for fine-tuning. For more precise control over the fade, use keyframes to change the opacity over time. See Intro to video keyframing in Final Cut Pro for Mac and Add video effect keyframes in Final Cut Pro for Mac.
In Final Cut Pro, add one or more clips to the timeline.
Do one of the following:
Create a fade-in: Select the start point of the first clip in the timeline.
Create a fade-out: Select the end point of the last clip in the timeline.
Do one of the following:
Choose Edit > Add Cross Dissolve (or press Command-T) to add the default Cross Dissolve transition to the selection. To change the default transition, see Set the default transition.
Click the Transitions button in the top-right corner of the timeline (or press Control-Command-5), then drag the Cross Dissolve transition from the Transitions browser to the selection.

Make adjustments to the Cross Dissolve transition, as needed.
See Adjust transitions in the timeline in Final Cut Pro for Mac and Adjust transitions in the inspector and viewer in Final Cut Pro for Mac.
Final Cut Pro creates the transition at the edit point using media handles. If the video clip has attached audio, a crossfade transition is applied to the audio.
Note: If you want to include connected clips in the fade effect, select them along with the original clip and make a compound clip before applying the Cross Dissolve transition.
Copy a transition to other edit points
After you add a transition to your project and make adjustments to it, you can reuse it anywhere else in your project.
In Final Cut Pro, select a transition in the timeline.
Do one of the following:
Choose Edit > Copy (or press Command-C), click the edge of a clip (an edit point) in the timeline, then choose Edit > Paste (or press Command-V).
Hold down the Option key and drag the transition to another edit point.
If you copy a transition to an edit point that already has a transition, the existing transition is overwritten.
Note: If you extend a clip to its maximum length in either direction, the clip edge turns red. You may need to trim (shorten) the clip to create the media handle necessary to create a transition. See How transitions are created in Final Cut Pro for Mac.
Download this guide: Apple Books | PDF