Logic Pro User Guide for iPad
- What’s new in Logic Pro 1.1
-
- What is Logic Pro?
- Working areas
- Work with function buttons
- Work with numeric values
-
- Intro to tracks
- Create tracks
- Create tracks using drag and drop
- Choose the default region type for a software instrument track
- Select tracks
- Duplicate tracks
- Reorder tracks
- Rename tracks
- Change track icons
- Change track colors
- Use the tuner on an audio track
- Show the output track in the Tracks area
- Delete tracks
- Edit track parameters
- Start a Logic Pro subscription
- How to get help
-
- Intro to recording
-
- Before recording software instruments
- Record software instruments
- Record additional software instrument takes
- Record to multiple software instrument tracks
- Record multiple MIDI devices to multiple tracks
- Record software instruments and audio simultaneously
- Merge software instrument recordings
- Spot erase software instrument recordings
- Replace software instrument recordings
- Capture your most recent MIDI performance
- Use the metronome
- Use the count-in
-
- Intro to arranging
-
- Intro to regions
- Select regions
- Cut, copy, and paste regions
- Move regions
- Remove gaps between regions
- Delay region playback
- Trim regions
- Loop regions
- Repeat regions
- Mute regions
- Split and join regions
- Stretch regions
- Separate a MIDI region by note pitch
- Bounce regions in place
- Change the gain of audio regions
- Create regions in the Tracks area
- Convert a MIDI region to a Drummer region or a pattern region
- Rename regions
- Change the color of regions
- Delete regions
- Create fades on audio regions
- Access mixing functions using the Fader
-
- Intro to Step Sequencer
- Use Step Sequencer with Drum Machine Designer
- Record Step Sequencer patterns live
- Step record Step Sequencer patterns
- Load and save patterns
- Modify pattern playback
- Edit steps
- Edit rows
- Edit Step Sequencer pattern, row, and step settings in the inspector
- Customize Step Sequencer
-
- Effect plug-ins overview
-
- Instrument plug-ins overview
-
- ES2 overview
- Interface overview
-
- Modulation overview
-
- Vector Envelope overview
- Use Vector Envelope points
- Use Vector Envelope solo and sustain points
- Set Vector Envelope segment times
- Vector Envelope XY pad controls
- Vector Envelope Actions menu
- Vector Envelope loop controls
- Vector Envelope release phase behavior
- Vector Envelope point transition shapes
- Use Vector Envelope time scaling
- Use the Mod Pad
- Modulation source reference
- Via modulation source reference
-
- Sample Alchemy overview
- Interface overview
- Add source material
- Save a preset
- Edit mode
- Play modes
- Source overview
- Synthesis modes
- Granular controls
- Additive effects
- Additive effect controls
- Spectral effect
- Spectral effect controls
- Filter module
- Low and highpass filter
- Comb PM filter
- Downsampler filter
- FM filter
- Envelope generators
- Mod Matrix
- Modulation routing
- Motion mode
- Trim mode
- More menu
- Sampler
- Copyright
ES2 integrated effects processor in Logic Pro for iPad
ES2 is equipped with an integrated effects processor. Any changes to the parameters of these effects are saved with each sound setting.

You can activate only two effects at the same time.
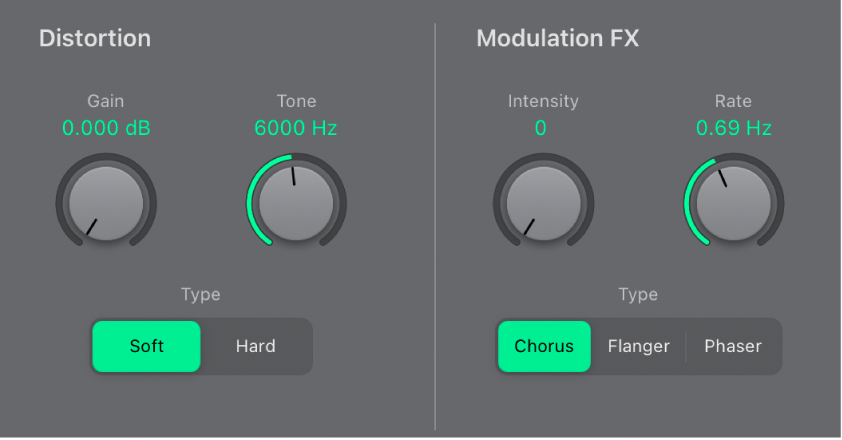
The Distortion circuit.
Your choice of a Chorus, Flanger, or Phaser effect. These effects share the same control knobs—Intensity and Speed.
A chorus effect is based on a delay line, the output of which is mixed with the original, dry signal. The short delay time is modulated periodically, resulting in pitch deviations. The modulated deviations, in conjunction with the original signal pitch, produce the chorus effect.
A flanger works in a similar fashion to a chorus, but with even shorter delay times. The output signal is fed back into the input of the delay line. This feedback results in the creation of harmonic resonances that wander cyclically through the spectrum, giving the signal a “metallic” sound.
A phaser mixes a delayed and an original signal. The delayed element is derived from an allpass filter, which applies a frequency-dependent delay to the signal. This is expressed as a phase angle. The effect is based on a comb filter, which is basically an array of inharmonic notches—rather than resonances, as with the flanger—that also wanders through the frequency spectrum. This delivers a “sweeping” sound.
Distortion effect parameters
Gain knob and field: Set the amount of distortion. Turn this knob to zero to disable the effect.
Tone knob and field: Control the treble portion of the distortion signal.
Type buttons: Choose the distortion type.
Soft button: Activate the Distortion effect Soft mode. The distortion circuit sounds somewhat like a tube overdrive.
Hard button: Activate the Distortion effect Hard mode. The distortion effect sounds like a fully transistorized fuzz box.
Modulation FX parameters
Intensity knob and field: Set the depth of the effect. Turn this knob to zero to turn off the effect.
When the Chorus type is active: Set how rich the modulation is.
When the Flanger type is active: Set how “cutting” the modulation is.
When the Phaser type is active: Set the depth of the “sweeping” effect—the width of the modulation.
Rate knob and field: Set the modulation rate.
Type buttons: Choose the effects processor.
Download this guide: PDF