Final Cut Pro User Guide
- Welcome
-
- What’s new in Final Cut Pro 10.5.3
- What’s new in Final Cut Pro 10.5
- What’s new in Final Cut Pro 10.4.9
- What’s new in Final Cut Pro 10.4.7
- What’s new in Final Cut Pro 10.4.6
- What’s new in Final Cut Pro 10.4.4
- What’s new in Final Cut Pro 10.4.1
- What’s new in Final Cut Pro 10.4
- What’s new in Final Cut Pro 10.3
- What’s new in Final Cut Pro 10.2
- What’s new in Final Cut Pro 10.1.2
- What’s new in Final Cut Pro 10.1
- What’s new in Final Cut Pro 10.0.6
- What’s new in Final Cut Pro 10.0.3
- What’s new in Final Cut Pro 10.0.1
-
- Intro to effects
-
- Intro to transitions
- How transitions are created
- Add transitions
- Set the default transition
- Delete transitions
- Adjust transitions in the timeline
- Adjust transitions in the inspector and viewer
- Merge jump cuts with the Flow transition
- Adjust transitions with multiple images
- Modify transitions in Motion
-
- Add storylines
- Use the precision editor
- Conform frame sizes and rates
- Use XML to transfer projects
-
- Glossary
- Copyright

Export HDR files with Final Cut Pro
Directly within Final Cut Pro, you can create high-dynamic-range (HDR) files suitable for certain HDR televisions and displays. Specifically, you can use Final Cut Pro to create HDR10 and HLG movie files.
HDR10 is most commonly used for streaming and for output on Blu-ray discs.
HLG is useful for broadcast and live TV. An advantage of HLG is that you don’t need an HDR TV to view the content. You can view it on a legacy standard-dynamic-range (SDR) TV that isn’t designed to work with HLG or HDR, and the image will have acceptable quality. However, if an HDR-capable TV detects the relevant metadata in the HLG file, it will play back the file in HDR.
Export an HDR10 file
In the Final Cut Pro browser, select the project you want to export.
If the inspector isn’t already shown, do one of the following:
Choose Window > Show in Workspace > Inspector (or press Command-4).
Click the Inspector button on the right side of the toolbar.

Set the color processing for the library to Wide Gamut HDR.
Set the project color space to Wide Gamut HDR - Rec. 2020 PQ.
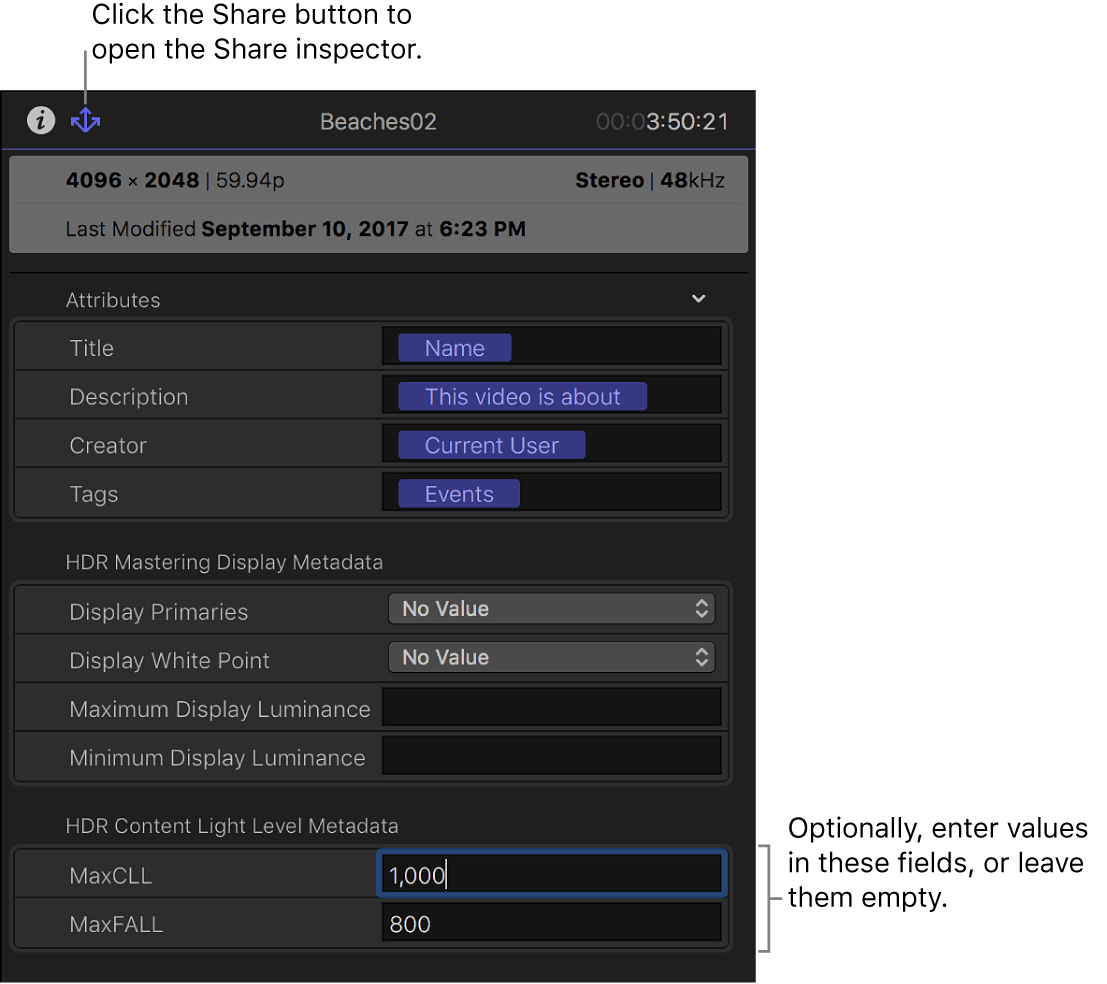
With the project still selected in the browser, click the Share button at the top of the inspector.
The Share inspector appears.

In the HDR Content Light Level Metadata section of the inspector, enter values based on the content of your program and the specifications of the target device.
If you’re not sure of the proper values to enter, leave the fields empty.
MaxCLL (Maximum Content Light Level): Enter the level, in nits, of the brightest pixel component in the program.
For example, if the peak brightness (maximum luminance) of the target television or display is 1000 nits, you can apply the HDR Tools effect to the entire project, with the effect configured to convert to a maximum Rec. 2020 PQ output level of 1000 nits. In this case, you would enter 1000 for MaxCLL. For more information about the HDR Tools effect, see Convert or adjust HDR clips in Final Cut Pro.
MaxFALL (Maximum Frame Average Light Level): Enter the value, in nits, for the frame in your program with the highest average brightness level.
If you know the characteristics of your mastering display (the reference monitor you use tasks such as color correction that require maximum color and brightness accuracy), enter the values in the HDR Mastering Display Metadata section.
For example, if you’re mastering with a Sony BVM-X300 monitor, you would enter the following:
Display Primaries: Rec. 2020
Display White Point: D65
Maximum Display Luminance: 1000
Minimum Display Luminance: 0 or 0.0001
If you’re not sure of the proper values to enter, leave the fields empty.
HDR files require a 10-bit or higher codec, such as Apple ProRes.
Note: Check the “Color space” field in the Settings pane of the Share window before you export to ensure that the project color space is set to Wide Gamut HDR - Rec. 2020 PQ.
Export an HLG file
In the Final Cut Pro browser, select the project you want to export.
If the inspector isn’t already shown, do one of the following:
Choose Window > Show in Workspace > Inspector (or press Command-4).
Click the Inspector button on the right side of the toolbar.

Set the color processing for the library to Wide Gamut HDR.
Set the project color space to Wide Gamut HDR - Rec. 2020 HLG.
HDR files require a 10-bit or higher codec, such as Apple ProRes.
Note: Check the “Color space” field in the Settings pane of the Share window before you export to ensure that the project color space is set to Wide Gamut HDR - Rec. 2020 HLG.
Final Cut Pro does not support the creation of other HDR formats, such as HDR10+, Dolby Vision, and Advanced HDR, but you can use Final Cut Pro to export an HDR movie with the Rec. 2020 PQ standard and then use other color grading software to generate the necessary metadata for these formats.
You can, however, share your project in Dolby Vision 8.4, a format designed to optimize HDR content for Apple devices. See Share to Apple devices with Final Cut Pro and this Apple Support article.
For more detailed information about color spaces and wide-gamut HDR, see HDR and Wide Color Gamut in Final Cut Pro.