
Set up Messages on Mac
If you have an Apple Account, you can use iMessage—a secure messaging service—to send unlimited messages to anyone using iMessage on their Apple device. Messages sent using iMessage appear in blue text bubbles.
If you have an iPhone, you can also send SMS, MMS, or RCS text messages to any mobile phone from your Mac. (Availability may depend on your carrier, country, or region.) Messages sent using SMS, MMS, and RCS appear in green text bubbles.
Get messages on your Mac using iMessage
Go to the Messages app
on your Mac.Enter your Apple Account email address or phone number, then click Sign In. Make sure to sign in to the same Apple Account on every device.
Enter your Apple Account password, then click Sign In.
Choose Messages > Settings, click iMessage, then do any of the following:
Store your messages in iCloud: Select Enable Messages in iCloud. See Set up iCloud for Messages on all your devices in the iCloud User Guide.
Note: You can also turn Messages in iCloud on or off in iCloud settings. See Change iCloud settings.
Choose your email addresses or phone numbers for sending and receiving messages: Select options below “You can be reached for messages at” for incoming messages, then, if you selected more than one option, click the pop-up menu below “Start new conversations from” to specify which email address or phone number to use for new, outgoing messages.
Note: The phone number or email you select is what others see before you share your name and photo.
See the Apple Support article Add or remove your phone number in Messages or FaceTime.
Let senders know when you read their messages: Select “Send read receipts.” See Turn read receipts on or off.
If you don't want to see messages on your Mac, you can sign out of iMessage. Choose Messages > Settings, then click iMessage. Click Sign Out, then confirm that you want to sign out.
Note: If you want to stop receiving messages sent to your phone number, deselect the phone number below "You can be reached for messages at." See the Apple Support article Add or remove your phone number in Messages or FaceTime.
Get SMS, MMS, and RCS texts from iPhone
When you sync SMS, MMS, or RCS text messages on your iPhone and Mac, these messages appear on both devices. You can also send and receive these messages from your Mac. When you send a message to someone who uses a phone that’s not an iPhone, your message is sent as an SMS, MMS, or RCS message.
Note: Availability varies by region and carrier.

Important: To receive and send SMS, MMS, or RCS messages on your Mac, you must be signed in to the same Apple Account and be using iMessage on your iPhone and Mac. See the Apple Support article Continuity features and requirements for Apple devices.
Go to the Messages app
on your Mac.Choose Messages > Settings, then click iMessage and make sure you’re signed in.
On your iPhone, go to the Settings app
 , tap Apps, tap Messages, then turn on iMessage.
Tap Send & Receive, then make sure the Apple Account selected below “Start new conversations from” is the same Apple Account you’re signed in to on your Mac.
Tap
 , then tap Text Message Forwarding.
Note: If you don’t see Text Message Forwarding, make sure you’re signed in to the same Apple Account on both your iPhone and your Mac.
In the list of devices, turn on your Mac.
All messages you send or receive appear on both devices, even if you’re texting someone without an iPhone.
Set up name and photo sharing
You can use a custom photo or a Memoji to add personality and emotions to your texts. Messages shares your name and photo automatically,* or prompts you before you share them in a new conversation, like this:

Go to the Messages app
on your Mac.Choose Messages > Settings, then click General.
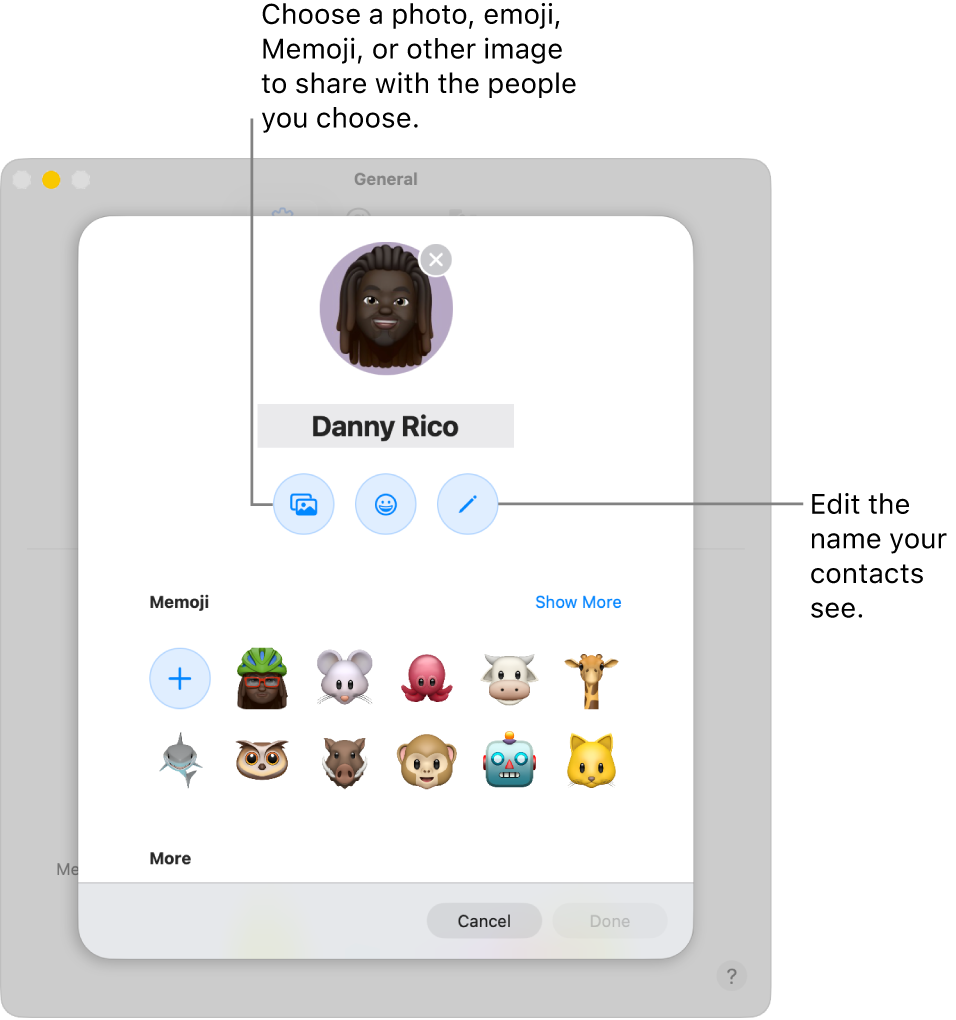
Click Set up Name and Photo Sharing, then follow the onscreen instructions to customize the following:
Photo: Choose a default option, or choose Customize to select a photo, emoji, monogram, or personalized Memoji.
Name: Enter your name the way you want it displayed.
To change who you share your name and photo with, click the Share Automatically pop-up menu, then choose one of the following:
Contacts Only: Your name and photo are shared in conversations with your contacts automatically.
Always Ask: Messages prompts you for each conversation, verifying that you want to share your name and photo.
Click Done.

To stop sharing your name and photo, choose Messages > Settings, click General, deselect the Share Name and Photo option, then click Stop Sharing.
Note: When you share your name and photo in Messages, your contacts are prompted to update your contact card in the Contacts app. They won’t see your new information until they do.