
Sync and adjust camera angles in Final Cut Pro
You can open multicam clips in the angle editor to adjust the sync and the angle order, set the monitoring angle (the angle you see in the viewer when the multicam clip is playing back in the angle editor), or add or delete angles. You can also edit the individual clips inside a multicam clip (similar to how you can edit the contents of a compound clip). The many changes you can make in the angle editor include basic edits and trimming as well as effects you would normally add in the timeline, such as color corrections and transitions.
Note: When you open any multicam clip in the angle editor (whether from the browser or the timeline) you’re actually opening the parent multicam clip. Any changes you make in the angle editor are propagated to all child clips of that multicam clip, in every project. See Create multicam clips in Final Cut Pro.
You can’t cut and switch between angles in the angle editor. You also can’t connect clips, solo clips, use the precision editor, perform ripple deletes, or use the Detach Audio and Break Apart Clip Items commands.
Tip: Before you edit multicam clips in the angle editor, duplicate them in the browser to maintain clean backup copies.
Open a multicam clip in the angle editor
In Final Cut Pro, do one of the following:
Double-click a multicam clip in the browser.
Control-click a multicam clip in the browser or the timeline, and choose Open in Angle Editor.
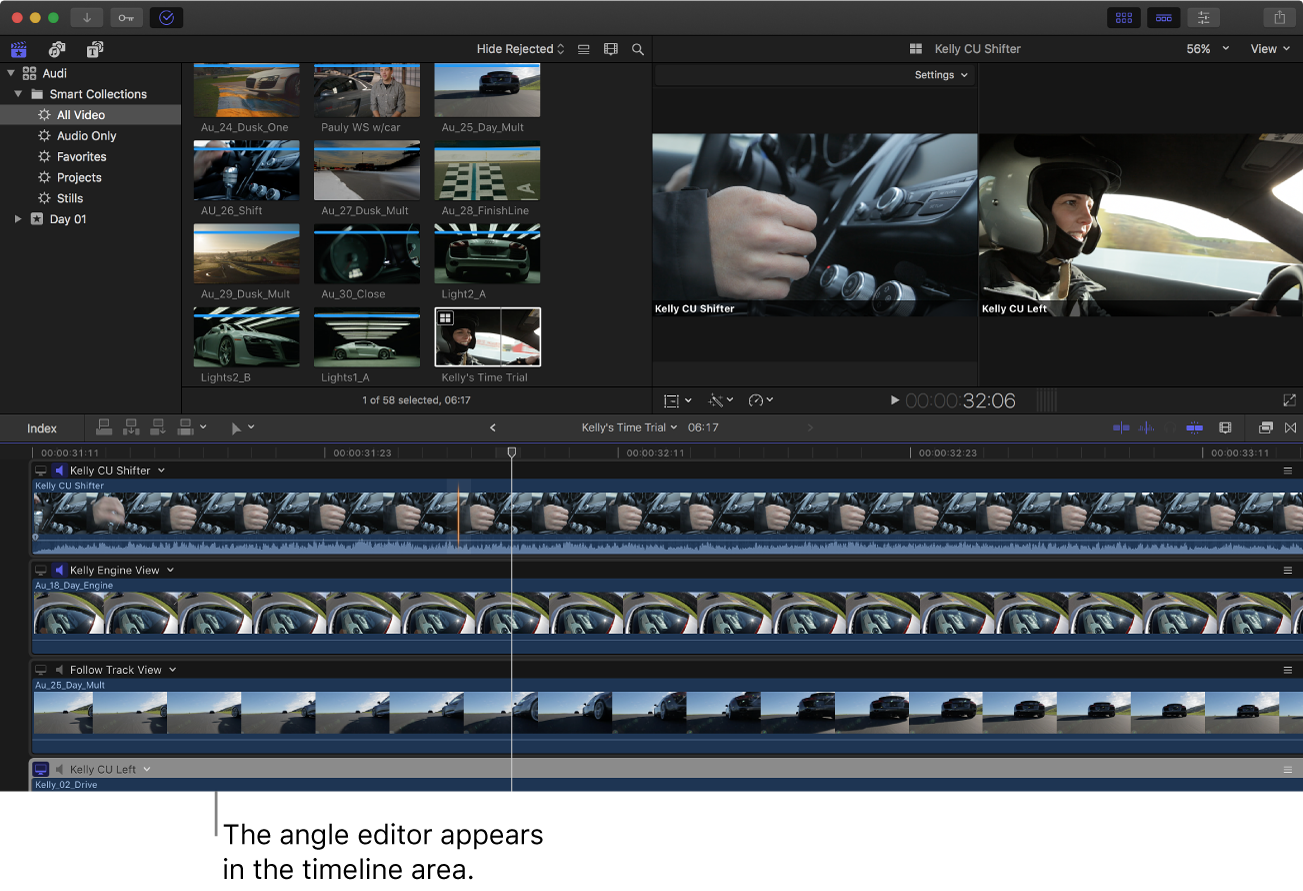
The angle editor opens in the timeline area at the bottom of the Final Cut Pro window. Although similar to the timeline, the angle editor provides a separate interface dedicated to editing angles and clips inside multicam clips. Each angle in the multicam clip appears as a separate row in the angle editor.
Set video and audio monitoring in the angle editor
In the angle editor, you can set any one angle to be the monitoring angle. This is the angle you see in the viewer when the multicam clip is playing back in the angle editor. You can also monitor the audio of any number of angles at once.
You use the monitoring angle to sync angles in the angle editor. The monitoring angle is not the same thing as the active angle (which you see in the timeline).
Note: Setting the correct monitoring angle is important for the two sync commands described later in this section: Sync to Monitoring Angle and Sync Angle to Monitoring Angle.
To open the Final Cut Pro angle editor, do one of the following:
Double-click a multicam clip in the browser.
Control-click a multicam clip in the browser or the timeline, then choose Open in Angle Editor.
To set an angle as the monitoring angle, do one of the following:
Click the Video Monitor button at the left side of the angle.
Click the pop-up menu next to the angle name and choose Set Monitoring Angle.
Press Shift-V while skimming the angle.
The Video Monitor button becomes highlighted, and the entire angle is highlighted in light gray. The angle plays in the viewer when you play back the multicam clip in the angle editor. Only one angle can be the video monitoring angle at a time.
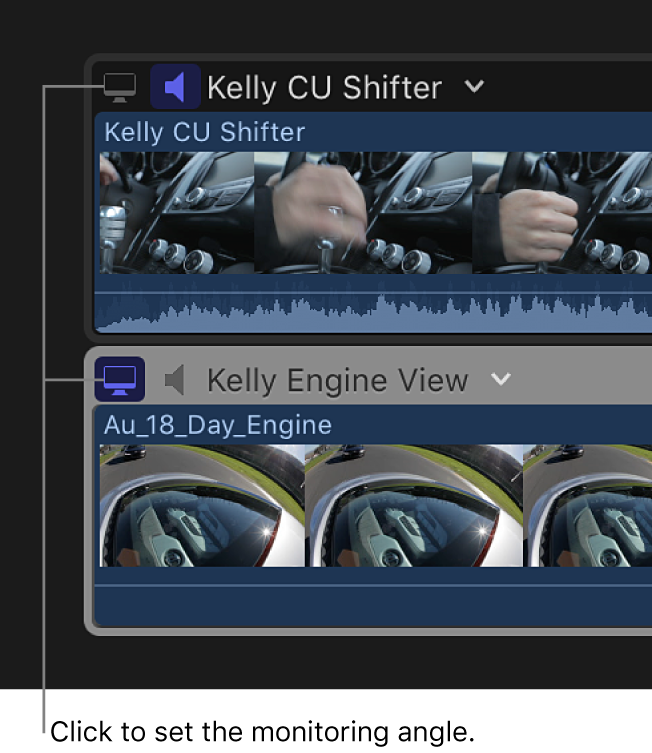
To turn on audio monitoring for an angle, do one of the following:
Click the Audio Monitor button once. (To turn off audio monitoring, click the button again.)
Click the pop-up menu next to the angle name and choose Monitor Audio. (To turn off audio monitoring, choose Monitor Audio again.)
Press Shift-A while skimming the angle. (To turn off audio monitoring, press Shift-A again.)
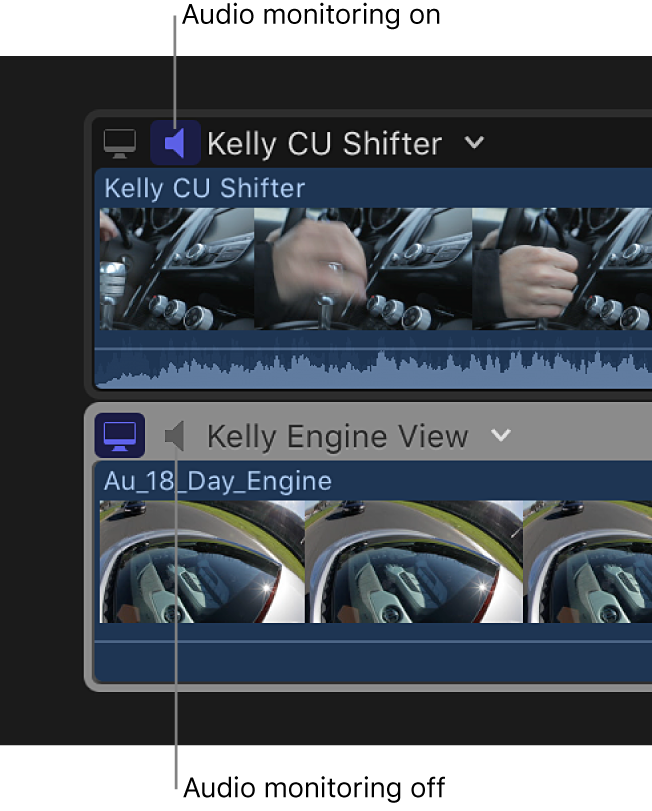
The monitoring settings don’t affect any of your active angles. They simply change what’s playing back in the viewer while you’re working in the angle editor.
Tip: You can use audio monitoring to double-check the sync of individual angles in a multicam clip. Open the clip in the angle editor, then turn on audio monitoring for two or more angles at a time. You’ll hear immediately if the angles are in sync or if you need to adjust them further.
Manually adjust the sync of a multicam clip
A primary function of the angle editor is to provide an easy way to correct out-of-sync angles in your multicam clips. The instructions below describe how to sync angles by locating sync points and then manually dragging the angles into alignment.
To open the Final Cut Pro angle editor, do one of the following:
Double-click a multicam clip in the browser.
Control-click a multicam clip in the browser or the timeline, then choose Open in Angle Editor.
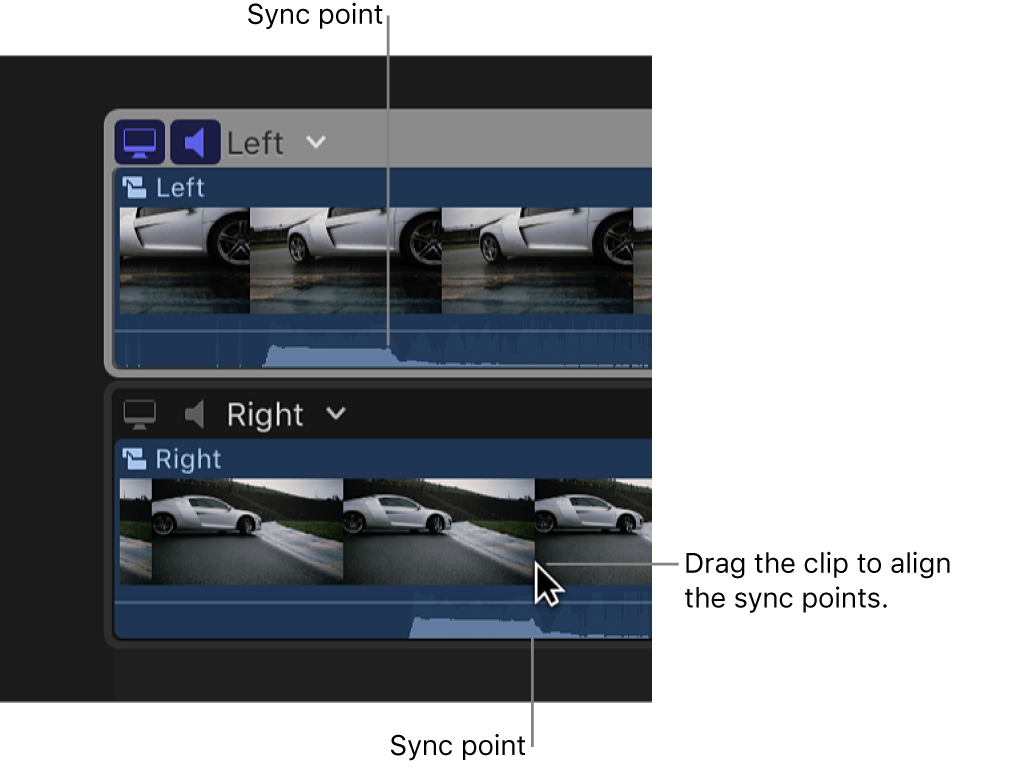
Locate a sync point in one of the out-of-sync angles by skimming the angle in the angle editor.
As you skim, the angle is displayed in the left side of the viewer (in place of the angle viewer). The sync points could be video or audio cues (such as a clapboard closing or a door slam).
Locate the corresponding sync point in one or more angles that you want to sync to the original angle.
To simplify this process, you can add markers at the sync points, to guide you visually and to provide snap points.
Drag the clips left or right in the rows of the angle editor so that the sync points align vertically.
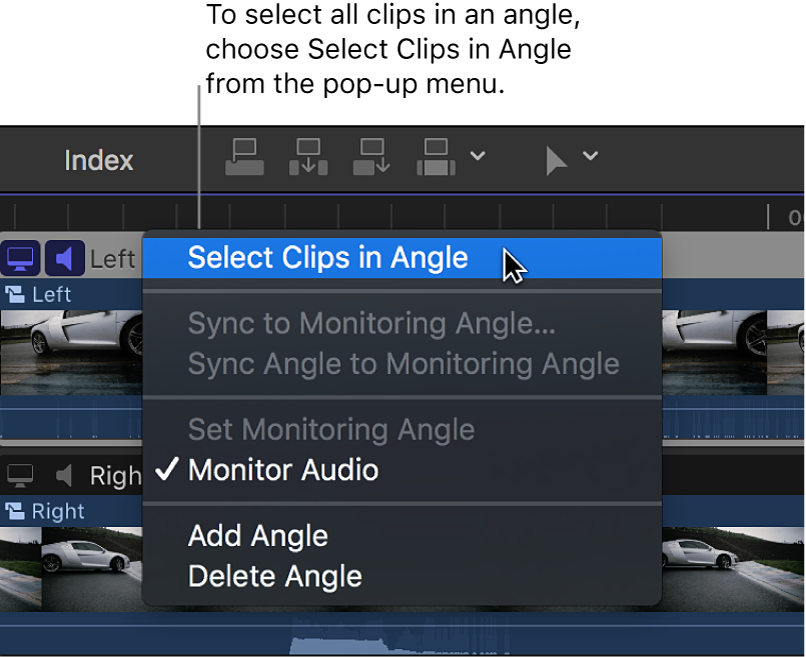
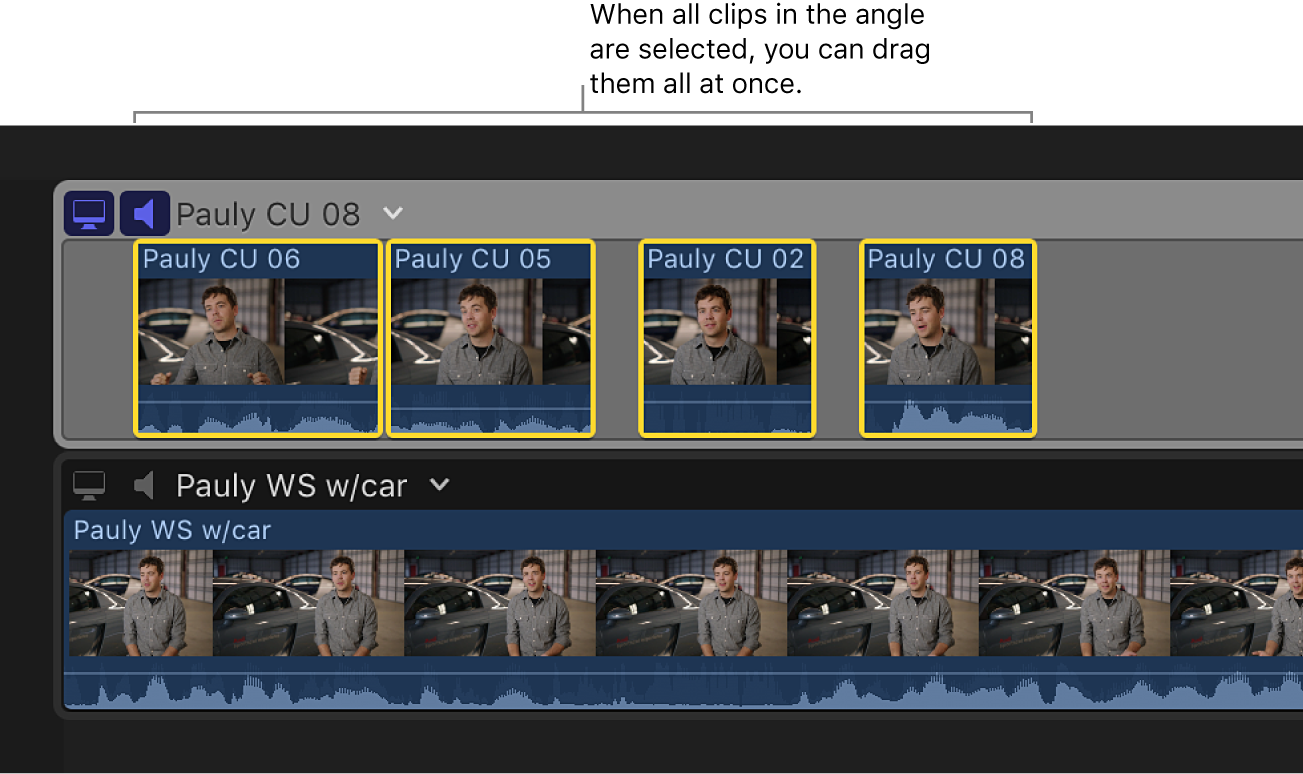
If an angle contains more than one clip, you can easily select all clips in the angle so that you can move them all at once. To do this, click the pop-up menu next to the angle name and choose Select Clips in Angle.
You can then drag the clips left or right to move them all by the same amount.
Automatically adjust the sync of a multicam clip
The instructions below describe two automatic methods for syncing angles in a multicam clip.
To open the Final Cut Pro angle editor, do one of the following:
Double-click a multicam clip in the browser.
Control-click a multicam clip in the browser or the timeline, then choose Open in Angle Editor.
In the out-of-sync angle, click the pop-up menu to the right of the angle name and choose one of the following:
Sync to Monitoring Angle: This option opens a two-up display in the viewer, showing the frame at the skimmer position on the left and the frame at the playhead position of the monitoring angle on the right. In the out-of-sync angle, skim to a frame, then click to sync the angle to the playhead position. All the clips in the angle move together to align the frame you clicked with the playhead. To close the two-up display in the viewer, click Done.
Sync Angle to Monitoring Angle: This option compares the audio waveforms in the selected angle to the waveforms in the monitoring angle, and then moves the clips in the selected angle to sync them with those in the monitoring angle. This is the same audio sync technology that you can use to automatically analyze and sync clips together into a compound clip.
If you select clips in one or more angles before choosing this option, the command name in the pop-up menu changes to Sync Selection to Monitoring Angle. When you choose this option, Final Cut Pro moves all of the selected clips to sync them with those in the monitoring angle. If there’s a selection in the monitoring angle, this option is not available.
WARNING: This option does not ripple clips forward. If clips are moved to a timeline location that’s already occupied by existing clips, the moved clips overwrite the existing clips.
Note: Some audio recordings are not suited for use with this feature. Choosing this option may result in long processing times during which Final Cut Pro is not available for editing.
Adjust the order of angles in a multicam clip
You can adjust the order in which angles appear in the angle viewer and the angle editor.
Note: If you’ve already started a multicam edit on a multicam clip in the timeline, changing the angle order does not affect which angle is chosen for each cut and switch edit.
To open the Final Cut Pro angle editor, do one of the following:
Double-click a multicam clip in the browser.
Control-click a multicam clip in the browser or the timeline, then choose Open in Angle Editor.
Drag the handle at the right side of an angle row to move the angle up or down in the angle order.
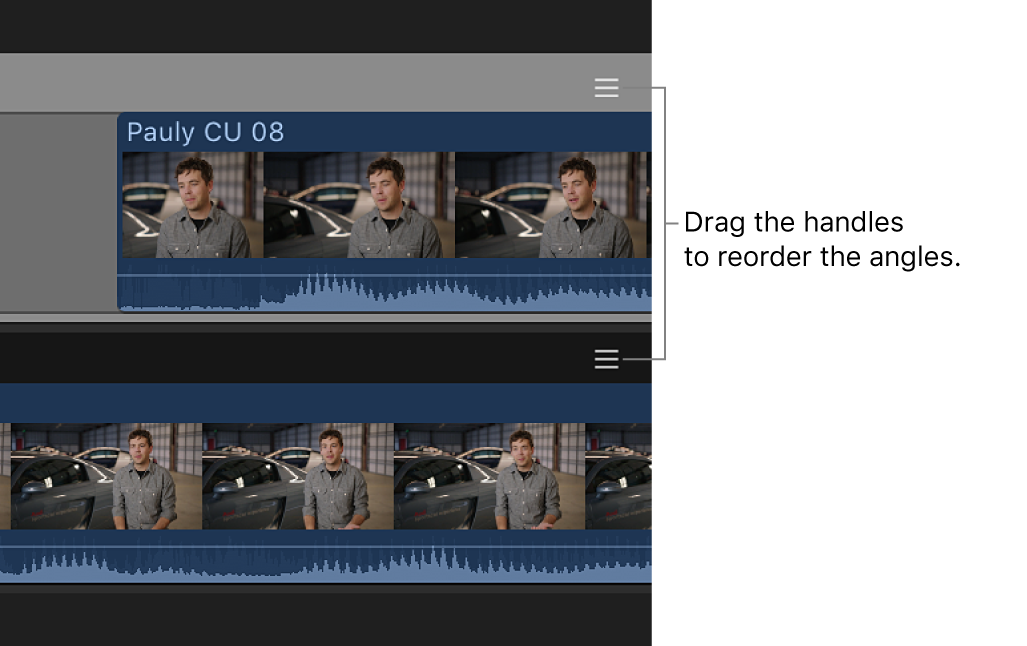
The angles in the angle editor and the angle viewer change to the new order.
Add, delete, or rename angles in a multicam clip
To open the Final Cut Pro angle editor, do one of the following:
Double-click a multicam clip in the browser.
Control-click a multicam clip in the browser or the timeline, then choose Open in Angle Editor.
Do any of the following:
Delete an angle: Click the pop-up menu to the right of the angle name and choose Delete Angle.
The angle is removed from the angle editor, the angle viewer, and all child clips of the multicam clip.
Important: Deleting an active angle affects the edits in your projects. The deleted angle is replaced with black filler in all projects.
Add an angle: Click the pop-up menu to the right of the angle name and choose Add Angle.
A new, empty angle appears in the angle editor and the angle viewer.
Rename an angle: At the left side of the angle editor, click the name of the angle you want to rename. When the text becomes highlighted, type the new name.
The new name appears in the angle editor and (if overlays are turned on) in the angle viewer.
You can also copy and paste clips in the angle editor. Clips are pasted sequentially as overwrite edits, and in the monitoring angle only.
To close the angle editor and return to the timeline, choose View > Timeline History Back, or press Command-Left Bracket ([).
Download this guide: Apple Books | PDF