Use Mastering Assistant in Logic Pro
With Mastering Assistant in Logic Pro for Mac and iPad, make your final mix sound great on any playback device.
Insert Mastering Assistant on the stereo output channel strip when you have finished your final mix down. After Mastering Assistant analyzes your audio and applies processing to your mix, you can adjust individual parameters like changing presets, adjusting EQ, and more. When you’re satisfied with the results, bounce your mix.
Insert Mastering Assistant
Insert Mastering Assistant on the stereo output channel of your project, after any other plug-ins you might already have inserted on the stereo output channel:
On Mac, click Mastering, which is the last Audio Effect slot on the stereo output channel strip. Or Choose Mix > Mastering Assistant.
On iPad, tap the Mixer button, tap the Setup button in the toolbar of the Mixer, then tap Mastering at the bottom of the Audio Effect slot of the stereo output channel strip.

Mastering Assistant immediately analyzes your project, including all software instruments and effects. Based on its analysis, Mastering Assistant might do any of the following to your mix:
Apply corrective EQ
Adjust the loudness
Adjust the overall stereo spread
Play your project to listen to how Mastering Assistants affects your mix. To turn Mastering Assistant on and off, click or tap Bypass in the Mastering Assistant window (or toggle it on and off in the Audio Effect slot).
If you set locators, you can have Mastering Assistant analyze just that section of your project. For example, you might want Mastering Assistant to analyze just the loudest part of your project.
Adjust Mastering Assistant
You can adjust a variety of parameters in Mastering Assistant after it initially analyzes the audio in your project. You can click Reanalyze at any point after adjusting these parameters if you don’t like the changes you’ve made.
Choose a different Character preset
When you initially insert Mastering Assistant, it uses the default Character preset called “Transparent” to process your mix. Transparent is suitable for most genres of music, and is based on classic analog hardware mastering signal paths.
If you’re using Logic Pro on a Mac with Apple silicon or Logic Pro for iPad, you can choose different Character presets that have different sonic characteristics:
Open the Mastering Assistant plug-in window.
Click or tap the character button, then choose a preset:
For a clean yet punchy sound, choose Clean, which is designed for EDM and acoustic music.
For deep low end and refined high end, choose Valve, which is a good option for both acoustic music and hip-hop.
For an aggressive sound with a subtle emphasis on mid-range frequencies, choose Punch, which is ideally suited for rock music.
Adjust EQ
Mastering Assistant applies corrective EQ based on its analysis of your mix. You can adjust the overall level of EQ and make manual adjustments to the EQ curve:
To adjust the overall level of EQ applied by Mastering Assistant, drag the Auto EQ slider up or down. The EQ curve in the window changes depending on how you set the Auto EQ slider.
To make manual adjustments to the EQ curve, drag any of the three control points that appear up or down to adjust the level, and to the left or right to adjust the center point of the frequency for each EQ band. The gain rate for each EQ band is +/- 6 Decibels (dB). To toggle your custom EQ curve on and off, click the Custom EQ button below the Auto EQ slider.
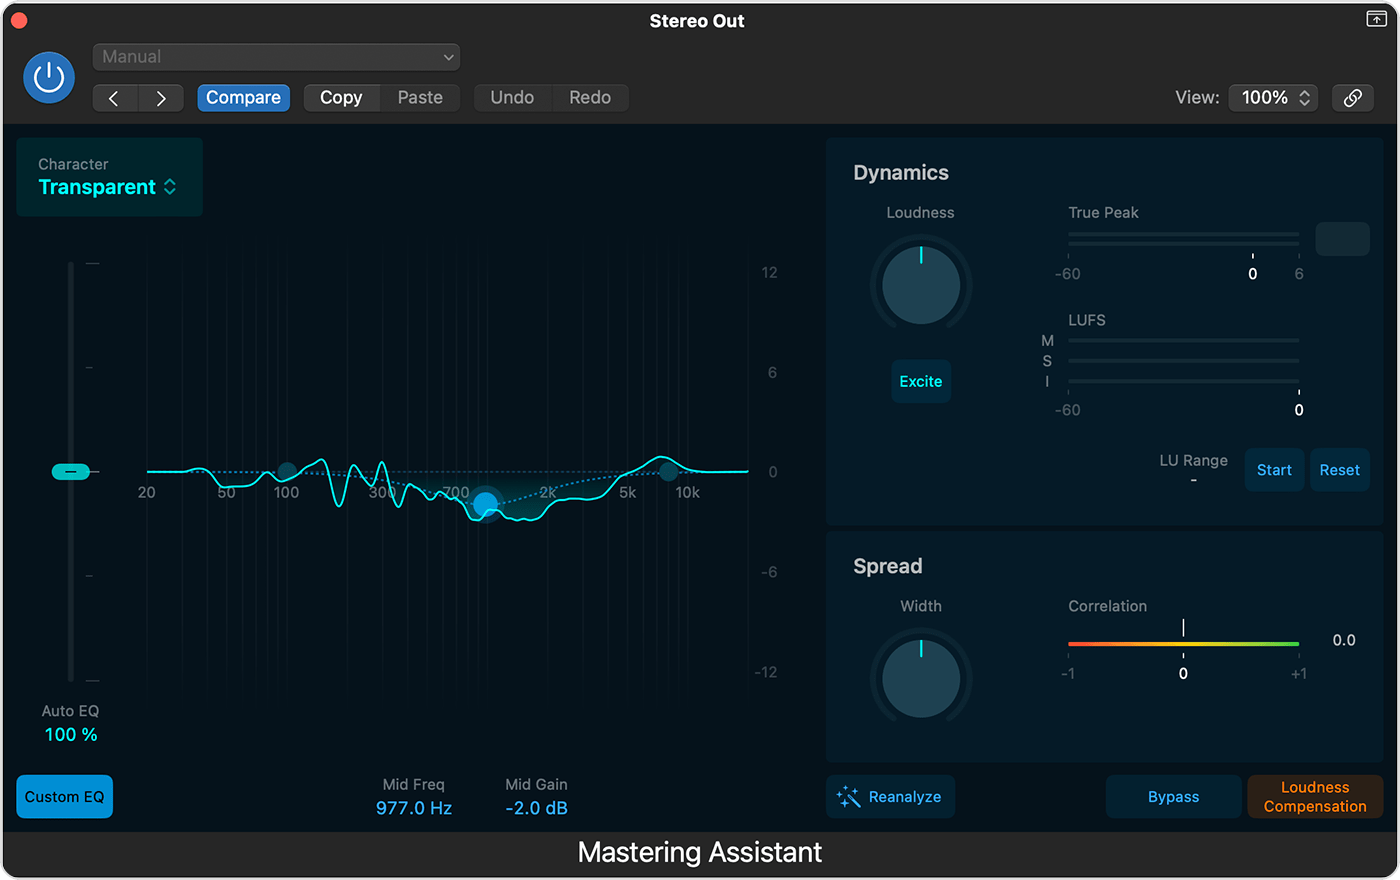
The spectrum analyzer under the EQ curve shows the level of the frequencies across the entire frequency spectrum in real time as you play your track.
Adjust loudness and other dynamics
Mastering Assistant adjusts the loudness to optimize the perceived volume of your mix according industry standards. You can also manually adjust the Loudness knob and other dynamics parameters:
Turn the Loudness knob to increase or decrease loudness. When the knob is in the center position, the output of your mix registers at around –14 LUFS-I (Loudness Units, relative to Full Scale, Integrated), which is typically the target loudness for many streaming platforms. Increasing the loudness can reduce dynamics in your mix.
To more accurately compare your mix with Mastering Assistant against your original mix, click or tap the Loudness Compensation button. This can help with assessing how your mix sounds without being influenced by increased loudness. You can use the Loudness Compensation button in conjunction with the Bypass button to compare your mix with and without Mastering Assistant processing.

To add crispness to your mix, try turning on Excite. Excite adds saturation to the upper-mid range frequencies of your mix.
The Dynamics section also has meters and other tools that can help optimize the loudness of your mix.
Adjust the stereo width of your mix
Mastering Assistant analyzes the stereo width of your mix and sets the Width knob accordingly. To manually increase or decrease the width of your mix, turn the Width knob. Turn the knob all the way to the left to create a mono mix that you can use to check mono compatibility.
You can use the Correlation meter to check the phase relationship of a your mix. Your mix should be above zero for good mono compatibility.
Bounce your final mix
Before you bounce your mix, check this list so you get the best results:
If you’ve made any adjustments to your mix after Mastering Assistant’s initial analysis, including altering the volume or EQ on individual tracks, click Reanalyze.
Turn off Loudness Compensation.
Need more help?
Tell us more about what's happening, and we’ll suggest what you can do next.