Verify your certificates for macOS Server 5.3 and earlier
If you're having trouble with xscertd, or when assigning certificates to Services, you might need to verify the Keychain Access Controls.
If you see messages containing "getCACerts" in your log files, or if you have problems assigning your certificates to services in OS X Server, Access Controls might be preventing the server from accessing the private key component of the identity.
Verify Access Controls
Open Keychain Access on the server.
Select the System Keychain from the sidebar on the left.
Select the All Items category using the sidebar on the left. If you don't see All Items, click
 .
.Verify these OPENDIRECTORY identity preference objects:
Verify ROOT_CA_IDENTITY
Double-click the OPENDIRECTORY_ROOT_CA_IDENTITY identity preference.
In the Preferred Certificate menu, it should be set to "Your-org-name Open Directory Certificate Authority". Make sure it has custom trust settings
 .
.Make a note of the name of this certificate and the expiration date shown. Close the identity preference window.
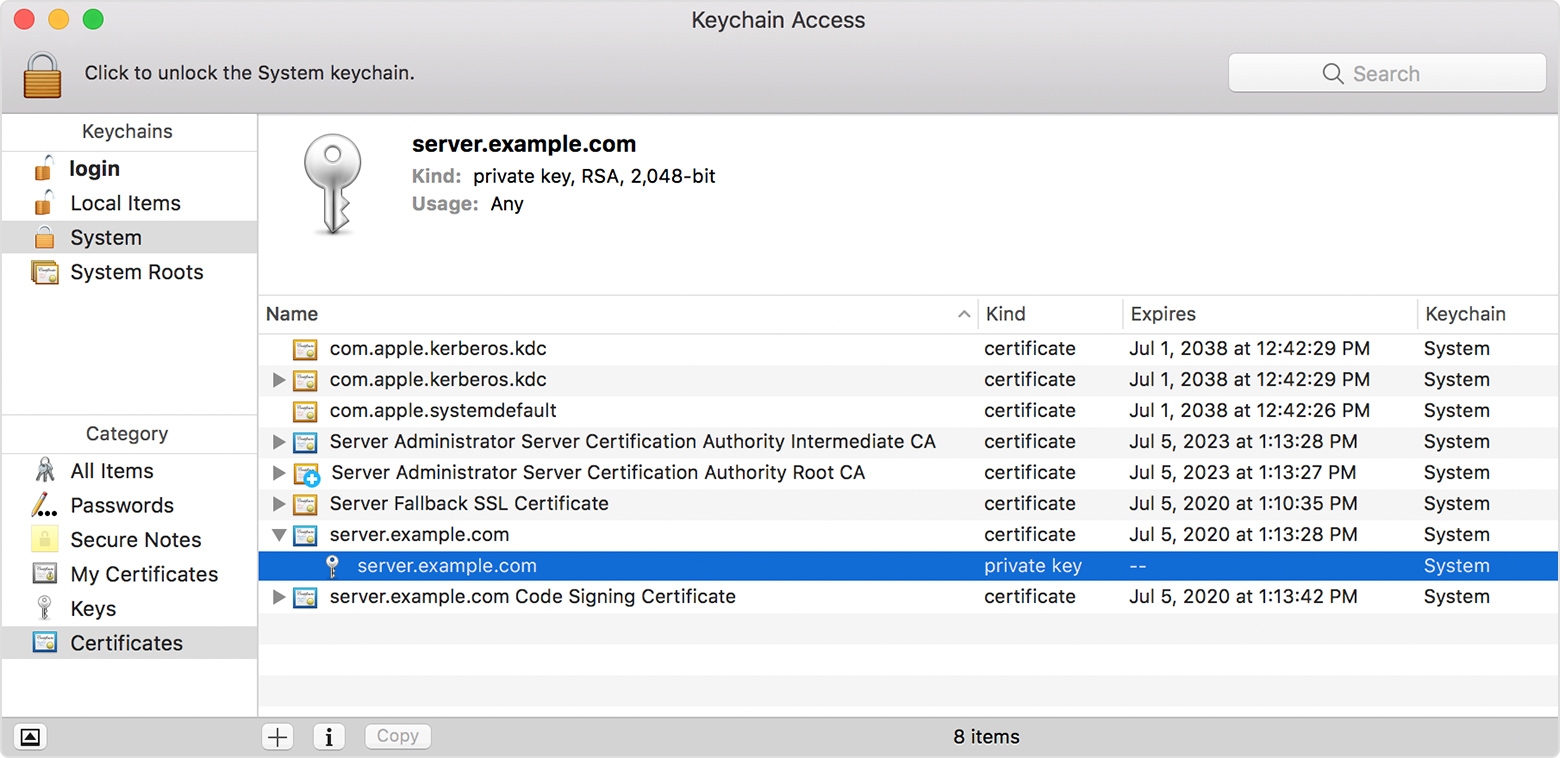
Click the Certificates Category.
Find the certificate with the same name and expiration date. Click the disclosure triangle for this certificate. The private key will appear below the certificate.
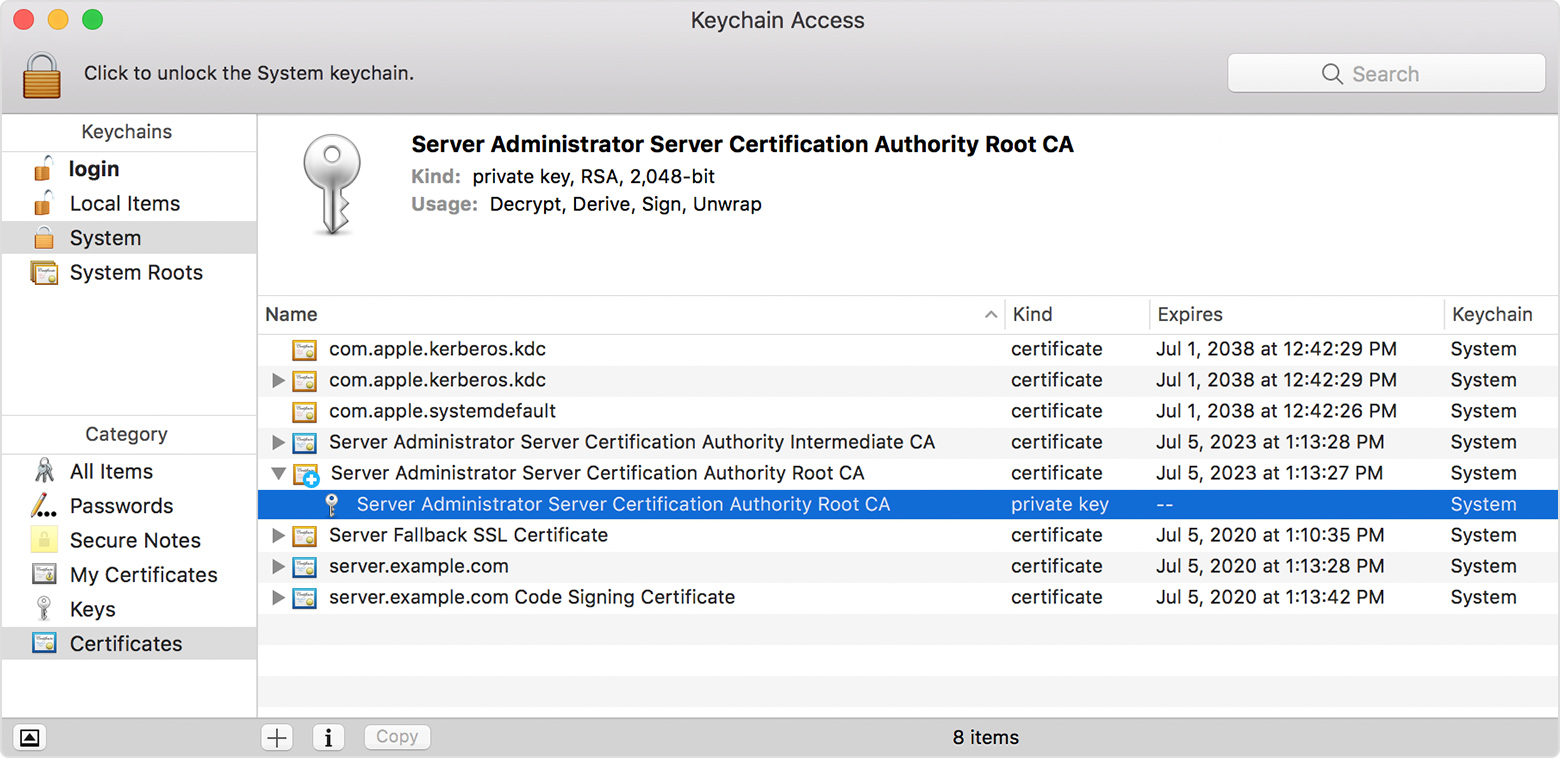
Double-click the private key.
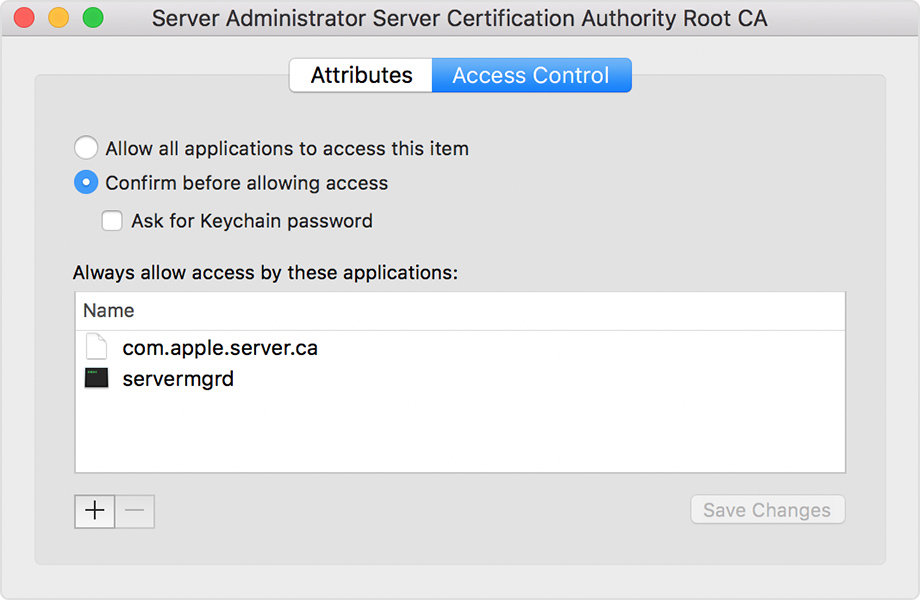
Click the Access Control tab. You might be prompted for administrator authentication.
You should see that these applications are allowed to access this key:
slapconfig
xscertd-helper
xscertadmin
servermgrd
If any item is missing from the list, add it manually. Click the + button to add a new item, then press Command-Shift-G.
In the Go to folder window, enter the specific path of the item that's missing:
For the slapconfig item, enter the path /usr/sbin/slapconfig
For the xscertd-helper item, enter the path /usr/libexec/xscertd-helper
For the xcertadmin item, enter the path /usr/sbin/xscertadmin
For the servermgrd item, enter the path /Applications/Server.app/Contents/ServerRoot/System/Library/CoreServices/ServerManagerDaemon.bundle/Contents/MacOS/servermgrd
After you enter the path for the missing item, click Go to highlight it. Then, click Add to add the item.
When all the items appear in the list, click Save Changes. If you're prompted for your admin password, enter it and click Modify Keychain.
Verify INTERMEDIATE_CA_IDENTITY
Double-click the OPENDIRECTORY_INT_CA_IDENTITY identity preference.
The Preferred Certificate menu should be set to "IntermediateCA_DNS_NAME_OF_SERVER_1". Make sure it is marked valid
 and is issued by this root ca.
Make a note of the name of this certificate and the expiration date shown. Close the identity preference window.
Click the Certificates category.
Find the certificate with the same name and expiration date. Click the disclosure triangle for this certificate. The private key will appear below the certificate.
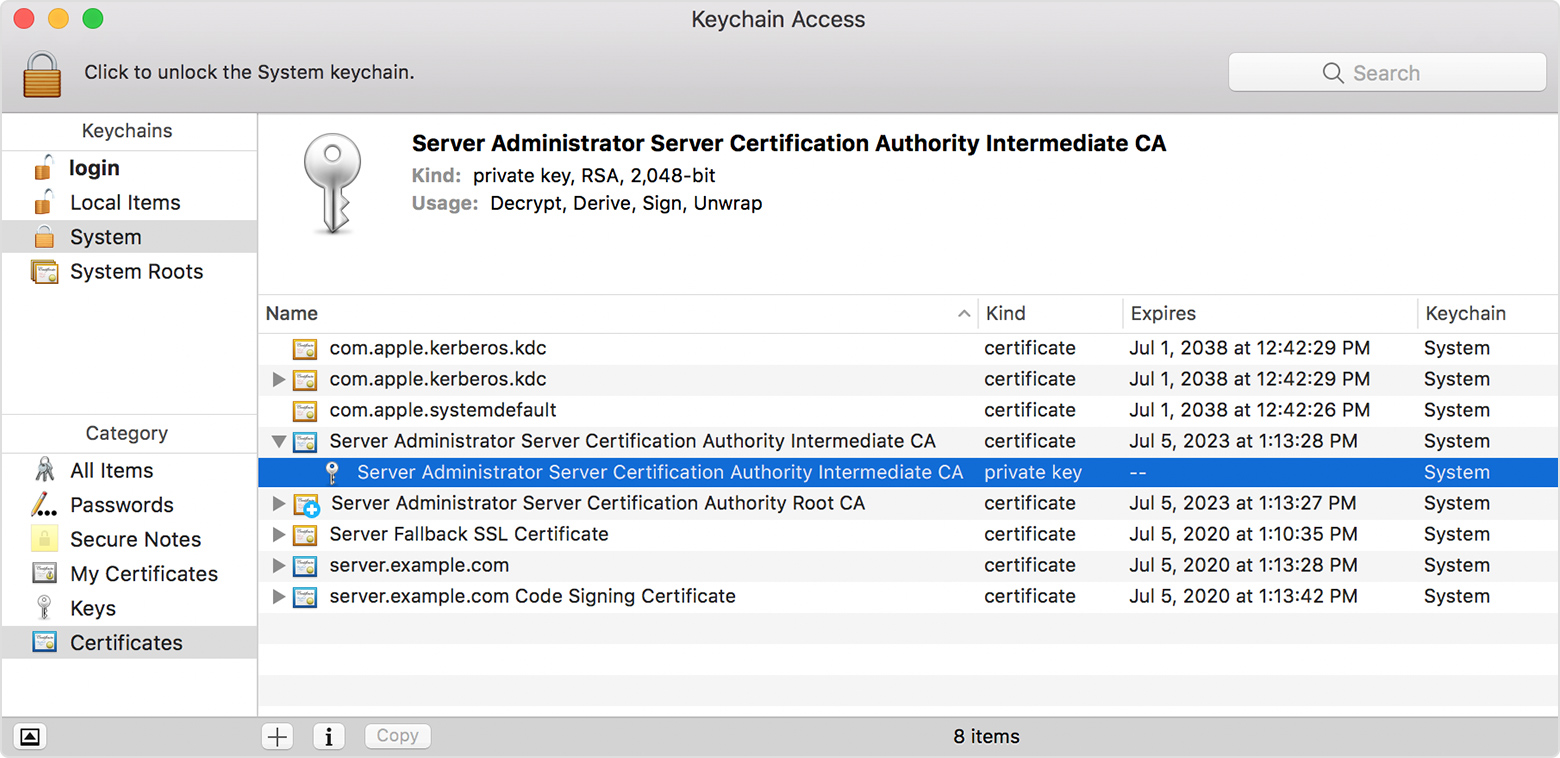
Double-click the private key.
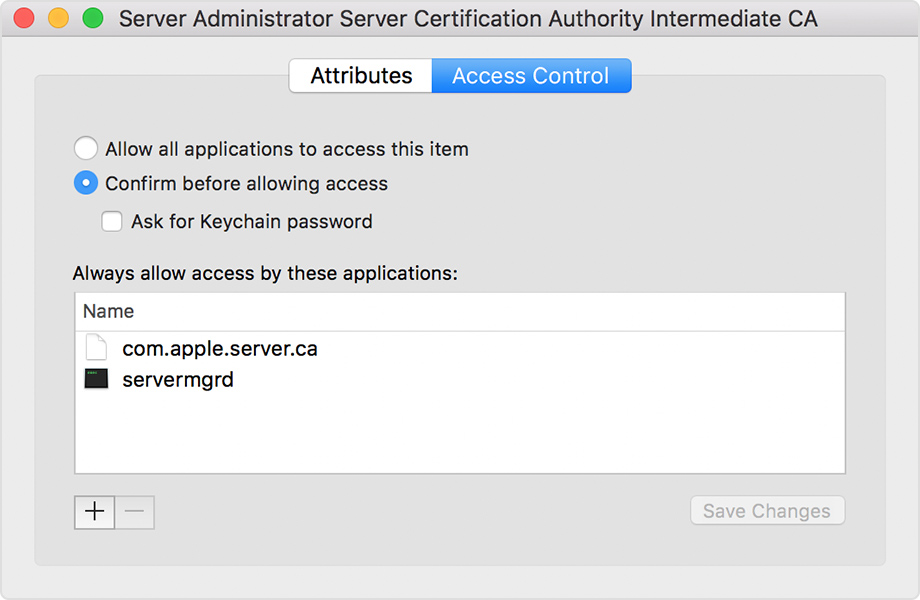
Click the Access Control tab. You might be prompted for administrator authentication.
You should see that these applications are allowed to access this key:
slapconfig
xscertd-helper
xscertadmin
servermgrd
If any item is missing from the list, add it manually. Click the + button to add a new item, then press Command-Shift-G.
In the Go to folder window, enter the specific path of the item that's missing:
For the slapconfig item, enter the path /usr/sbin/slapconfig
For the xscertd-helper item, enter the path /usr/libexec/xscertd-helper
For the xcertadmin item, enter the path /usr/sbin/xscertadmin
For the servermgrd item, enter the path /Applications/Server.app/Contents/ServerRoot/System/Library/CoreServices/ServerManagerDaemon.bundle/Contents/MacOS/servermgrd
After you enter the path for the missing item, click Go to highlight it. Then, click Add to add the item.
When all the items appear in the list, click Save Changes. If you're prompted for your admin password, enter it and click Modify Keychain.
Verify OPENDIRECTORY_SSL_IDENTITY
Double-click the OPENDIRECTORY_SSL_IDENTITY identity preference.
In the Preferred Certificate menu, it should be set to "dns-name-of-server". Make sure it is marked valid
and is issued by the OPENDIRECTORY_SSL_IDENTITY.Make a note of the name of this certificate and the expiration date shown. Close the identity preference window.
Click the Certificates category.
Find the certificate with the same name and expiration date. Click the disclosure triangle for this certificate. The private key will appear below the certificate.
Double-click the private key.
Click the Access Control tab. You might get a security prompt.
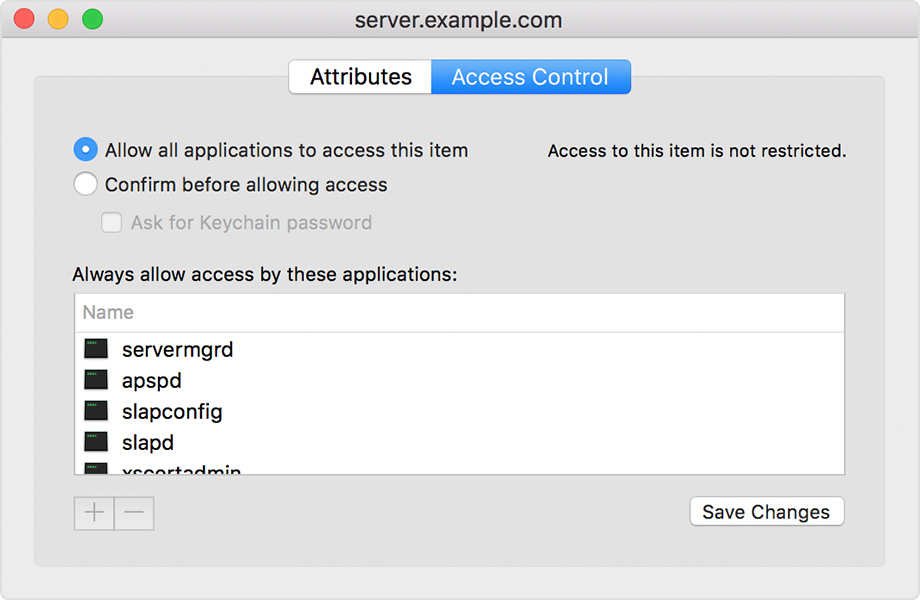
Make sure you have "Allow all applications to access this item" selected. Click Save Changes. If you're asked for your admin password, enter it and click Modify Keychain.
After you check the identity preferences
Once you've checked all three identity preferences, reboot the server to see if the issue persists.