Création et publication de vidéos 360° dans Motion
Dans Motion 5.4 et versions ultérieures, créez et publiez des graphismes animés 360° immersifs, avec sortie en temps réel sur un casque de réalité virtuelle (VR).
Vous pouvez créer des graphismes animés 360º dans une large gamme de formats et tailles d’image. Lorsque vous travaillez dans Motion, vous pouvez visualiser votre vidéo 360° dans un casque VR, tout en l’affichant simultanément dans le canevas de l’application. Une fois votre graphisme animé terminé, vous pouvez exporter votre projet et le publier sur divers sites Web de médias sociaux et de partage de vidéos, comme la chaîne YouTube Réalité virtuelle, Facebook 360 et Vimeo 360.
Cette image a été acquise auprès de Getty Images, Inc. Tous droits réservés.
Avant de commencer
Pour travailler avec une vidéo 360º dans Motion, assurez-vous que votre Mac dispose de la configuration requise pour les vidéos 360º et Motion 5.4 ou version ultérieure. Si vous souhaitez visualiser les images lors du montage dans un casque VR, assurez-vous que celui-ci est pris en charge et que vous avez installé les logiciels nécessaires.
Vous pouvez enregistrer des métrages 360° à l’aide de plusieurs caméras montées dans un système spécial. Vous pouvez également utiliser une seule caméra 360° dotée de plusieurs objectifs. Chaque objectif enregistre un angle de caméra différent, les angles successifs se chevauchant.
Avant d’importer un métrage 360° dans Motion, vous devez créer une seule image 360° homogène. Certaines caméras à 360° réalisent cette étape automatiquement, pour vous permettre de commencer le montage immédiatement. Si les images proviennent d’un système à plusieurs caméras, vous devez assembler les différents angles à l’aide d’un logiciel tiers avant de pouvoir importer le métrage dans Final Cut Pro.
Afin d’utiliser un métrage 360º dans Motion, l’image assemblée doit être une vidéo 360° monoscopique ou stéréoscopique en projection équirectangulaire Les images équirectangulaires ressemblent à une carte du monde sur un plan rectangle en deux dimensions (2D).
Créer un projet 360º
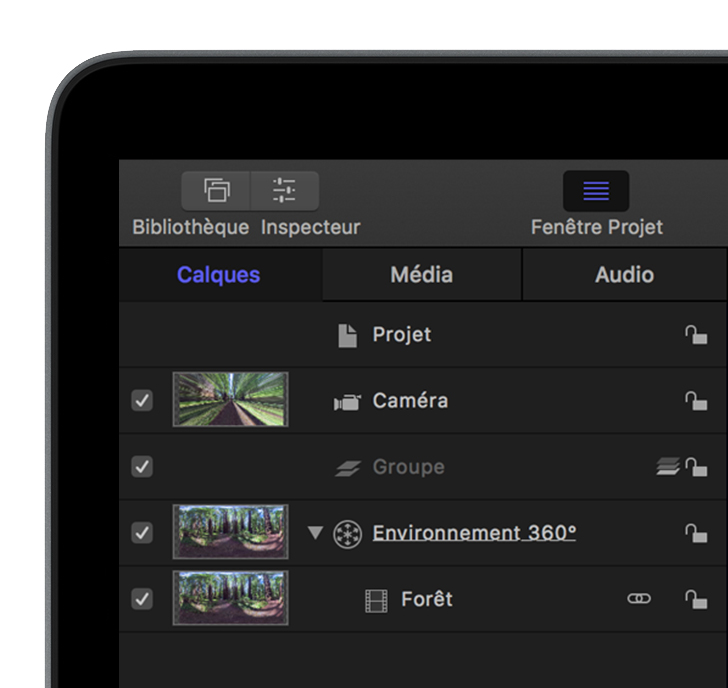
Pour créer un projet compatible 360º dans Motion, choisissez Fichier > Nouveau (ou appuyez sur Commande + N). Dans le menu local Préréglage, choisissez l’option Vidéo 360º correspondant à la résolution du métrage 360º source, ou à celle du fichier de sortie que vous souhaitez partager. Cliquez sur Ouvrir. Motion crée automatiquement un projet comprenant les objets suivants dans la liste Calques :
Un groupe 3D
Une caméra Point de vue
Un environnement 360º
Ajouter des médias à un projet 360º
Votre projet 360º peut contenir divers types de médias, dont des plans 360º, ainsi que des médias standard comme des graphismes, des vidéos et des images fixes.
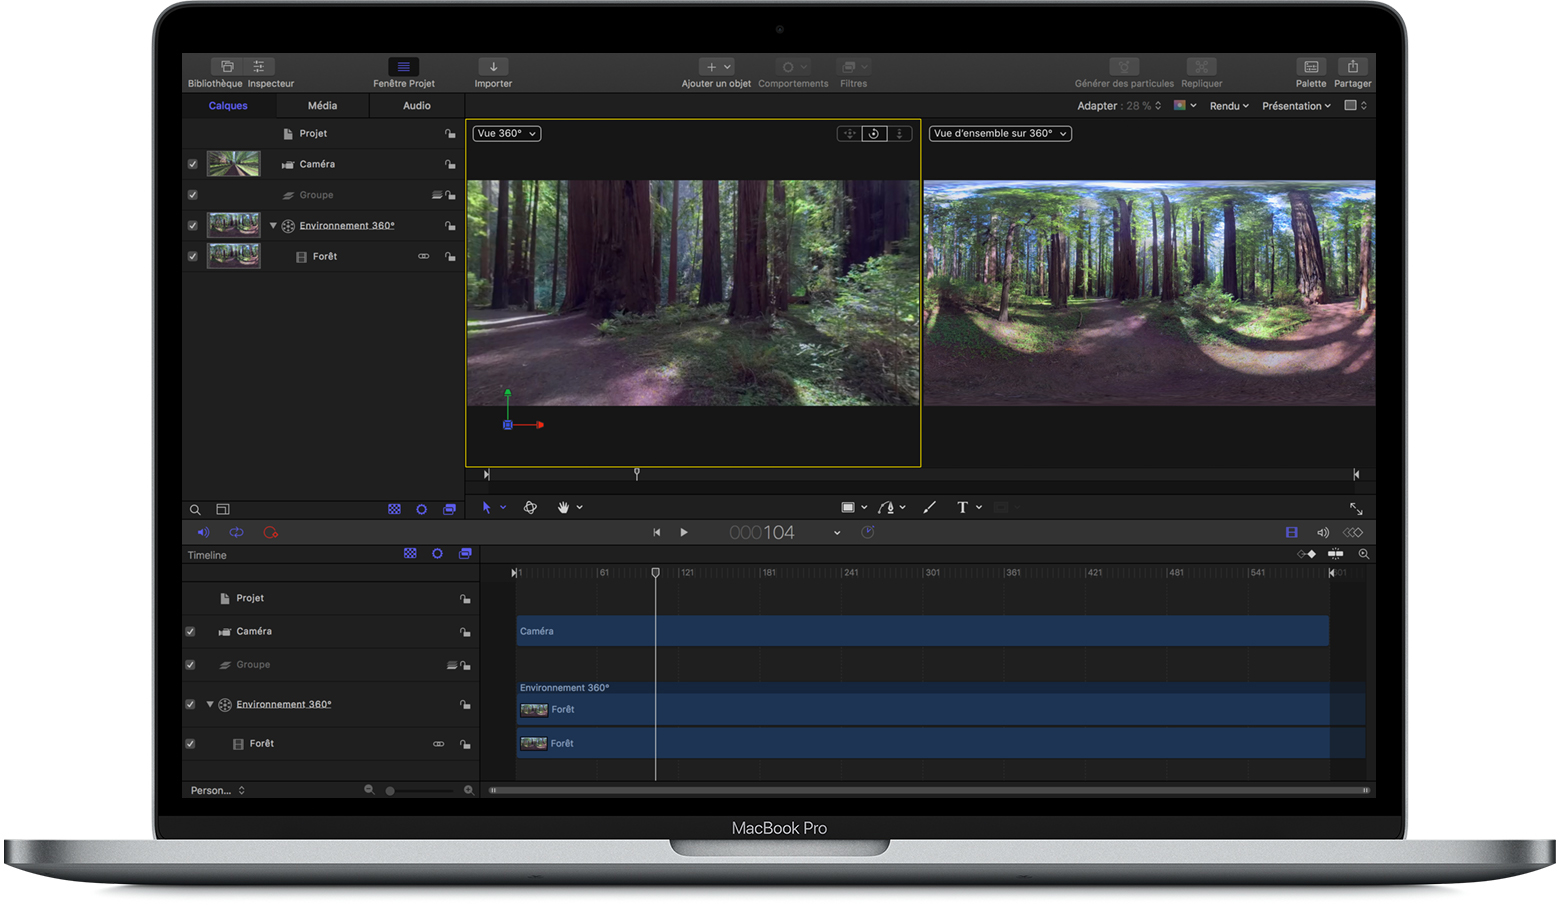
Pour importer un média 360º, choisissez Fichier > Importer, puis sélectionnez votre plan. Assurez-vous de sélectionner l’option « Importer en tant que 360º », puis cliquez sur Importer. Motion ajoute automatiquement le plan 360º au calque Environnement 360º. Le plan 360º apparaît dans la fenêtre d’affichage droite (la Vue d’ensemble 360º) en vue équirectangulaire. Vous pouvez afficher une vue sphérique du plan et naviguer à l’intérieur dans la fenêtre d’affichage gauche (la Vue 360º).
Si votre plan 360º n’apparaît pas dans le calque Environnement 360º, vous devez l’ajouter manuellement. Afin d’apparaître sous forme d’images 360º, les plans 360º doivent apparaître dans le calque Environnement 360º.
Ajouter des médias standard à un projet 360º
Vous pouvez ajouter des médias standard comme des images fixes et des graphismes à un projet 360º, puis les placer à l’intérieur de l’espace 360º sous forme d’éléments plats. Pour ajouter un média standard sous forme d’élément plat, choisissez Fichier > Importer, puis sélectionnez votre plan. Motion ajoute automatiquement les médias standard au calque Groupe 3D. Vous pouvez animer les médias standard d’un projet 360º de la même manière que dans un projet Motion traditionnel.
Naviguer dans la Vue 360º
Vous pouvez effectuer un panoramique à 360º dans la Vue 360º. Cliquez sur la commande En orbite![]() , puis faites glisser dans n’importe quelle direction pour effectuer un panoramique ou incliner la caméra. Pour rétablir l’orientation par défaut de la vue, double-cliquez sur la commande En orbite
, puis faites glisser dans n’importe quelle direction pour effectuer un panoramique ou incliner la caméra. Pour rétablir l’orientation par défaut de la vue, double-cliquez sur la commande En orbite![]() . Vous pouvez également changer l’orientation principale de la vidéo à l’aide du filtre Réorientation 360º.
. Vous pouvez également changer l’orientation principale de la vidéo à l’aide du filtre Réorientation 360º.
Lorsque vous naviguez dans la fenêtre d’affichage gauche, les médias standard importés dans un projet 360º paraissent plats. Les médias convertis en vue équirectangulaire s’adaptent à la sphère 360º.
Ajouter des effets et des particules
Motion comprend des filtres et des générateurs optimisés pour les vidéos 360º, dont des filtres de flou, d’éclat et de netteté. Si vous appliquez des effets non optimisés pour un affichage 360º, des jonctions et d’autres artefacts indésirables seront visibles dans votre projet 360º.
Lorsque vous ajoutez un effet, sélectionnez-le dans la liste Calques, puis choisissez Fenêtre > Afficher l’inspecteur > Filtres. Si le filtre inclut une case « Compatible 360º », cochez-la.
Vous pouvez également ajouter des particules à un projet 360º pour créer des effets sophistiqués faisant intervenir un grand nombre d’objets animés automatiquement. Les particules permettent notamment de simuler une chute de neige ou la présence de fumée dans la sphère 360º. Découvrez comment utiliser les particules dans Motion.
Créer des modèles Motion 360° pour les projets Final Cut Pro
Après avoir créé un projet Motion 360º, vous pouvez l’enregistrer en tant que transition, titre, effet ou générateur personnalisé pour Final Cut Pro, puis l’utiliser dans votre projet Final Cut Pro.
Vous pouvez convertir n’importe quel projet Motion en modèle Final Cut Pro, ou partir de l’un des modèles par défaut disponibles dans Motion. Pour utiliser l’un des modèles par défaut, choisissez Fichier > Créer à partir du navigateur de projets. Sélectionnez Vierge dans la colonne de gauche, puis choisissez l’un des types de modèles Final Cut Pro. Sélectionnez une option Vidéo 360º dans le menu Préréglage, puis cliquez sur Ouvrir.
Lorsque vous enregistrez un projet Motion en tant que modèle Final Cut Pro, vous pouvez y accéder depuis la catégorie désignée dans le navigateur approprié ou dans la barre latérale de Final Cut Pro.
Utiliser un média 360º dans un projet 3D
Vous pouvez exporter une vidéo 360° équirectangulaire avec un seul champ de vision, puis l’ajouter à un projet Motion standard. Dans le projet 360º, réglez la caméra de manière à définir l’angle de vue de l’image. Ensuite, à l’aide du filtre Réorientation 360°, ajustez le cadrage sur la partie de la sphère 360° à exporter. Vous pouvez même animer le panoramique, l’inclinaison et le zoom de la caméra et inclure ces mouvements dans le métrage exporté.
Convertir un projet normal en projet 360º
Lorsque vous convertissez un projet normal en projet 360º, Motion projette le métrage sur une surface plane dans l’espace 360°. Vous devez ajuster les autres objets si vous souhaitez qu’ils soient projetés dans la sphère 360º. Par exemple, si le projet contient un générateur que vous souhaitez projeter sur la sphère 360º, déplacez-le sur le calque Environnement 360º.
Dans votre projet actuel, ajoutez un environnement 360º en bas de la liste Calques. Ensuite, ajoutez des médias ou des effets 360º au calque Environnement 360º. Si votre projet ne contient pas de caméra, choisissez Objet > Nouvelle caméra, puis définissez-la en tant que Point de vue dans l’inspecteur de caméra.
Vous pouvez scinder le canevas en deux fenêtres d’affichage. Cliquez sur la zone dans l’angle droit du canevas, puis choisissez l’option Deux fenêtres juxtaposées. Choisissez Vue 360º dans le menu local Caméra de la fenêtre d’affichage gauche. Choisissez Vue d’ensemble sur 360º dans le menu local Caméra de la fenêtre d’affichage droite.
Besoin d’aide supplémentaire ?
Expliquez-nous ce qui se passe en détail, et nous vous proposerons les options à votre disposition.