Set up audio devices in Audio MIDI Setup on Mac
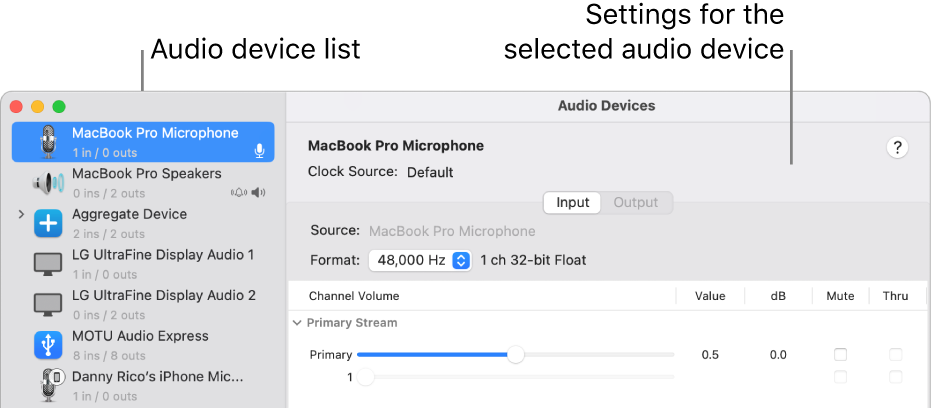
Use Audio MIDI Setup to set up audio input and output devices, such as microphones and multichannel audio interfaces. You can also use it to route audio from iOS and iPadOS devices directly into your Mac.
Available settings in Audio MIDI Setup depend on the audio device you’re using. For example, you can adjust the volume for each channel your audio output device has available.

Set up audio devices
Connect your audio devices to your Mac and, if necessary, install any software included with the devices.
In the Audio MIDI Setup app
 on your Mac, in the sidebar of the Audio Devices window, select a device.
Note: For iOS and iPadOS devices, first click Enable, then select the device. You may be asked to unlock your device with a passcode or to trust the device.
Control-click the device, or click the Configure Selected Device pop-up menu
 at the bottom-left of the sidebar, then choose how the device is going to be used:
For sound input: Choose Use This Device for Sound Input.
For sound output: Choose Use This Device for Sound Output.
For playing system sounds: Choose Play Alerts and Sound Effects Through This Device.
On the right side of the Audio Devices window, choose the options available for the device you selected:
In most cases, Clock Source is set to the default.
Click the Format pop-up menu, then set the sample rate and bit depth. Make sure they match the appropriate settings for your audio device.
If your Mac supports the hardware sample rate converter, the Hardware Rate Converter pop-up menu is available in the Input pane. When you choose Automatic from the pop-up menu, the hardware sample rate converter is turned on if the audio samples coming in are PCM and formatted according to the international standard IEC 60958-3. The hardware sample rate converter is turned off if the input stream is encoded. You can also choose Enable or Disable from the menu, to keep the hardware sample rate converter turned on or off.
If software volume control is available for your device, the Volume sliders appear blue to indicate that they’re active. Drag the sliders to set the volume for each channel.
To set up a stereo or surround (multichannel) speaker configuration, click Configure Speakers, then set up the configuration.
About virtual AVB connections
With virtual AVB connections, you can share high-quality audio between devices on the same local network. Instead of running long audio cables or dealing with wireless dropouts, you can do things like record music with perfect timing across multiple computers, instantly share audio between your computer and other devices, or stream without delays or audio glitches.
In the Audio Midi Setup app ![]() , you can connect an audio source (like your main recording Mac) to audio destinations (like a second Mac in another room) on the same local network.
, you can connect an audio source (like your main recording Mac) to audio destinations (like a second Mac in another room) on the same local network.
Your audio streams can handle:
1 to 32 audio channels (most setups use 8)
Sample rates from 44.1 kHz to 192 kHz
AM-824 or AAF streaming formats
Set up a virtual AVB connection
In the Audio Midi Setup app ![]() on your Mac, create a virtual AVB endpoint for other Mac computers and AVB devices by doing any of the following:
on your Mac, create a virtual AVB endpoint for other Mac computers and AVB devices by doing any of the following:
On the host Mac, click
 , then click Create Virtual AVB Device.
AVB Setup Assistant can be used to configure un-acquired AVB devices.
Some AVB devices are automatically acquired when directly connected via ethernet.
Auto-acquire doesn’t occur when the Mac and AVB devices are connected using an AVB-compatible network switch.
If using an additional Mac, browse your network for an AVB device and connect to your Virtual AVB host.
Acquired Mac or third-party party AVB devices must be un-acquired before running the AVB Setup Assistant. To un-acquire a Mac or AVB device, deselect their checkbox in the Network Device Browser window on the host Virtual AVB Mac.
Note: To successfully connect to your Virtual AVB host, ensure your network adapter and local network hardware support AVB connections.