MacBook Air (13-inch, M4, 2025) Left Speaker with Antenna
Before You Begin
 Warning
Read Battery Safety and follow workspace and battery handling guidelines before you begin.
Remove the following parts before you begin:
Tools
Adjustable torque driver (10–34 Ncm)
Antenna tool
ESD-safe tweezers
Nylon probe (black stick)
Torque driver (blue, 0.65 kgf cm)
Torx Plus 3IP 44 mm half-moon bit
Torx Plus 4IP 25 mm bit
Torx Plus 5IP 50 mm bit
Refer to a full list of tools required for all repairs.

Important
If you replace the left speaker with antenna, you must also replace the right speaker with antenna.
Note: This procedure may show images of different models, but the steps are the same. Ensure that you use the correct tools for the model you’re repairing.
Removal
Note: If you’ve already completed the removal steps, skip to reassembly.
Use the blue torque driver and 3IP bit to remove the four 3IP screws from the left speaker connector cowling and antenna coaxial cables connector cowling.
Two 3IP screws (923-12556) (1)
Two 3IP screws (923-12573) (2)
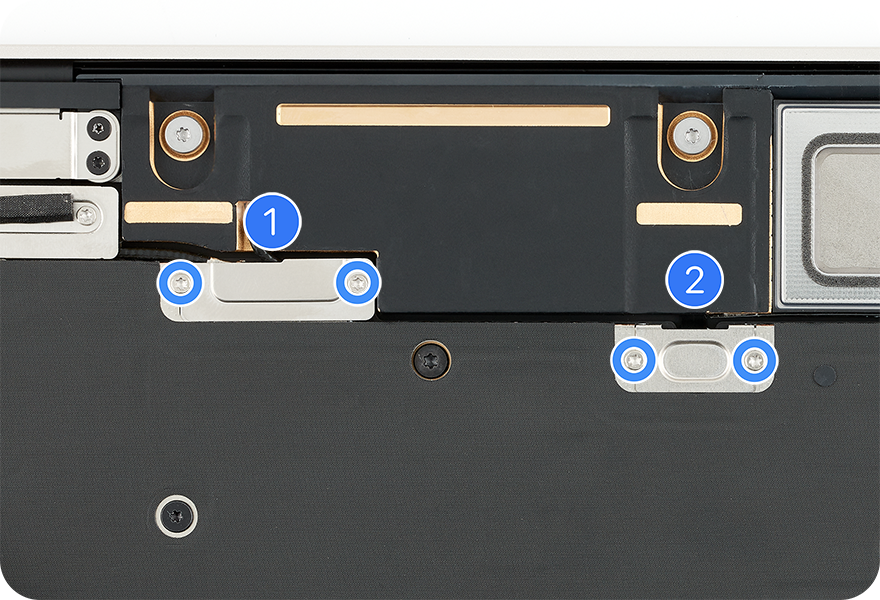
Remove the left speaker connector cowling and antenna coaxial cables connector cowling. Save the cowlings for reassembly.
Lift the end of the left speaker flex cable off the connector. Then lift the end of the antenna coaxial cable off the connector as shown.

Use the 10–34 Ncm adjustable torque driver and 4IP bit to remove the two 4IP screws (923-12566) from the left speaker with antenna.

Use the 10–34 Ncm adjustable torque driver and 5IP bit to remove the 5IP screw (923-12565) from the left speaker with antenna.

Tilt up the right side of the left speaker with antenna (1). Then slide the left speaker with antenna to the right and remove it from the top case (2).

Reassembly
Insert the left side of the left speaker with antenna into the top case as shown (1). Then lower the left speaker with antenna into the top case (2).

Set the torque value on the 10–34 Ncm adjustable torque driver to 11.5 Ncm. Then use the adjustable torque driver and 5IP bit to reinstall the 5IP screw (923-12565) into the left speaker with antenna.

Set the torque value on the 10–34 Ncm adjustable torque driver to 16 Ncm. Then use the adjustable torque driver and 4IP bit to reinstall the two 4IP screws (923-12566) into the left speaker with antenna in the order shown.

Position the end of the antenna coaxial cable over the connector as shown. Then use the blunt end of the antenna tool to press the end of antenna coaxial cable to the connector.

Press the end of the left speaker flex cable to the connector.

Position the antenna coaxial cables connector cowling and left speaker connector cowling.
Use the blue torque driver and 3IP bit to reinstall the four 3IP screws into the cowlings.
Two 3IP screws (923-12556) (1)
Two 3IP screws (923-12573) (2)

Reinstall the following parts to complete reassembly: