iPhone 15 Back Glass
Before You Begin
 Warning
Read Battery Safety and follow workspace and battery handling guidelines before you begin.
Read Broken Glass Safety before you begin.
For this model, you must perform the back glass sanding process.
Improper replacement, improper handling of parts, or failure to follow the provided instructions may cause malfunctions. Additionally, wireless charging may appear slow or the iPhone may not charge properly. These events could result in injury, or damage to the device, parts, or other property.
Tools
6.1-inch repair tray
Adhesive cutter
Adjustable heated display pocket
Camera cap
Display adhesive press plate
Display press
ESD-safe tweezers
Ethanol wipes or isopropyl alcohol (IPA) wipes
Heated display removal fixture
Heat-resistant gloves
Melamine sponge
Micro stix bit
Nylon probe (black stick)
Safety glasses with side shields
Torque driver (blue, 0.65 kgf cm)
Torque driver (green, 0.45 kgf cm)
Torx security bit
Important
Read Heated Display Removal Fixture if you’re setting up the fixture for the first time.
If you replace this part, it is recommended to run Repair Assistant in order to finish the repair. Repair Assistant will be available on the device after you’ve completed all reassembly steps
Removal
Use a torque driver and the Torx security bit to remove the two security screws, one from each side of the USB-C connector. Set aside the screws.

Use the heated display removal fixture to heat the back glass adhesive. Refer to the Heated Display Removal Fixture Operations Manual for instructions.
Remove the iPhone from the heated display removal fixture and place it in the repair tray.
Use the adhesive cutter to cut along the sides and top of the iPhone until the back glass is free. Slide the back glass slightly toward the bottom of the iPhone. Then open the iPhone by tilting the back glass onto the repair tray suction cups.


 Caution: To avoid damaging the flex cables, don’t tilt the back glass more than 5 degrees.
Insert the repair tray suction cups into the slots in the repair tray and place the camera cap next to the tray.
Note: The icon on the bottom of the tray indicates the direction to tilt up the back glass and the correct side to place the suction cups.
Covering the camera is recommended to prevent contamination.
Note: It is recommended to wear nitrile gloves when covering the camera.
- Caution: Don’t damage the back glass flex cables as you tilt up the back glass.
- Warning
If the battery is dented, punctured, or otherwise damaged, stop the repair. You can find a service option at support.apple.com/repair.
If the back glass is broken, inspect the enclosure. If there are shards of glass in the enclosure, put on the safety glasses with side shields and cut-resistant gloves. Use ESD-safe tweezers to remove the shards. Then use ethanol wipes or IPA wipes to remove all remaining shards from the adhesive on the perimeter of the enclosure. Vacuum all shards of glass from the workspace.


Use a torque driver and the Micro stix bit to remove three trilobe screws from two cowlings. Set aside the screws. Remove the cowlings and save them for reassembly.


To remove the lower cowling, slightly push the lower cowling toward the top of the iPhone to unhook it. Then tilt up the lower cowling and slide it out toward the Taptic Engine.

To remove the upper cowling, lightly press the top edge of the cowling to move it about 1 mm toward the bottom of the iPhone and release the top hook on the cowling. Then grasp the cowling from the bottom and remove it. Don’t damage the flex cables.


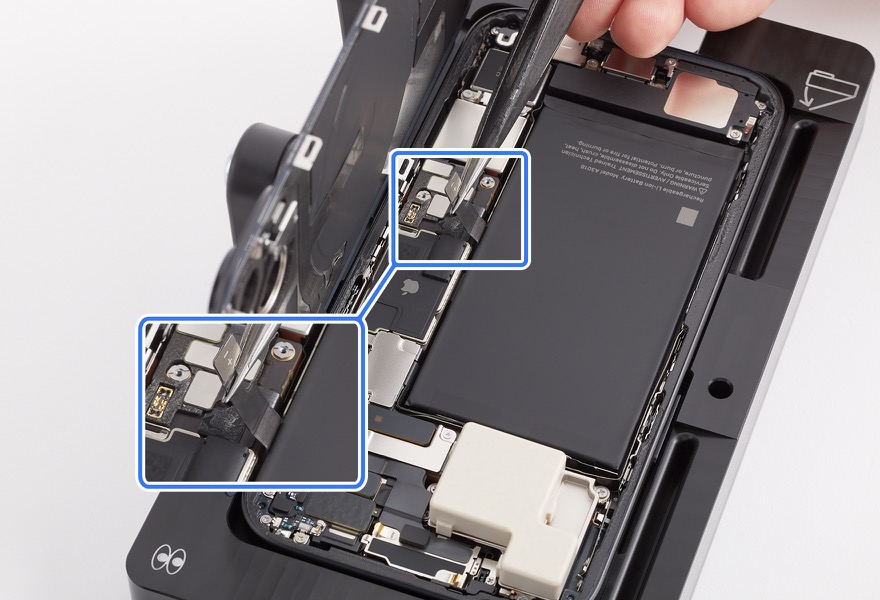
Lift the end of the battery flex cable off the connector and then lift the end of the the back glass flex cable off the connector. The back glass is now removed. Hold the back glass by the edges. Pull the tabs on the suction cups to release them from the back glass. Then set the back glass facedown on a clean, flat surface.
- Caution
The battery flex cable has strong adhesive under it. Don’t tear the battery flex cable while removing it.
You must disconnect the battery flex cable first to ensure that the iPhone stays turned off.
Reassembly
Remove the suction cups from the repair tray.
Use the adhesive removal tool or the black stick to lift the adhesive from the enclosure. Use ESD-safe tweezers to pull the adhesive. Repeat this process until all the adhesive is removed from the perimeter of the enclosure.
- Caution: Don’t touch the camera assembly, TrueDepth camera grounding springs, or nearby parts.


Use ethanol wipes or IPA wipes to clean all residual adhesive from the edges of the back glass.
Place the enclosure in the repair tray with the USB-C connector facing the cutout.
Important: If you’re installing a replacement back glass, peel the protective liner from the top and underside of it.
Inspect the TrueDepth camera. Ensure that the top edge of the TrueDepth camera is under the lip of the enclosure.
- Warning: Inspect the enclosure for loose or extra screws and small parts, which can damage the battery and cause safety issues.
- Caution: If the TrueDepth camera is positioned incorrectly, use the black stick to move it into the correct position.
Align the replacement back glass adhesive over the enclosure. Ensure that the top hole of the adhesive aligns over the camera.
- Caution: Ensure that you’ve removed all adhesive residue from the back glass and the enclosure before you apply the replacement back glass adhesive.
The replacement back glass adhesive has a top release liner, a middle release liner, and a bottom release liner. Grasp the tab on the bottom release liner. Then slowly pull the bottom release liner out from under the adhesive while pressing the adhesive onto the enclosure.
Important: Don’t remove the top release liner yet.

Bottom release liner (1)
Adhesive (2)
Note: The replacement back glass adhesive for the model may look different from the illustration, but the steps are the same.

Inspect the back glass adhesive to ensure that it’s positioned on the shelf of the enclosure. If the adhesive isn’t correctly positioned on the enclosure, repeat reassembly steps 2 and 3. Then repeat reassembly steps 5 through 8.
Use the black stick to adhere the back glass adhesive to the enclosure. Move the black stick around the edge of the enclosure at least three times to ensure that the adhesive is adhered evenly.

Remove the top release liner in a clockwise direction starting from the middle left side.
Important: Don’t remove the release liners on the perimeter of the enclosure.

Top release liner

Insert the suction cups into the repair tray.
Align the right edge of the back glass with the right edge of the enclosure. Gently press along the edges of the back glass to secure it to the suction cups.
- Caution: Don’t press the back of the back glass to secure it to the suction cups. Pressing the back may affect functionality.
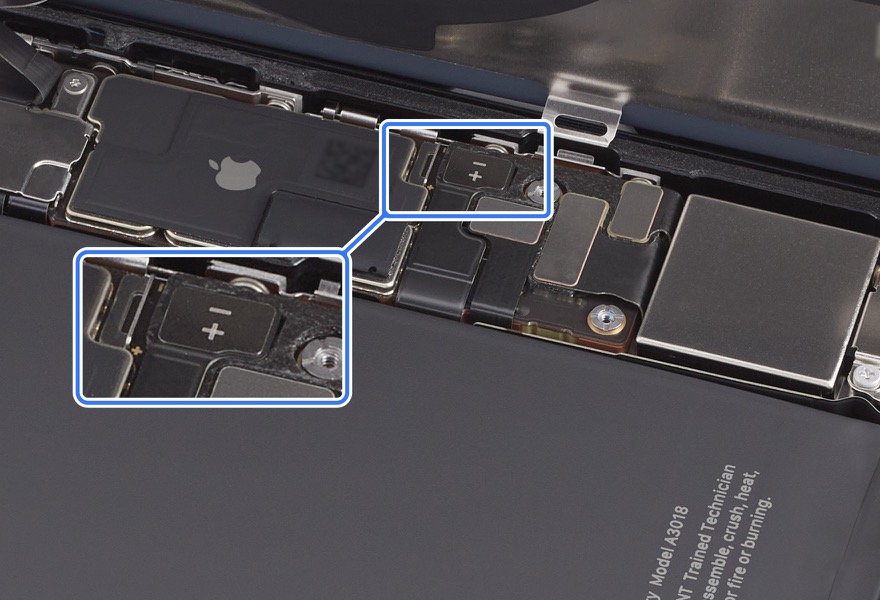
Press the end of the back glass flex cable (1) to the connector.

Position the upper cowling in the enclosure.

Use the black stick to lightly press the edge of the cowling to move it about 1 mm toward the bottom of the iPhone to engage the hooks at the bottom of the cowling. Ensure that the cowling lays flat.

Use the green torque driver and Micro stix bit to install one new trilobe screw (923-09820) into the upper cowling.
- Caution: The third strip of the middle release liner runs under one flex cable. Don’t damage the flex cable while removing the release liner.

Press the end of the battery flex cable (2) to the connector.

Use ESD-safe tweezers to position the lower cowling by engaging the top hook.
Use the green torque driver and Micro stix bit to install two new trilobe screws (923-09819) into the lower cowling.

Peel the first strip of the middle release liner (1) clockwise, starting at the bottom left of the enclosure. Peel the second strip (2) counterclockwise, starting at the bottom right of the enclosure. Peel the third strip (3) clockwise, starting at the bottom right of the enclosure.


Inspect the back glass adhesive to ensure that it’s in the correct position and not damaged or wrinkled. If the adhesive is damaged, remove it and apply replacement adhesive.
- Warning: Carefully inspect the back glass for loose or extra screws and other small parts that may have attached to magnetized areas. These small parts can damage the iPhone and cause safety or functional issues when the iPhone is reassembled.


Pull the tabs on the suction cups to release them from the back glass.
- Warning: If the battery is dented, punctured, or otherwise damaged, stop the repair. You can find a service option at support.apple.com/repair.
Remove the camera cap and tilt down the back glass to rest on the enclosure.
Remove the suction cups from the repair tray.

Press the back glass on the four areas shown simultaneously. Then press along the edges of the back glass until the back glass is flush with the enclosure.

- Caution
Ensure that the flex cables aren’t trapped between the back glass and the enclosure. Feel the edges of the back glass for variations or gaps. If the back glass isn’t flush, repeat all removal steps and check the flex cables for damage. Then repeat reassembly steps 1 through 25 before continuing to step 26.
Don’t touch the camera lenses.
Raised edges

Edges in correct position

Turn the iPhone over in the repair tray so the display is faceup.

Position the repair tray with the display faceup in the display press. Pull down the lever until the display press locks.

Wait until the timer on the display press beeps and timer shows 0. Pull down the lever (1) and pull out the release knob (2). Then lift the lever (3).

Remove the repair tray from the display press.
Use the blue torque driver and Torx security bit to install two new security screws, one on each side of the USB-C connector. Count five clicks as you install each new screw to ensure that the screw is fully installed.
- Caution: If the screws aren’t flush, remove and set aside the screws. Then repeat step 31 to install a new set of security screws. If the new screws aren’t flush, repeat all removal and reassembly steps.
Note: Use the correct screw color for your model.
Black (923-09817)
Blue, green, pink, yellow (923-09818)
Important
Depending on the part replaced, Repair Assistant may be available on the device to finish the repair. Learn how to initiate Repair Assistant.
Note: If you have not run Repair Assistant, the device’s parts and service history may show a part status of “finish repair,” and Apple Diagnostics for Self Service Repair may show a part status of “unknown.”