Add and edit drawings in Keynote on iPad
You can create and edit drawings on your slides using Apple Pencil or your finger, then move or resize them.

Note: If you want to use your Apple Pencil for selecting objects and scrolling instead of drawing, tap ![]() , tap Apple Pencil, then turn on Select and Scroll. If your Apple Pencil supports it, you can turn on Double-Tap to Switch, then double-tap the lower part of Apple Pencil to turn Select and Scroll on and off.
, tap Apple Pencil, then turn on Select and Scroll. If your Apple Pencil supports it, you can turn on Double-Tap to Switch, then double-tap the lower part of Apple Pencil to turn Select and Scroll on and off.
Add a drawing
Do one of the following:
Use Apple Pencil: Start drawing anywhere on the slide.
Use your finger: Tap
 , tap
, tap  , then tap Drawing.
Draw anywhere on the slide; you can do any of the following at any time:
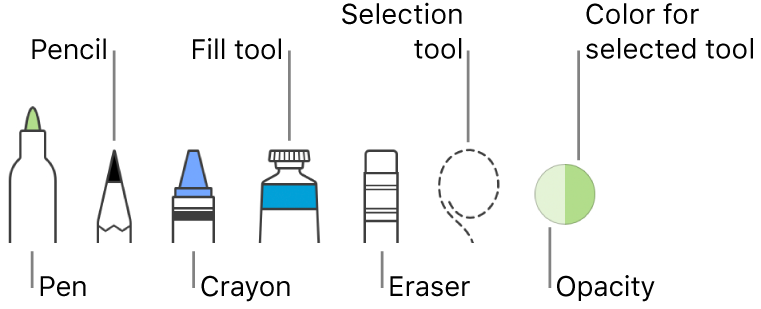
Switch drawing tools: Tap any of the tools at the bottom of the screen. Tap the tool again to see more options.
Change colors: Tap the current color at the bottom of the screen, then tap a new color. Swipe left to see tools to fine-tune the color.
Change the color of part of your drawing: Tap the selection tool, then drag around a portion of the drawing to select it. Tap the current color at the bottom of the screen, then tap a new one. Swipe left to see tools to fine-tune the color.
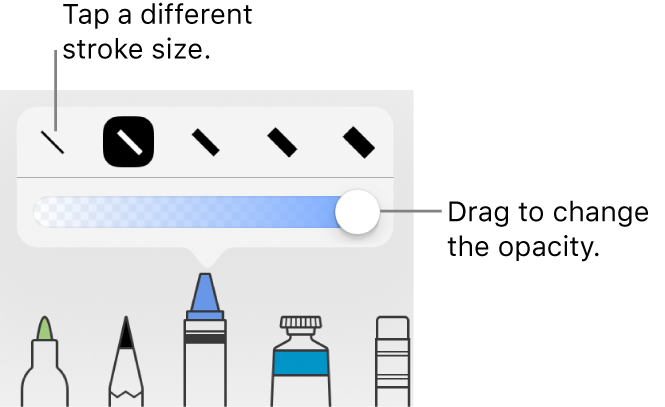
Adjust the color’s opacity: If you’re using the pen, pencil, crayon, or fill tool, tap it, then drag the slider.
Adjust the stroke size (line thickness): If you’re using the pen, pencil, crayon, or eraser, tap it, then tap a stroke size.

Fill an area with color: Tap the fill tool, then tap the area. To draw a shape already filled with color, tap the fill tool, then draw the shape.
Erase a stroke: Tap the eraser tool, tap it again, tap
 , then tap the stroke.
Duplicate part of your drawing: Tap the selection tool, drag around a portion of the drawing to select it, then tap Duplicate.
Scroll the slide: Swipe with two fingers; if you’re using Apple Pencil, swipe with one finger instead.
Tap Done.
Drag your drawing to move it. To resize it, tap it with a finger, then drag any blue dot. To edit a drawing, tap it with Apple Pencil or double-tap it with a finger.
Separate a drawing into parts
You can separate a drawing into individual objects that you can move, resize, or delete separately.
Double-tap the drawing with a finger.
Tap the selection tool, then drag around the part of the drawing you want to separate.
Tap Separate.
You can repeat this process to separate a drawing into multiple objects.
Merge drawings
You can merge drawings so that they stay together as a single object, which you can move and resize as a whole.
Touch and hold one object, then tap the other objects with another finger.
Tap Merge.
Animate a drawing
You can animate a drawing using the Line Draw build-in or build-out effect so that it appears in your presentation as if it’s being drawn or disappears as if it’s being erased.
Tap the drawing you want to animate, then tap Animate.
Tap Build In or Build Out, then tap Line Draw at the top of the Effects list.
Tap Options, then do any of the following:
Adjust how long the animation plays: Drag the Duration slider.
Change how quickly the drawing appears or disappears: Tap Acceleration, then choose an option.
Change when to start the animation: Tap After Transition or On Tap.
Preview the animation: Tap Play.
Tap Done in the upper-right corner of the screen.
To learn more, see Animate an object onto and off a slide.
Note: If you copy an animated drawing from Pages or Numbers into Keynote, the animation is removed. You can add the animation again using the steps above.
Share or save a drawing
You can share or save a drawing as an image.
On the slide, tap the drawing, then tap Share.
Do one of the following:
Share: Tap a method for sending the drawing.
Save: Tap Save to Files or, to save to Photos, tap Save Image.