Final Cut Pro User Guide for Mac
- Welcome
- What’s new
-
- Intro to effects
-
- Intro to transitions
- How transitions are created
- Add transitions and fades
- Quickly add a transition with a keyboard shortcut
- Set the default duration for transitions
- Delete transitions
- Adjust transitions in the timeline
- Adjust transitions in the inspector and viewer
- Merge jump cuts with the Flow transition
- Adjust transitions with multiple images
- Modify transitions in Motion
-
- Add storylines
- Use the precision editor
- Conform frame sizes and rates
- Use XML to transfer projects
- Glossary
- Copyright

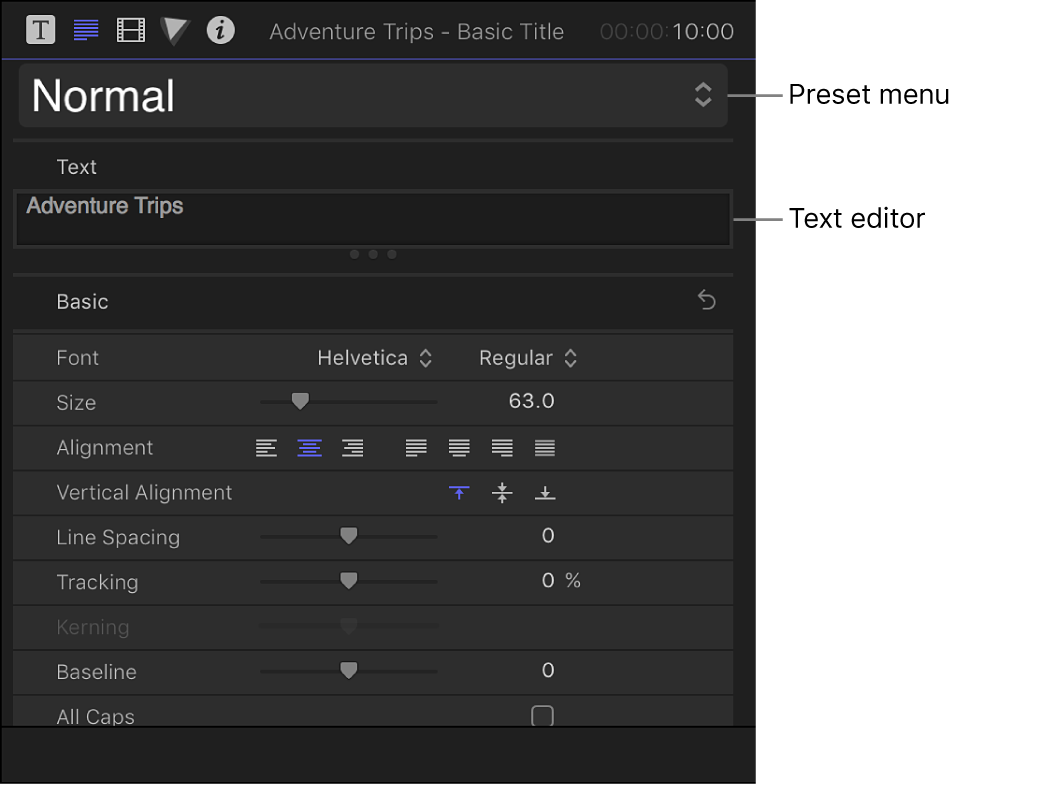
Text inspector controls in Final Cut Pro for Mac
You can make common text adjustments using controls in the Text inspector.
To access these controls, select a title clip in the Final Cut Pro timeline, then open the Text inspector.

Preset pop-up menu
Preset: An unlabeled pop-up menu at the top of the Text inspector, used to apply preset text styles to titles in the timeline. You can also use this pop-up menu to save text appearance and format settings. See Apply preset text styles in Final Cut Pro for Mac.
Text editor
Text: Many titles include a text field (the darker shaded area) to add and edit text in your title from the inspector.
Basic controls
Font: A pop-up menu to choose a font for selected text.
Font Style: An unlabeled pop-up menu (to the right of the Font pop-up menu) to choose a type style, such as Regular, Bold, Condensed, and so on. The available styles are specific to the font family selected in the Font pop-up menu.
Size: A slider to set the point size of the text. The slider is constrained to a maximum of 288 points. To create larger text, drag to the right over the numeric value slider, or click the value, type a new number, and press Return.
Alignment: Buttons to set the alignment and justification of text.
Vertical Alignment: Buttons to set the vertical alignment of text.
Line Spacing: A slider to set the distance between each line of text (leading) in point-size increments.
Tip: To modify the spacing for individual lines of text when hard returns are present, select text, then adjust the Line Spacing slider. Spacing is modified on the line that includes the selected text.
Tracking: A slider to set the spacing between text characters; applies a uniform value between each character.
Kerning: A slider to adjust spacing between text characters.
Baseline: A slider to adjust the baseline of text characters: an invisible horizontal line defining the bottom alignment of characters.
All Caps: A checkbox to make text characters uppercase.
All Caps Size: A slider (available when the All Caps checkbox is selected) to set the size of uppercase characters based on a percentage of the font point size.
Download this guide: PDF