Logic Pro User Guide for iPad
-
- What is Logic Pro?
- Working areas
- Work with function buttons
- Work with numeric values
-
- Intro to tracks
- Create tracks
- Create tracks using drag and drop
- Choose the default region type for a software instrument track
- Select tracks
- Duplicate tracks
- Reorder tracks
- Rename tracks
- Change track icons
- Change track colors
- Use the tuner on an audio track
- Show the output track in the Tracks area
- Delete tracks
- Edit track parameters
- Start a Logic Pro subscription
- How to get help
-
- Intro to recording
-
- Before recording software instruments
- Record software instruments
- Record additional software instrument takes
- Record to multiple software instrument tracks
- Record multiple MIDI devices to multiple tracks
- Record software instruments and audio simultaneously
- Merge software instrument recordings
- Spot erase software instrument recordings
- Replace software instrument recordings
- Capture your most recent MIDI performance
- Route MIDI internally to software instrument tracks
- Record with Low Latency Monitoring mode
- Use the metronome
- Use the count-in
-
- Intro to arranging
-
- Intro to regions
- Select regions
- Cut, copy, and paste regions
- Move regions
- Remove gaps between regions
- Delay region playback
- Trim regions
- Loop regions
- Repeat regions
- Mute regions
- Split and join regions
- Stretch regions
- Separate a MIDI region by note pitch
- Bounce regions in place
- Change the gain of audio regions
- Create regions in the Tracks area
- Convert a MIDI region to a Session Player region or a pattern region
- Rename regions
- Change the color of regions
- Delete regions
-
- Intro to chords
- Add and delete chords
- Select chords
- Cut, copy, and paste chords
- Move and resize chords
- Loop chords on the Chord track
- Edit chords
- Work with chord groups
- Use chord progressions
- Change the chord rhythm
- Choose which chords a Session Player region follows
- Analyze the key signature of a range of chords
- Create fades on audio regions
- Extract vocal and instrumental stems with Stem Splitter
- Access mixing functions using the Fader
-
- Intro to Step Sequencer
- Use Step Sequencer with Drum Machine Designer
- Record Step Sequencer patterns live
- Step record Step Sequencer patterns
- Load and save patterns
- Modify pattern playback
- Edit steps
- Edit rows
- Edit Step Sequencer pattern, row, and step settings in the inspector
- Customize Step Sequencer
-
- Effect plug-ins overview
-
- Instrument plug-ins overview
-
- ES2 overview
- Interface overview
-
- Modulation overview
- Use the Mod Pad
-
- Vector Envelope overview
- Use Vector Envelope points
- Use Vector Envelope solo and sustain points
- Set Vector Envelope segment times
- Vector Envelope XY pad controls
- Vector Envelope Actions menu
- Vector Envelope loop controls
- Vector Envelope point transition shapes
- Vector Envelope release phase behavior
- Use Vector Envelope time scaling
- Modulation source reference
- Via modulation source reference
-
- Sample Alchemy overview
- Interface overview
- Add source material
- Save a preset
- Edit mode
- Play modes
- Source overview
- Synthesis modes
- Granular controls
- Additive effects
- Additive effect controls
- Spectral effect
- Spectral effect controls
- Filter module
- Low, bandpass, and highpass filters
- Comb PM filter
- Downsampler filter
- FM filter
- Envelope generators
- Mod Matrix
- Modulation routing
- Motion mode
- Trim mode
- More menu
- Sampler
- Studio Piano
- Copyright
Multipressor controls in Logic Pro for iPad
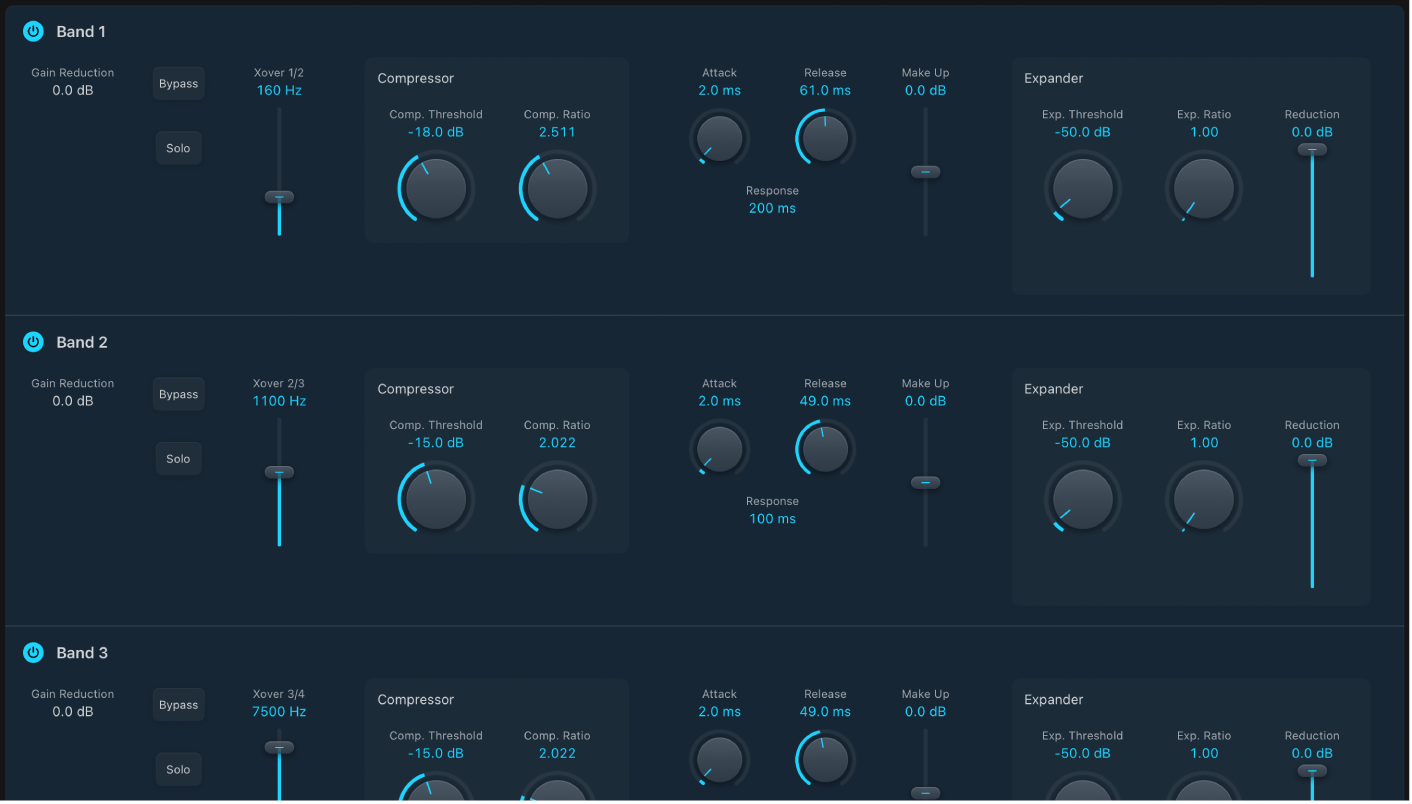
Multipressor controls for each frequency band are identical.

Common band parameters
Band On/Off button: Turn each band on or off. When enabled, the button is highlighted.
Gain Reduction field: Shows the amount of level reduction or expansion.
Bypass button: Bypass the selected frequency band.
Solo button: Turn on to hear compression or expansion only for the selected frequency band.
Xover slider and field: Drag to set the crossover frequency between adjacent bands.
Compressor parameters
Comp. Threshold knob and field: Set the compression threshold for the selected band. Setting the parameter to 0 dB results in no compression of the band. This parameter can also be set with the upper arrow to the left of each level meter.
Comp. Ratio knob and field: Set the compression ratio for the selected band. Setting the parameter to 1:1 results in no compression of the band.
Attack knob and field: Set the time before compression starts for the selected band, after the signal exceeds the threshold.
Release knob and field: Set the time before compression stops on the selected band, after the signal falls below the threshold.
Response field: Drag vertically to set a smaller value for shorter (peak) detection or a larger value for longer (RMS) detection, in milliseconds.
Make Up slider and field: Drag to set the amount of the gain make-up for each band.
Expander parameters
Exp. Threshold knob and field: Set the expansion threshold for the selected band. Setting the parameter to its minimum value (−60 dB) means that only signals that fall below this level are expanded.
Exp. Ratio knob and field: Set the expansion ratio for the selected band.
Reduction slider and field: Set the amount of downward expansion for the selected band.
Global parameters
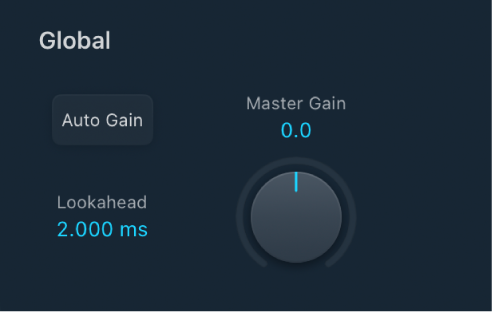
Multipressor output parameters are global and affect all frequency bands.

AutoGain button: Turn on to reference the overall processing of the signal to 0 dB, making the output louder.
Lookahead field: Drag to set how far ahead the effect analyzes the incoming signal, allowing faster reactions to peak volumes.
 Master Gain knob and field: Set the overall amount of gain at the Multipressor output.
Download this guide: PDF