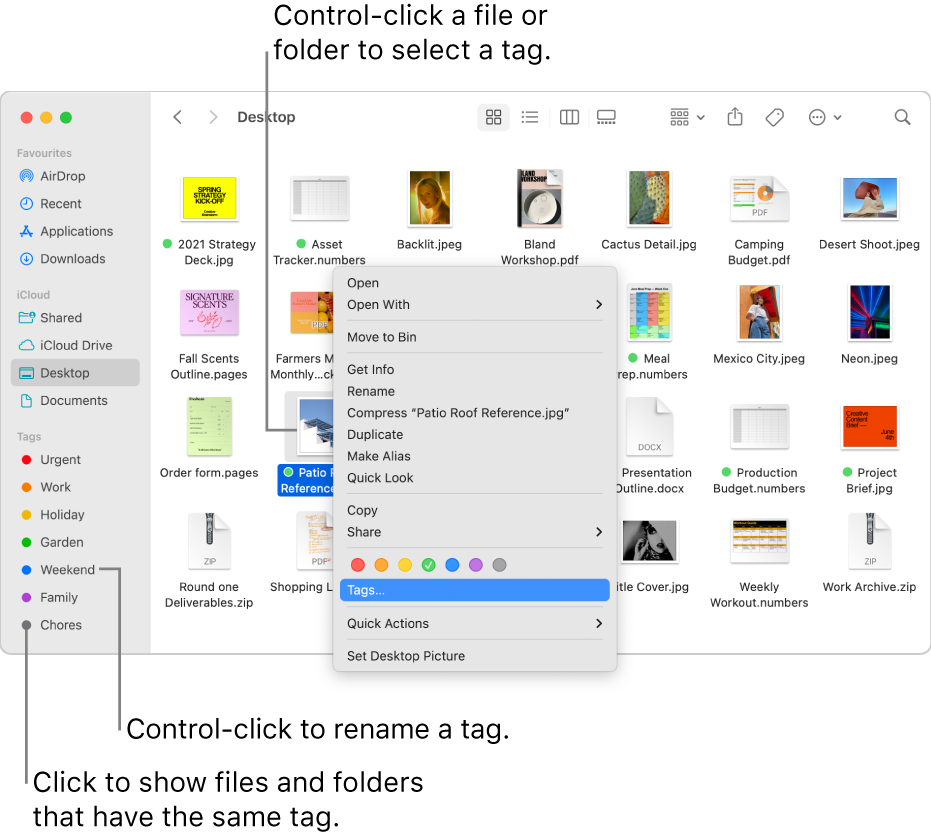
Use tags to organise files on Mac
You can tag files and folders to make them easier to find. Tags work with all your files and folders, whether you store them on your Mac or keep them in iCloud.

Tag files and folders
You can add multiple tags to any file or folder.
On your Mac, do any of the following:
Tag an open file: Hold the pointer to the right of the document title, click the down arrow
 , click in the Tags field, then enter a new tag or choose one from the list.
Tag a new file when you save it: Click File > Save. In the Save dialogue, click in the Tags field, then enter a new tag, or choose one from the list.
Tag a file on the desktop or in the Finder: Select the item, then open the File menu. You can also Control-click the item, or tap it with two fingers. Choose a colour
 above Tags (the name of the tag replaces Tags as you move the pointer over the colour) or click Tags to choose from more tags or to enter a new tag.
In a Finder window, you can also select the item, click the Tags button
 , then enter a new tag, or choose one from the list.
Tip: Use keyboard shortcuts to tag files quickly — select a file, then use Control-1 through Control-7 to add (or remove) your favourite tags. Control-0 (zero) removes all tags from a file.
Find items you tagged
On your Mac, click the Finder icon
 in the Dock to open a Finder window.
Do any of the following:
Search for a tag: Enter the tag colour or name in the search field, then select the tag from the suggestions.
Select a tag in the sidebar: To see everything with a certain tag, click the tag
 in the Finder sidebar.
To change the items you see in the sidebar, choose Finder > Preferences, click Tags, then select the tags you want to see.
Group items by a tag: Click the Group button
 , then choose Tags.
Sort items by a tag: In any view, choose View > Show View Options, click the Sort By pop-up menu, then choose Tags. In List view, select the Tags tick box to display the column, move the pointer over the Tags column, then click it. Click the column name again to reverse the sort order.
Remove tags
On your Mac, do one of the following:
Remove tags from an item: Control-click the item or tap it with two fingers, then click Tags. Select the tags you want to remove, then press Delete.
Remove tags from your Mac: In the Finder, choose Finder > Preferences, then click Tags. Select the tags you want to remove, then click the Remove button
 .
.
Edit tags
In the Finder
 on your Mac, choose Finder > Preferences, then click Tags.
Do any of the following:
See a tag in the Finder sidebar: Select the blue tick box to the right of the tag.
Change a tag colour: Click the colour next to the tag
 , then choose a new colour.
Change a tag name: Click the tag, click the tag’s name, then enter a new name.
Create a new tag: Click the Add button
 .
.Delete a tag: Select the tag, then click the Remove button
 .
.Add a tag to the shortcut menu: Select the tag in the list, then drag it over the tag you want to replace in the favourites section at the bottom of the window. There can be up to seven tags in the shortcut menu that appears when you Control-click a file.
Remove a tag from the shortcut menu: Drag the tag out of the Favourite Tags section until you see the remove sign
 .
.