Logic Pro User Guide for iPad
-
- What is Logic Pro?
- Working areas
- Work with function buttons
- Work with numeric values
-
- Intro to tracks
- Create tracks
- Create tracks using drag and drop
- Choose the default region type for a software instrument track
- Select tracks
- Duplicate tracks
- Reorder tracks
- Rename tracks
- Change track icons
- Change track colors
- Use the tuner on an audio track
- Show the output track in the Tracks area
- Delete tracks
- Edit track parameters
- Start a Logic Pro subscription
- How to get help
-
- Intro to recording
-
- Before recording software instruments
- Record software instruments
- Record additional software instrument takes
- Record to multiple software instrument tracks
- Record multiple MIDI devices to multiple tracks
- Record software instruments and audio simultaneously
- Merge software instrument recordings
- Spot erase software instrument recordings
- Replace software instrument recordings
- Capture your most recent MIDI performance
- Route MIDI internally to software instrument tracks
- Record with Low Latency Monitoring mode
- Use the metronome
- Use the count-in
-
- Intro to arranging
-
- Intro to regions
- Select regions
- Cut, copy, and paste regions
- Move regions
- Remove gaps between regions
- Delay region playback
- Trim regions
- Loop regions
- Repeat regions
- Mute regions
- Split and join regions
- Stretch regions
- Separate a MIDI region by note pitch
- Bounce regions in place
- Change the gain of audio regions
- Create regions in the Tracks area
- Convert a MIDI region to a Session Player region or a pattern region
- Rename regions
- Change the color of regions
- Delete regions
-
- Intro to chords
- Add and delete chords
- Select chords
- Cut, copy, and paste chords
- Move and resize chords
- Loop chords on the Chord track
- Edit chords
- Work with chord groups
- Use chord progressions
- Change the chord rhythm
- Choose which chords a Session Player region follows
- Analyze the key signature of a range of chords
- Create fades on audio regions
- Extract vocal and instrumental stems with Stem Splitter
- Access mixing functions using the Fader
-
- Intro to Step Sequencer
- Use Step Sequencer with Drum Machine Designer
- Record Step Sequencer patterns live
- Step record Step Sequencer patterns
- Load and save patterns
- Modify pattern playback
- Edit steps
- Edit rows
- Edit Step Sequencer pattern, row, and step settings in the inspector
- Customize Step Sequencer
-
- Effect plug-ins overview
-
- Instrument plug-ins overview
-
- ES2 overview
- Interface overview
-
- Modulation overview
- Use the Mod Pad
-
- Vector Envelope overview
- Use Vector Envelope points
- Use Vector Envelope solo and sustain points
- Set Vector Envelope segment times
- Vector Envelope XY pad controls
- Vector Envelope Actions menu
- Vector Envelope loop controls
- Vector Envelope point transition shapes
- Vector Envelope release phase behavior
- Use Vector Envelope time scaling
- Modulation source reference
- Via modulation source reference
-
- Sample Alchemy overview
- Interface overview
- Add source material
- Save a preset
- Edit mode
- Play modes
- Source overview
- Synthesis modes
- Granular controls
- Additive effects
- Additive effect controls
- Spectral effect
- Spectral effect controls
- Filter module
- Low, bandpass, and highpass filters
- Comb PM filter
- Downsampler filter
- FM filter
- Envelope generators
- Mod Matrix
- Modulation routing
- Motion mode
- Trim mode
- More menu
- Sampler
- Studio Piano
- Copyright
Edit a Session Player performance in Logic Pro for iPad
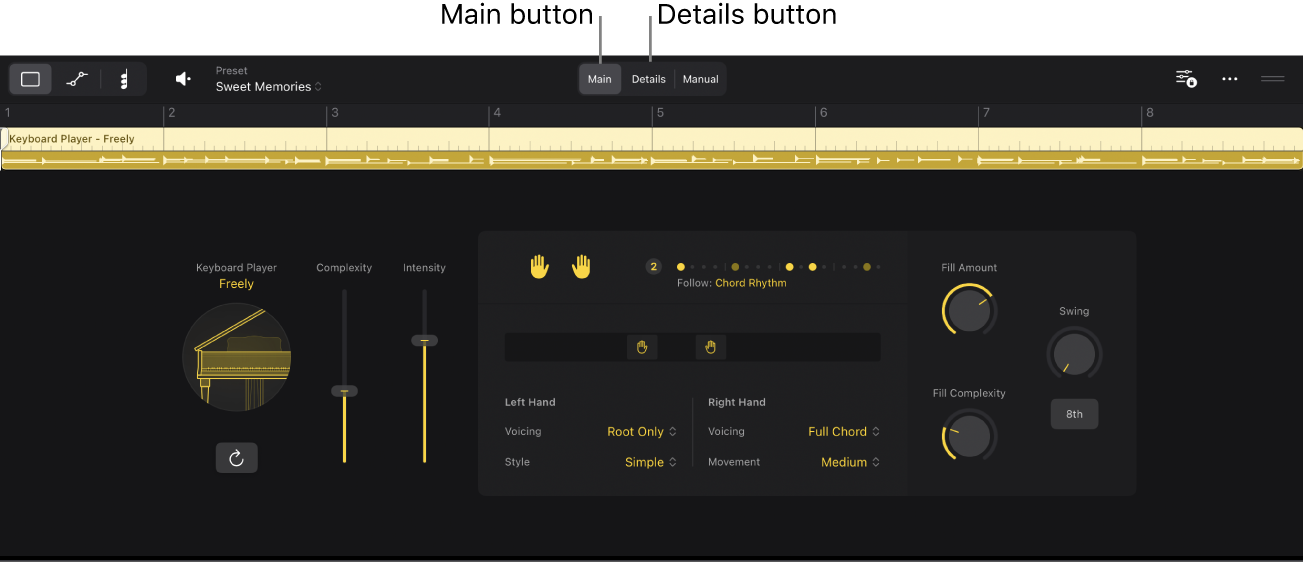
There are a number of settings in the Session Player Editor in Logic Pro for iPad that are common to all Session Players (Bass Player, Keyboard Player, and Drummer). You can access these settings using the Main button and Details button in the Session Player Editor.
For all Session Players, you can choose a pattern, edit the complexity and intensity of the performance, adjust the amount and complexity of fills, and edit swing settings and other performance settings. As you adjust the settings, they interact with each other, creating a near-endless number of performances.

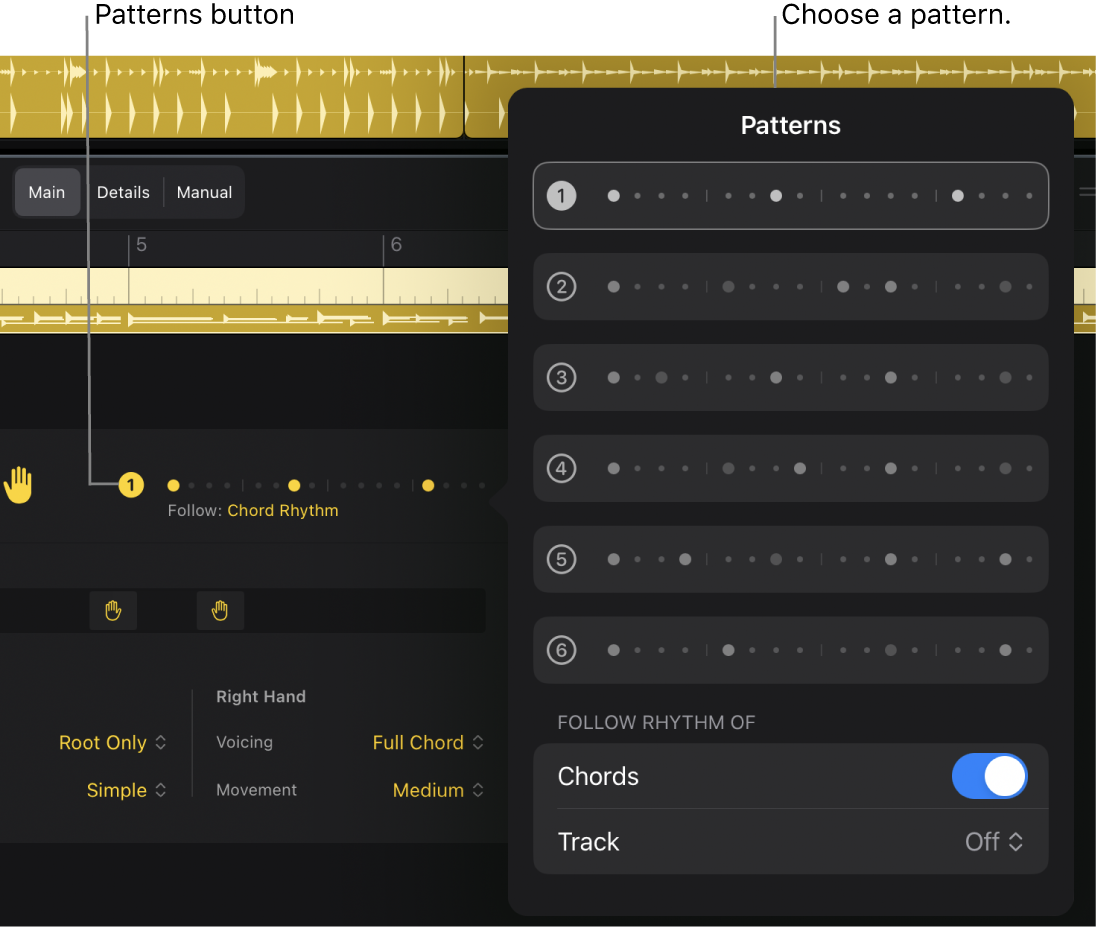
Patterns form the rhythmic basis of a performance and are rough visualizations of performances. Each pattern represents a musical bar divided into sixteenth notes (dots). A brighter dot indicates the main accents for the Session Player to play or accentuate a note. The dimmer dots indicate probable accents when the complexity setting is higher. In addition to choosing a predefined pattern, you can also create your own pattern from scratch.

Some settings are unique to specific Session Players, instruments, and styles. See Edit a Keyboard Player performance, Edit a Bass Player performance, and Edit a Drummer performance.
Adjust the complexity or intensity of the performance
In the Logic Pro Session Player Editor, drag the Complexity slider or Intensity slider to adjust the performance.
The higher you drag the respective slider, the greater the complexity or intensity of the performance.
Choose a rhythmic pattern
In the Logic Pro Session Player Editor, tap the Patterns button to open the Patterns dialog, then choose a pattern.

Note: The Drummer features multiple Patterns buttons that allow you to choose different patterns for the various kit pieces. The patterns show multiple rows of dots for the different kit pieces, which you can mute using the kit piece icons. For the hi-hat, cymbal, toms, and percussion pieces, the brighter dots indicate stronger accents and the dimmer dots weaker accents.
Edit fill settings
In the Logic Pro Session Player Editor, do any of the following:
To decrease or increase the number and length of fills: Drag the Fill Amount knob vertically.
To decrease or increase the complexity of the fills: Drag the Fill Complexity knob vertically.
Edit swing settings
In the Logic Pro Session Player Editor, do any of the following:
To adjust the shuffle feel of the currently playing pattern: Drag the Swing knob vertically.
To determine whether the swing is based on eighth notes or sixteenth notes: Tap the 8th or 16th button.
Edit other performance settings
In the Logic Pro Session Player Editor, tap the Details button, then do any of the following:
Drag the Feel knob up to have the Session Player play ahead of the beat or down to play behind the beat.
Drag the Dynamics knob vertically to adjust the range of the volume.
Drag the Humanize knob vertically to influence the quantization of patterns. The more to the right you turn the knob, the more rhythmically loose the performance becomes.
Choose an option from the Tempo pop-up menu to change how fast the rhythm is played.
Note: When you choose Automatic, the Session Player plays in half-time or double-time when the project tempo differs greatly from the default tempo of the style.
Copy settings from one Session Player region to another
In Logic Pro, tap the More button
 on the right side of the Session Player Editor menu bar, then tap Copy.
Select the destination Session Player region in the Tracks area.
The Session Player Editor refreshes to show the currently selected region’s settings.
In the Session Player Editor, tap the More button again, then tap Paste.
The performance settings of the destination region are replaced with the style and settings of the copied region.
Keep settings when changing style or preset
After you make changes to the Session Player’s performance, you can lock the performance settings to prevent any changes when switching styles. You can also lock the Fills and Swing parameters when changing styles and presets.
In Logic Pro, tap the Lock Settings button
 on the right side of the Session Player Editor menu bar, then choose the settings you want to lock.
You can also quickly create a new performance for the selected region, without editing any settings in the Session Player Editor, to play back a subtly different version.
Download this guide: PDF