Keynote User Guide for iPhone
- Welcome
-
- Intro to Keynote
- Intro to images, charts, and other objects
- Create your first presentation
- Choose how to navigate your presentation
- Open a presentation
- Save and name a presentation
- Find a presentation
- Print a presentation
- Copy text and objects between apps
- Basic touchscreen gestures
- Create a presentation using VoiceOver
-
- Send a presentation
- Intro to collaboration
- Invite others to collaborate
- Collaborate on a shared presentation
- Follow activity in a shared presentation
- Change a shared presentation’s settings
- Stop sharing a presentation
- Shared folders and collaboration
- Use Box to collaborate
- Create an animated GIF
- Post your presentation in a blog
- Copyright

Add or remove rows and columns in Keynote on iPhone
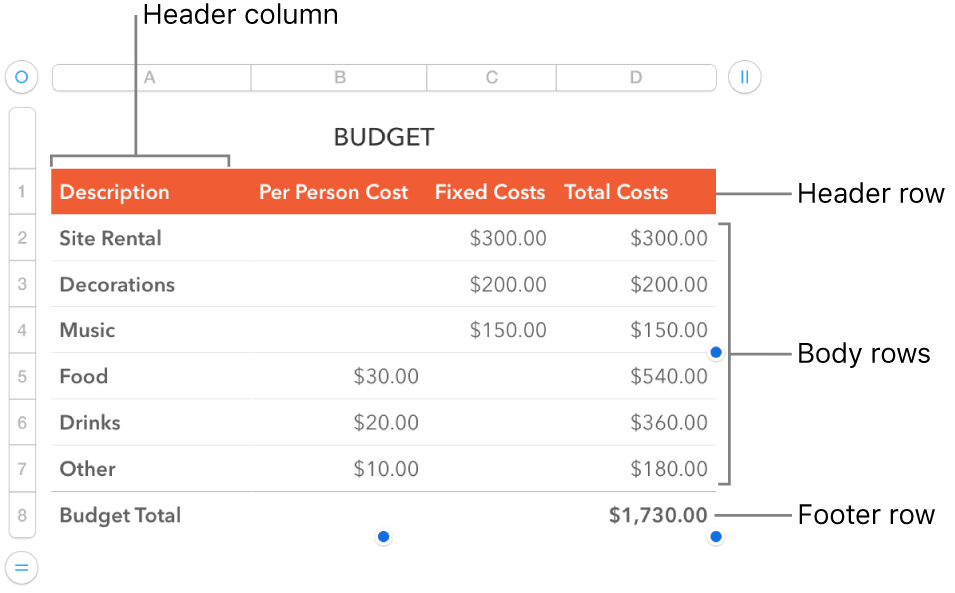
You can add, delete, and rearrange rows and columns in a table. There are three types of rows and columns:
Body rows and columns contain the table data.
Header rows and columns (if any) appear at the top and left side of the table. They usually have a different background color from the body rows, and they’re typically used to identify what the row or column contains.
Footer rows (if any) appear at the bottom of a table, and they can have a different background color from the body rows.

Add or remove rows and columns
Tap the table.
Do any of the following:
Add or delete rows or columns at the edge of the table: Tap
 in the bottom-left corner of the table to add or delete rows. Tap
  in the top-right corner of the table to add or delete columns.
Change the number of rows or columns in the table: Select the table, tap
 , tap Table, then use
  next to Rows or Columns, or tap the number of rows or columns to enter a new value.
Insert or delete a row or column within the table: Tap the row number or column letter, then tap Insert or Delete.
You may not be able to delete a row or column if all its cells aren’t empty.
Add or remove header rows and columns
Adding header rows, header columns, and footer rows converts existing rows or columns to headers or footers. For example, if you have data in the first row of a table and you add a header row, the first row is converted to a header that contains the same data. Data in header cells isn’t used in calculations.
Tap the table, tap
 , tap Table, then tap Headers & Footer.
Tap
 next to a header or footer category.