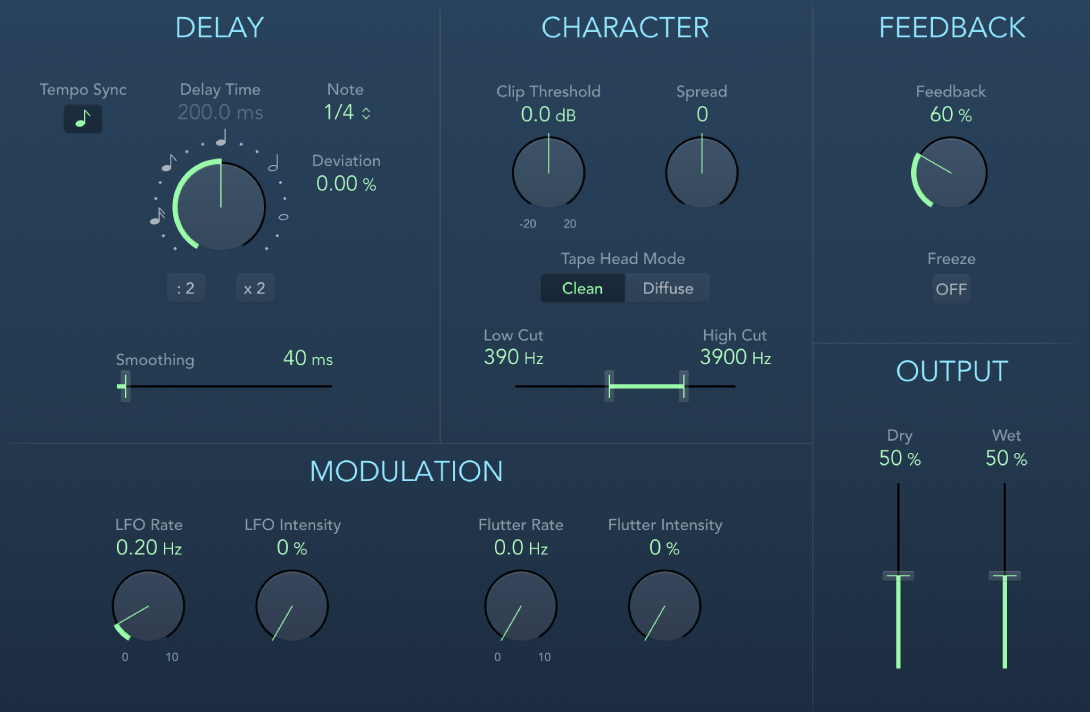
Tape Delay controls in Final Cut Pro for Mac
Tape Delay simulates the sound of vintage tape echo machines. It can run at a free rate or be synchronized with the clip. The effect is equipped with a highpass and lowpass filter in the feedback loop, making it easy to create authentic dub echo effects. Tape Delay also includes an LFO for delay time modulation. This can be used to produce chorus effects, even on long delays.
To add the Tape Delay effect to a clip and show the effect’s controls, see Add Logic effects to clips in Final Cut Pro for Mac.

Tempo Sync button: This is used to sync delay repeats with the clip in Logic Pro and is disabled for use in Final Cut Pro.
Delay Time knob and field: Set the delay time in milliseconds. Notes (and dots) are displayed around the Delay Time knob when the delay time is synchronized with the clip. Click the notes or dots (or rotate the knob) to choose an exact synchronization value.
Note: Clicking note or dot values resets the Deviation parameter value. Choose a value from the Note pop-up menu to retain the current Deviation value.
: 2 and x 2 buttons: Halve or double the current delay time.
Note pop-up menu: Set the grid resolution for the delay time.
Deviation field: Set the amount of deviation from the grid.
Smoothing slider and field: Even out the LFO and flutter effect. See the LFO and Flutter parameter descriptions, below.
Clip Threshold knob: Set the level of the distorted tape saturation signal. Higher values produce no additional audible distortion. Lower values result in an aggressive distortion. This behavior is influenced by high Feedback values, which result in eventual distortion, irrespective of the Clip Threshold value. However, aggressive distortion and signal breakup are achieved far more rapidly when a low Clip Threshold level is used.
Spread knob and field: Set the width of the effect signal in stereo instances. This parameter is not available in mono instances.
Tape Head Mode buttons: Click either Clean or Diffuse to emulate a different tape head position. This affects the behavior of other parameters, such as Flutter and Feedback.
Low Cut and High Cut sliders and fields: Cut frequencies below the Low Cut value and above the High Cut value to shape the sound of taps (delay repeats) with the highpass and lowpass filters. The filters are located in the feedback circuit, which means that the filtering effect increases in intensity with each delay repeat. If you want an increasingly muddy and confused tone, move the High Cut slider toward the left. For ever thinner echoes, move the Low Cut slider toward the right. If you can’t hear the effect, check the Dry and Wet controls and the filter settings.
LFO Rate knob and field: Set the speed of the LFO.
LFO Intensity knob and field: Set the amount of LFO modulation. A value of 0 turns off delay modulation.
Flutter Rate and Flutter Intensity knobs and fields: Simulate the speed irregularities of tape transports used in analog tape delay units.
Flutter Rate: Set the speed variation.
Flutter Intensity: Set the intensity of the flutter effect.
Feedback knob: Set the amount of delayed and filtered signal that is routed back to the input. Set Feedback to the lowest possible value to generate a single echo. Set Feedback to 100% to endlessly repeat the signal. The levels of the original signal and taps (echo repeats) tend to accumulate and may cause distortion. Use the Character controls to change the color of these overdriven signals.
Freeze button: Capture current delay repeats and sustain them until Freeze is turned off.
Dry and Wet sliders and fields: Independently control the amount of original and effect signal.
Download this guide: PDF