Match the tempo automatically in Logic Pro for Mac
Record without a metronome, have Smart Tempo analyze the recording and automatically create a tempo map, then use hints to refine the analysis and add time signature changes.
You can record audio or MIDI tracks without a metronome and have Smart Tempo analyze the recording two ways:
With free tempo recording, record without a metronome and quickly adapt the track to the project tempo or adapt the project tempo to the newly recorded track. You can make a free recording in an empty project or in a project that already has other tracks. You can also choose to apply an average tempo of your free recording to the project.
With Adapt or Automatic mode, record without a metronome and have Logic Pro match the project tempo while recording. You can then use tempo-related tools like the metronome, the Drummer plug-in, and tempo-synced effects, which will follow the tempo map of your original recording.
After you record, use hints to improve the tempo analysis and to add time signature data.
If you don’t want to use Smart Tempo features, choose Keep mode.
Use free tempo recording
Add the Free Tempo Recording button to the toolbar:
Click the Display Mode pop-up menu in the LCD, located in the center of the control bar.
Under Transport, choose Free Tempo Recording.
Click the Free Tempo Recording button
 , then play your part. If your project has other tracks, they’re muted while you record so you can play without thinking about the tempo.
Click the Free Tempo Recording button again when you’re finished.
In the window that appears, choose how you want Smart Tempo to handle the analysis, then click Apply.
If this is the first track in the project, you might want to choose “Apply region tempo to project tempo,” which will create a tempo map for the project.
If the project had tracks before this, you might want to choose “Apply Project Tempo to Region,” so the new recording conforms to the tempo of the other tracks in the project.
Trim any silence from the beginning or end of the recording and move the region to the location you want in the timeline.
To determine the accuracy of the Smart Tempo analysis, you can turn on the metronome and play your recording back. If you think the Smart Tempo analysis could be more precise, add hints to improve the analysis, edit beat markers, and more in the Smart Tempo Editor.
Record without a metronome in Adapt or Auto mode
To match the project tempo to your performance while recording, use Adapt or Automatic mode. Use Adapt mode temporarily, when recording the first tracks in your new project. With Automatic mode, Logic Pro automatically chooses Adapt if no tempo reference material is present in the project (or if the metronome off), or chooses Keep mode if there are tracks with tempo reference material present.
Create a new project.
To view the Tracks area, click the Tracks Area button
 .
.Click the Smart Tempo pop-up menu in the Tempo section of the LCD, then choose Adapt or Auto.
Click the Metronome button
 in the toolbar to turn it off.
 Click the Record Enable button
 in the track header .
Click the Record button
 (or press the R key on your keyboard) to start recording the audio or MIDI track. Logic creates a tempo map, which appears in the Tempo track above the Tracks area.
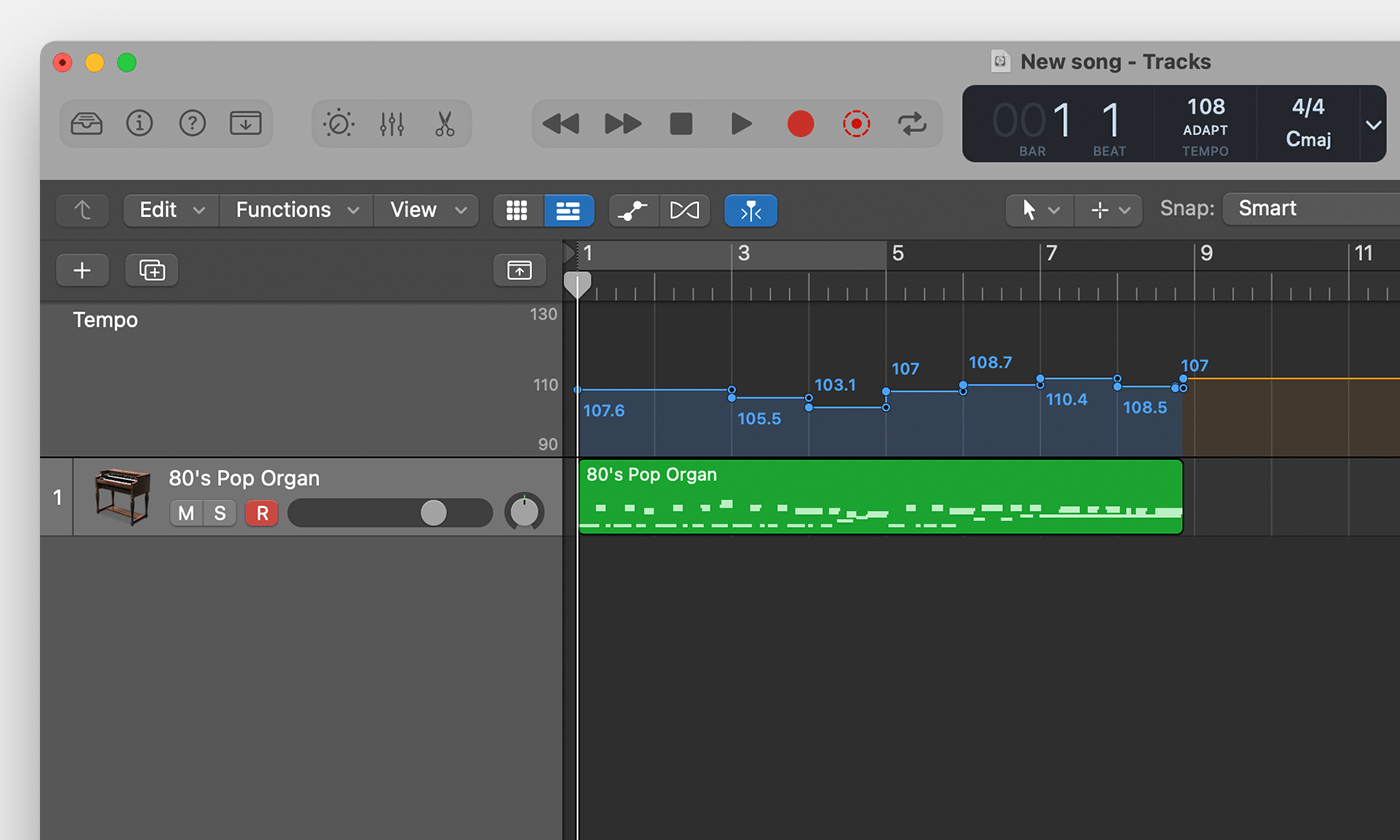
When you’re finished, click the Stop button
 .
. Trim any silence at the beginning or end of the recording, then move the region to the location you want in the timeline. When you move or edit the region, changes in tempo follow region to its new location.
If you used Adapt mode, make sure to switch to Auto or Keep mode so any subsequent recordings don't change the original tempo map.
Next, add a Drummer track, Apple Loops to the track, or other rhythmic elements, which will automatically follow the original tempo map. You can also turn the metronome on, and it will follow the tempo map.
When you move or edit regions, changes in tempo follow regions to their new location. If you did a multitrack recording and you add tracks later, you can add the tracks to the set of tracks Smart Tempo uses to create the tempo map and reanalyze the tempo.
Refine Smart Tempo analysis for audio regions with hints
After initially analyzing an audio region with Smart Tempo, you might want to refine the analysis to make the tempo map more accurate. With Hint Mode in the Smart Tempo Editor, you can add “hints” to help Logic Pro detect downbeats and beats more accurately.
And if your recording has time signature changes and you want Logic Pro to detect them, you must add time signature hints. Time signature changes within a region or selection can only be detected by adding time signature hints.
To use hint mode:
Double-click the region you want to work on in the Tracks area, then click Smart Tempo in the editor at the bottom of the window. Hint mode is on by default, indicated by a lit Hint Mode button
 in the control bar of the Smart Tempo Editor.
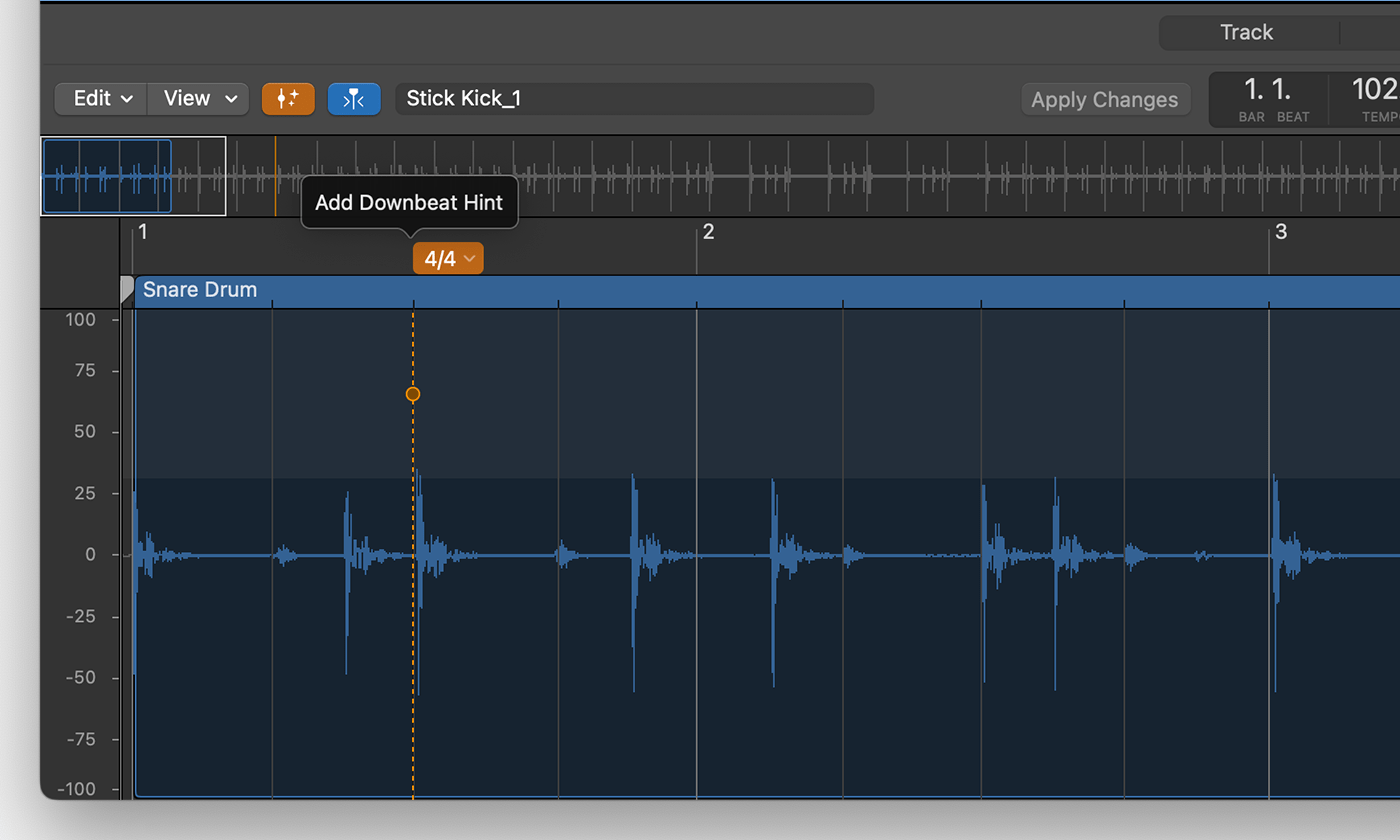
To add a downbeat hint, place your pointer the upper part of the main display of the editor, then click. An orange line with a circular handle appears in the region.
To add a beat hint, click in the lower part of the region in the main display.
To add a time signature hint:
Add a downbeat or beat hint where the time signature change occurs.
Click the time signature above the hint.
Choose the time signature from the pop-up menu.
To add a tempo range, do either of these:
Add a downbeat hint to the first beat of a bar, beat hints to each remaining beat of the bar, and a downbeat hint on the following bar.
Add downbeat hints in three consecutive bars.
After you apply changes and update the tempo analysis, a tempo range is created that lasts until the next hint.
To move a hint, drag the handle to the left or right.
When you’re finished adding hints, click Apply Changes in the toolbar of the editor.
Adding just a few downbeat and beat hints can improve the analysis. You can keep adding hints later, but remember to apply changes every time you add new hints.
Lock a range
If you want to add hints to other areas of the region, you can lock regions you've already analyzed so they're not analyzed when you apply changes again:
To select the range you want to lock, click and drag left or right in the ruler or in the center of the waveform of the Smart Tempo editor.
Option-click the selected range, then choose Lock Range from the pop-up menu.
Preview, edit tempo data, and more in the Smart Tempo Editor
The Smart Tempo Editor also includes other functions:
To edit tempo data in the audio file, click the Edit pop-up menu. You can reanalyze the audio file, apply the tempo of a region to the project or apply the project tempo to a region, extend tempo changes, remove tempo edits made to the file, and more.
To double or halve the tempo of the file, click x2 or /2 in the Tempo display. For example, you might’ve recorded an audio track in Adapt mode, and Logic Pro detected the tempo at double or half the tempo you want.
To preview the file, click Playback icon
 .
. To add a metronome to the preview, click Metronome button
 .
.To loop playback of the file or selection, click Loop icon
 .
.For more detailed editing in the Smart Tempo Editor like scaling a selection of downbeat markers in the selected regions, click the Hint Mode button
to turn off hint mode.
Learn more about using the Smart Tempo Editor
Use Smart Tempo with multitrack recording
For multitrack audio recordings, Logic Pro creates a downmix of a set of the multitrack audio files. Smart Tempo then analyzes the downmix to create the tempo map.
You can work with Smart Tempo and multitrack recordings three ways:
You can create a multitrack recording and have Smart Tempo match the tempo while recording.
You can import multiple audio files into a project and have Smart Tempo analyze them at the same time on import.
You can select audio regions in the Tracks area of a project and have Smart Tempo analyze them together.
When creating a multitrack recording, or if you're importing multiple files into the Tracks area, set these options first.
Choose File > Project Settings > Smart Tempo.
Choose Adapt Project Tempo from the "Default for Project Tempo mode" pop-up menu.
When importing audio files, choose On from the “Set imported audio files to” pop-up menu. This automatically turns on Flex for imported files.
When refining the tempo analysis in the Smart Tempo Editor, make sure to use the downmix, which you can select from the filename display in the toolbar of the Smart Tempo Editor.
Learn more about using Smart Tempo with multitrack recording
If you don’t want to record with Smart Tempo
If you don’t want to use Smart Tempo features, choose Keep mode. With Keep mode, tempo-related material like Drummer tracks conform to the current tempo setting. You can still analyze tracks after the you record them.
To choose Keep mode:
Choose File > Project Settings > Smart Tempo.
From the Project Tempo Mode pop-up menu, choose Keep Project Tempo.