Set up a Windows partition on your Mac
Before you can install Windows your Mac, you need to create and then format a Windows partition.
Setting up a Windows partition is one of the steps for installing Windows on your Mac. Use Boot Camp Assistant to create the partition, then use the Windows installer to format it.
Create the Windows partition
To create the Windows partition, open Boot Camp Assistant and follow the onscreen instructions. Boot Camp Assistant is in the Utilities folder of your Applications folder.
Use only Boot Camp Assistant to create the partition. If you partition with another app and then use Boot Camp Assistant, the drive with the partition could be erased.
Boot Camp Assistant creates the partition only if the drive is formatted as Mac OS Extended (Journaled) and doesn't already have a partition created by Boot Camp Assistant. If Boot Camp Assistant sees other partitions, it may warn you that the startup disk cannot be partitioned.
If you need help determining the best size of the partition, refer to your Windows documentation. For Windows 8, the partition should be at least 30 GB.
If Boot Camp Assistant says that verification failed, repair the drive using Disk Utility. If that doesn't help, back up your drive and reinstall OS X.
The drive you're partitioning must be an internal drive. If you have more than one internal drive and the drive you're partitioning is not in the first drive bay, remove the drives in the lower-numbered bays, then reinstall them after installing Windows. A Fusion Drive is treated as one drive, and the Windows partition is created on the disk drive instead of the flash drive (SSD).
Format the Windows partition
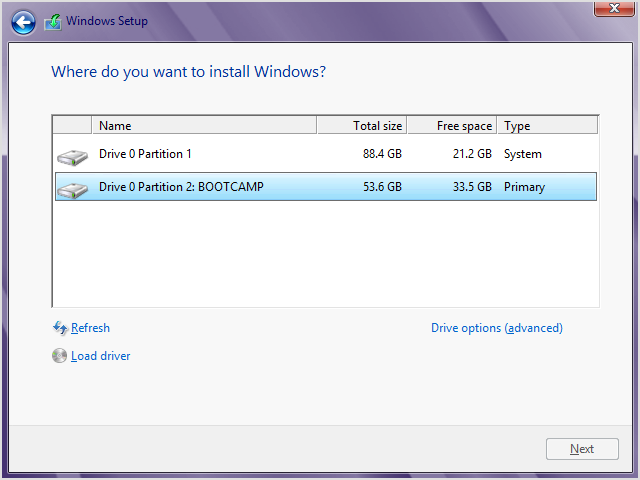
Use the Windows installer to format the Windows partition that Boot Camp Assistant created. When you're asked where to install Windows, select the partition named "BOOTCAMP":
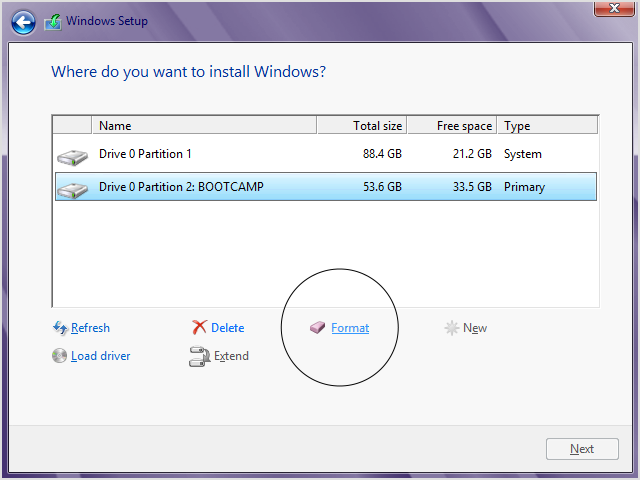
Then click Format to begin formatting the partition using the NTFS file system. If you're installing Windows 7 or Windows 8.0, you won't see the Format option until you click "Drive options (advanced)":
If the installer says that it couldn't create a new partition or locate an existing one, disconnect any Thunderbolt storage devices connected to your Mac. Reconnect them after installing Windows.
If you see “No Boot Disk Attached” when starting up your Mac, the Windows partition probably isn't formatted correctly. Remove the partition, then repeat the previous steps for creating and formatting the partition.
Modify the Windows partition
Remove the partition, change its size, or change its name.
Remove the partition
Use Boot Camp Assistant to safely remove Windows and the Windows partition from your Mac, restoring your startup drive to a single Mac partition. You may want to back up your information first, because removing the partition erases all of the data it contains.
Open Boot Camp Assistant.
Select “Remove Windows 7 or later version," then click Continue.
Do one of the following:
If your Mac has a single internal disk, click Restore.
If your Mac has multiple internal disks, select the Windows disk, select “Restore disk to a single OS X partition,” then click Continue.
Change the size of the partition
It's not possible to change the size of the partition after installing Windows, but you can remove the partition and create a new partition of the correct size. Don't try to resize your partition with Windows or a third-party app.
Change the name of the partition
You can rename the Windows partition from within Windows. For instructions, refer to your Windows documentation.
Information about products not manufactured by Apple, or independent websites not controlled or tested by Apple, is provided without recommendation or endorsement. Apple assumes no responsibility with regard to the selection, performance, or use of third-party websites or products. Apple makes no representations regarding third-party website accuracy or reliability. Contact the vendor for additional information.