OS X Server: How to connect to VPN service from Windows
Learn how to connect to VPN service from Windows.
You may be unable to connect to a VPN server running on OS X Server. This may be related to how Windows handles IPSec NAT traversal by default. This article will explain how to change this behavior to allow VPN connections to OS X Server VPN.
The steps in this article involve making changes to the Windows Registry using the Registry Editor (Regedit). Even if you are very comfortable editing the registry, you should make a backup of the registry prior to editing it. Making mistakes in Regedit can cause Windows issues or can prevent Windows from starting. The changes may cause the software that installed the entries to not work correctly until you restore the entries. Follow the appropriate article below for steps on how to back up your Windows Registry.
Change Windows IPSec NAT traversal behavior
Open Registry Editor:
XP: From the Start menu choose Run. In the resulting dialog, type "regedit" (without quotes) and click OK.
Vista: From the Start menu, in the Start Search dialog, type "regedit" (without quotes) and press Enter.
Windows 7: From the Start menu, in the "Search programs and files" dialog, type "regedit" (without quotes) and press Enter.
If Windows needs your permission to continue, click Continue.
Click the plus sign (XP) or arrow (Vista and Windows 7) next to HKEY_LOCAL_MACHINE to expand its contents.
Expand the contents of SYSTEM.
Expand the contents of CurrentControlSet.
Expand the contents of services.
Click to select (you just need to highlight this folder) the folder called PolicyAgent.
From the File menu, choose Export.
In the dialog box that appears, make sure the "Selected branch" option is enabled. Then, save the file somewhere that you can find it later, such as the desktop; this is a backup of this Windows Registry key. You should keep this in case you need to reimport your original settings later.
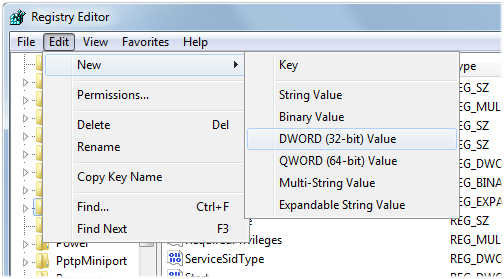
Make sure PolicyAgent is still selected, from the Edit menu, choose New and select DWORD (32-bit) Value.
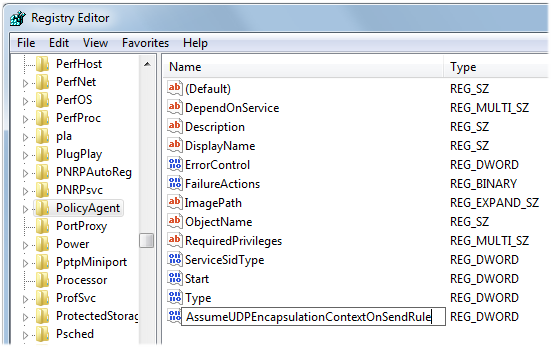
Edit the name of the value to be: "
AssumeUDPEncapsulationContextOnSendRule"(without quotes) and press Return.
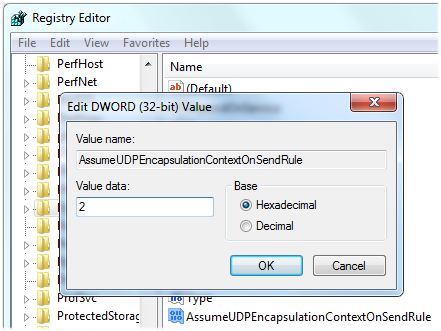
Double-click "AssumeUDPEncapsulationContextOnSendRule" and set the Value data to 2.
Click OK.
Close Registry Editor.
Change the Local Security Policy
Open Local Security Policy:
XP: From the Start menu choose Run. In the resulting dialog, type "secpol.msc" (without quotes) and click OK.
Vista: From the Start menu, in the Start Search dialog, type "secpol.msc" (without quotes) and press Enter.
Windows 7: From the Start menu, in the "Search programs and files" dialog, type "secpol.msc" (without quotes) and press Enter.
Click the plus sign (XP) or arrow (Vista and Windows 7) next to Local Policies to expand its contents.
Click to select (you just need to highlight this folder) the folder called Security Options.
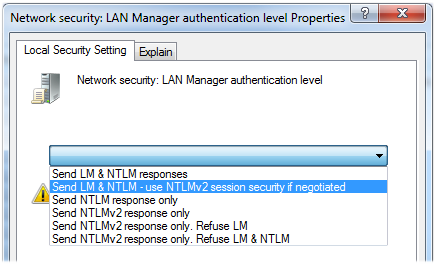
On the right hand side of the Local Security Policy, locate and double-click on Network security: LAN Manager authentication level.
In the drop-down list, select "Send LM & NTLM - use NTMLv2 session security if negotiated".
Click OK.
On the right hand side of the Local Security Policy, locate and double-click on: "Network security: Minimum session security for NTML SSP based (including secure RPC) clients".
Uncheck "Require 128-bit encryption".
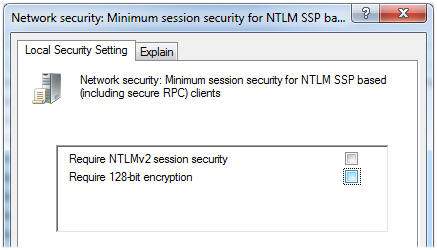
Click OK.
Close Local Security Policy.
Restart the computer.
You should now be able to create a VPN connection on Windows and be able to connect to OS X Server VPN.
Learn more
For a list of ports used by the VPN service, see article:
Well known TCP and UDP ports used by Apple software products
If you are using an AirPort device on the OS X Server side, see article:
AirPort: NAT port mapping to L2TP VPN servers at private addresses via AirPort Utility does not work
For more information about the default behavior of IPsec NAT traversal in Windows, see article:
The default behavior of IPsec NAT traversal (NAT-T) is changed in Windows XP Service Pack 2
Information about products not manufactured by Apple, or independent websites not controlled or tested by Apple, is provided without recommendation or endorsement. Apple assumes no responsibility with regard to the selection, performance, or use of third-party websites or products. Apple makes no representations regarding third-party website accuracy or reliability. Contact the vendor for additional information.