Logic Pro User Guide for iPad
-
- What is Logic Pro?
- Working areas
- Work with function buttons
- Work with numeric values
-
- Intro to tracks
- Create tracks
- Create tracks using drag and drop
- Choose the default region type for a software instrument track
- Select tracks
- Duplicate tracks
- Reorder tracks
- Rename tracks
- Change track icons
- Change track colors
- Use the tuner on an audio track
- Show the output track in the Tracks area
- Delete tracks
- Edit track parameters
- Start a Logic Pro subscription
- How to get help
-
- Intro to recording
-
- Before recording software instruments
- Record software instruments
- Record additional software instrument takes
- Record to multiple software instrument tracks
- Record multiple MIDI devices to multiple tracks
- Record software instruments and audio simultaneously
- Merge software instrument recordings
- Spot erase software instrument recordings
- Replace software instrument recordings
- Capture your most recent MIDI performance
- Use the metronome
- Use the count-in
-
- Intro to arranging
-
- Intro to regions
- Select regions
- Cut, copy, and paste regions
- Move regions
- Remove gaps between regions
- Delay region playback
- Trim regions
- Loop regions
- Repeat regions
- Mute regions
- Split and join regions
- Stretch regions
- Separate a MIDI region by note pitch
- Bounce regions in place
- Change the gain of audio regions
- Create regions in the Tracks area
- Convert a MIDI region to a Drummer region or a pattern region
- Rename regions
- Change the color of regions
- Delete regions
- Create fades on audio regions
- Access mixing functions using the Fader
-
- Intro to Step Sequencer
- Use Step Sequencer with Drum Machine Designer
- Record Step Sequencer patterns live
- Step record Step Sequencer patterns
- Load and save patterns
- Modify pattern playback
- Edit steps
- Edit rows
- Edit Step Sequencer pattern, row, and step settings in the inspector
- Customize Step Sequencer
-
- Effect plug-ins overview
-
- Instrument plug-ins overview
-
- ES2 overview
- Interface overview
-
- Modulation overview
-
- Vector Envelope overview
- Use Vector Envelope points
- Use Vector Envelope solo and sustain points
- Set Vector Envelope segment times
- Vector Envelope XY pad controls
- Vector Envelope Actions menu
- Vector Envelope loop controls
- Vector Envelope release phase behavior
- Vector Envelope point transition shapes
- Use Vector Envelope time scaling
- Use the Mod Pad
- Modulation source reference
- Via modulation source reference
-
- Sample Alchemy overview
- Interface overview
- Add source material
- Save a preset
- Edit mode
- Play modes
- Source overview
- Synthesis modes
- Granular controls
- Additive effects
- Additive effect controls
- Spectral effect
- Spectral effect controls
- Filter module
- Low and Highpass filter
- Comb PM filter
- Downsampler filter
- FM filter
- Envelope generators
- Mod Matrix
- Modulation routing
- Motion mode
- Trim mode
- More menu
- Sampler
- Copyright
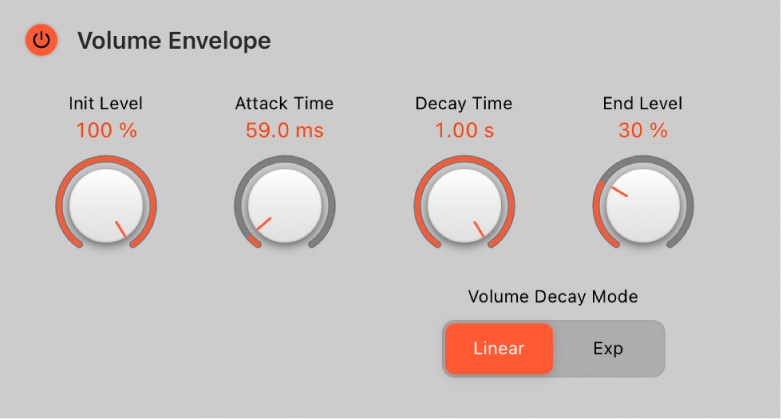
Space Designer volume envelope in Logic Pro for iPad
The volume envelope is used to set the reverb initial level and to control volume changes over time.

Volume envelope parameters
Volume Envelope On/Off button: Enable or disable the volume envelope.
Init Level knob and field: Set the initial volume level of the impulse response attack phase. It is expressed as a percentage of the full-scale volume of the impulse response file. The attack phase is generally the loudest point of the impulse response. Set Init Level to 100% to ensure maximum volume for early reflections.
Attack Time knob and field: Determine the time before the decay phase of the volume envelope begins.
Decay Time knob and field: Set the length of the decay phase.
Note: The overall decay is determined by the global Length and Size parameter values. To explain, a Length value of 100% and a Size value of 100% result in a decay that is the full length of the loaded impulse response.
End Level knob and field: Set the end volume level. It is expressed as a percentage of the overall volume envelope.
If set to 0%, you can fade out the reverb tail.
If set to 100%, you can’t fade out the tail, and the reverb stops abruptly if the end point falls within the tail. If the end time falls outside the reverb tail, End Level has no effect.
Volume Decay Mode buttons: Choose a mode that determines how the reverb tail is handled.
Linear button: The decay curve of the volume envelope is shaped by a linear algorithm, and results in a less natural-sounding reverb tail.
Exp button: The decay curve of the volume envelope is shaped by an exponential algorithm, in order to generate the most natural-sounding reverb tail.
Download this guide: PDF