Create a bootable installer for macOS
You can use a USB flash drive or other secondary volume as a startup disk from which to install the Mac operating system. These steps are primarily for system administrators and other experienced users.
Do you need a bootable installer?
You don't need a bootable installer to upgrade macOS or reinstall macOS. However, a bootable installer can be useful when those or other macOS installation methods are unsuccessful, or when you want to install macOS on multiple computers without downloading the installer each time.
Creating a bootable installer is not the same as preparing an external storage device for use as a startup disk.
Download the full macOS installer
Get the full installer by downloading it via the App Store, your web browser, or Terminal using the instructions in How to download and install macOS.
To get the installer, you only need to download it, not install it. If the installer opens automatically after downloading, simply quit the installer.
In most cases, you must also use a Mac that is compatible with the macOS you're downloading.
Enterprise administrators: Download from Apple, not a locally hosted update server.
Check the name of the installer after downloading it. It should be an app named Install [Version Name], such as Install macOS Tahoe. If it’s a disk image (.dmg) or package (.pkg) file, review the download instructions for details about how to get the installer from these files.
Check the location of the installer. It should be in the Applications folder, which is the folder that opens when you choose Go > Applications from the menu bar in the Finder. Move the installer to this folder, if necessary.
Connect and rename a USB flash drive
Connect a USB flash drive or other secondary volume directly to your Mac. When you create the bootable installer, this flash drive will automatically be erased using the appropriate format: Mac OS Extended (Journaled).
Check the storage capacity of the flash drive. A 32GB flash drive has more than enough storage space for any macOS installer, and 16GB is enough for most earlier versions of macOS. If more space is needed, Terminal will let you know.
Change the name of the flash drive to MyVolume, which is the name expected by the Terminal commands below.
Copy the appropriate command
Depending on which macOS you downloaded, triple-click or drag within the scrollable area of one of these commands to select the full command. Then press Command-C to copy the command to the Clipboard.
Tahoe
sudo /Applications/Install\ macOS\ Tahoe.app/Contents/Resources/createinstallmedia --volume /Volumes/MyVolume
Sequoia
sudo /Applications/Install\ macOS\ Sequoia.app/Contents/Resources/createinstallmedia --volume /Volumes/MyVolume
Sonoma
sudo /Applications/Install\ macOS\ Sonoma.app/Contents/Resources/createinstallmedia --volume /Volumes/MyVolume
Ventura
sudo /Applications/Install\ macOS\ Ventura.app/Contents/Resources/createinstallmedia --volume /Volumes/MyVolume
Monterey
sudo /Applications/Install\ macOS\ Monterey.app/Contents/Resources/createinstallmedia --volume /Volumes/MyVolume
Big Sur
sudo /Applications/Install\ macOS\ Big\ Sur.app/Contents/Resources/createinstallmedia --volume /Volumes/MyVolume
Catalina
sudo /Applications/Install\ macOS\ Catalina.app/Contents/Resources/createinstallmedia --volume /Volumes/MyVolume
Mojave
sudo /Applications/Install\ macOS\ Mojave.app/Contents/Resources/createinstallmedia --volume /Volumes/MyVolume
High Sierra
sudo /Applications/Install\ macOS\ High\ Sierra.app/Contents/Resources/createinstallmedia --volume /Volumes/MyVolume
El Capitan
sudo /Applications/Install\ OS\ X\ El\ Capitan.app/Contents/Resources/createinstallmedia --volume /Volumes/MyVolume --applicationpath /Applications/Install\ OS\ X\ El\ Capitan.app
Enter the command in Terminal
Open Terminal, which is in the Utilities folder of your Applications folder. Or use Spotlight
 in the menu bar to find and open it.
Paste the command that you copied above into Terminal, or type the command. Then press Return to enter the command.
When prompted, type your administrator password and press Return. Terminal doesn't show any characters as you type.
If you get a message that the installer does not appear to be a valid installer application, delete the installer, use Disk Utility to repair your startup disk, then download the installer again.
If you get a message that the command was not found, make sure that you’re using the correct command, and that the installer is in your Applications folder and named Install [Version Name]. If creating the bootable installer on a Mac that is using macOS Sierra 10.12.6 or earlier, append
--applicationpathto the command, followed by the appropriate installer path, similar to what is shown at the end of the command for El Capitan.
When prompted, type Y to confirm that you want to erase the volume, then press Return. Terminal shows the progress as the volume is erased.
If you get a message that Terminal would like to access files on a removable volume, click OK to allow Terminal to proceed.
If Terminal can't erase successfully, use Disk Utility to erase the volume using Mac OS Extended (Journaled) format, then try again.
When Terminal says that the install media is now available, your USB flash drive should have the same name as the installer, such as Install macOS Tahoe.
Quit Terminal, eject the flash drive, and disconnect it from your Mac. You can now remove and delete the installer from your Applications folder.
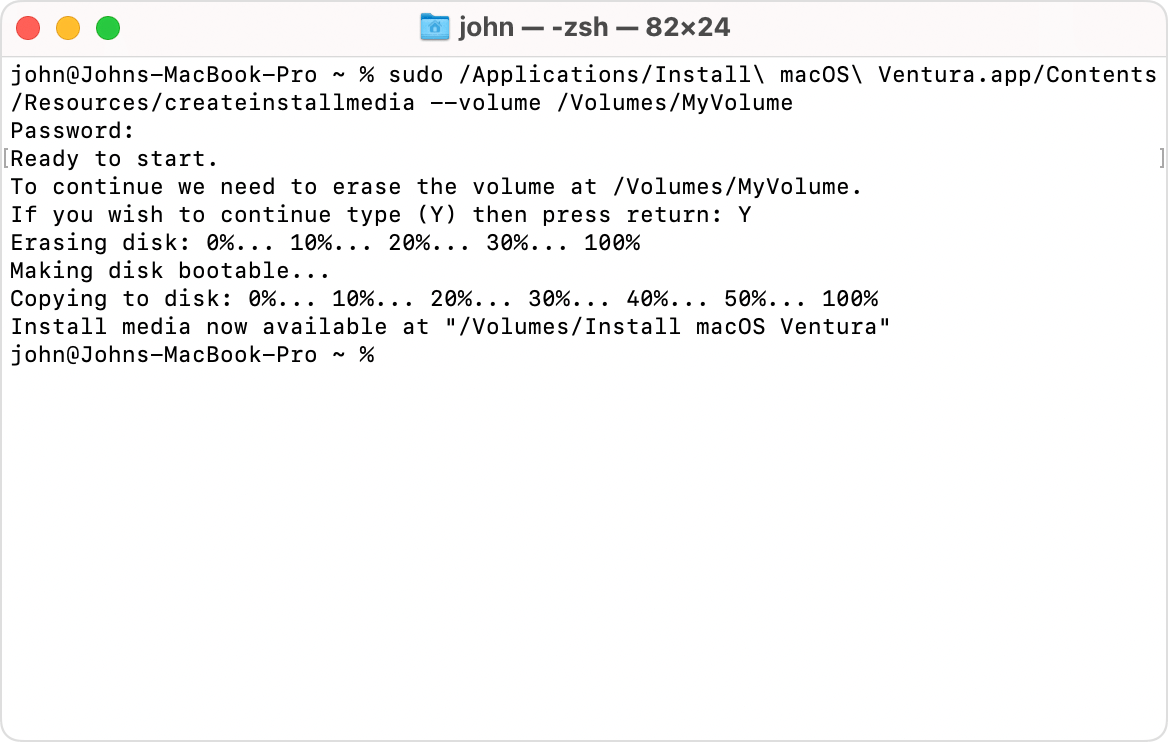
This example shows the creation of a bootable installer for macOS Ventura:
Use the bootable installer
Follow the steps based on whether you’re using the bootable installer on a Mac with Apple silicon.
Important: Your Mac must be connected to the internet so that the installer can get firmware and other information specific to this Mac model. If the macOS you’re installing is incompatible with your Mac, installation might not complete or your Mac might start up to a circle with a line through it.
Mac with Apple silicon
Shut down or turn off your Mac.
Connect the bootable installer directly to your Mac.
Press and hold the power button on your Mac. As you continue to hold, your Mac starts up and loads startup options, which shows your bootable volumes, including the bootable installer.
Select the bootable installer, then click Continue.
When the macOS installer opens, follow the onscreen instructions.
Any other Mac
Shut down or turn off your Mac.
Connect the bootable installer directly to your Mac.
Turn on your Mac, then immediately press and hold the Option (Alt) key.
Release the Option key when you see a screen showing your bootable volumes, including the bootable installer.
Select the bootable installer, then click the onscreen arrow or press Return.
If you're using a Mac with the Apple T2 Security Chip and you can't start up from the bootable installer, make sure that Startup Security Utility is set to allow booting from external or removable media.
Choose your language, if prompted.
Select Install macOS (or Install OS X) from the Utilities window, then click Continue and follow the onscreen instructions.