Logic Pro User Guide for iPad
- What’s new in Logic Pro 1.1
-
- What is Logic Pro?
- Working areas
- Work with function buttons
- Work with numeric values
-
- Intro to tracks
- Create tracks
- Create tracks using drag and drop
- Choose the default region type for a software instrument track
- Select tracks
- Duplicate tracks
- Reorder tracks
- Rename tracks
- Change track icons
- Change track colors
- Use the tuner on an audio track
- Show the output track in the Tracks area
- Delete tracks
- Edit track parameters
- Start a Logic Pro subscription
- How to get help
-
- Intro to recording
-
- Before recording software instruments
- Record software instruments
- Record additional software instrument takes
- Record to multiple software instrument tracks
- Record multiple MIDI devices to multiple tracks
- Record software instruments and audio simultaneously
- Merge software instrument recordings
- Spot erase software instrument recordings
- Replace software instrument recordings
- Capture your most recent MIDI performance
- Use the metronome
- Use the count-in
-
- Intro to arranging
-
- Intro to regions
- Select regions
- Cut, copy, and paste regions
- Move regions
- Remove gaps between regions
- Delay region playback
- Trim regions
- Loop regions
- Repeat regions
- Mute regions
- Split and join regions
- Stretch regions
- Separate a MIDI region by note pitch
- Bounce regions in place
- Change the gain of audio regions
- Create regions in the Tracks area
- Convert a MIDI region to a Drummer region or a pattern region
- Rename regions
- Change the color of regions
- Delete regions
- Create fades on audio regions
- Access mixing functions using the Fader
-
- Intro to Step Sequencer
- Use Step Sequencer with Drum Machine Designer
- Record Step Sequencer patterns live
- Step record Step Sequencer patterns
- Load and save patterns
- Modify pattern playback
- Edit steps
- Edit rows
- Edit Step Sequencer pattern, row, and step settings in the inspector
- Customize Step Sequencer
-
- Effect plug-ins overview
-
- Instrument plug-ins overview
-
- ES2 overview
- Interface overview
-
- Modulation overview
-
- Vector Envelope overview
- Use Vector Envelope points
- Use Vector Envelope solo and sustain points
- Set Vector Envelope segment times
- Vector Envelope XY pad controls
- Vector Envelope Actions menu
- Vector Envelope loop controls
- Vector Envelope release phase behavior
- Vector Envelope point transition shapes
- Use Vector Envelope time scaling
- Use the Mod Pad
- Modulation source reference
- Via modulation source reference
-
- Sample Alchemy overview
- Interface overview
- Add source material
- Save a preset
- Edit mode
- Play modes
- Source overview
- Synthesis modes
- Granular controls
- Additive effects
- Additive effect controls
- Spectral effect
- Spectral effect controls
- Filter module
- Low and highpass filter
- Comb PM filter
- Downsampler filter
- FM filter
- Envelope generators
- Mod Matrix
- Modulation routing
- Motion mode
- Trim mode
- More menu
- Sampler
- Copyright
Change the note velocity in the Piano Roll Editor in Logic Pro for iPad
Velocity indicates how hard the key was struck when the note was played, which usually corresponds to the note’s loudness (the MIDI velocity range is 1–127, with 127 being the loudest). Velocity can also control other synthesizer parameters, such as filter resonance or cutoff, alone or in conjunction with volume level.
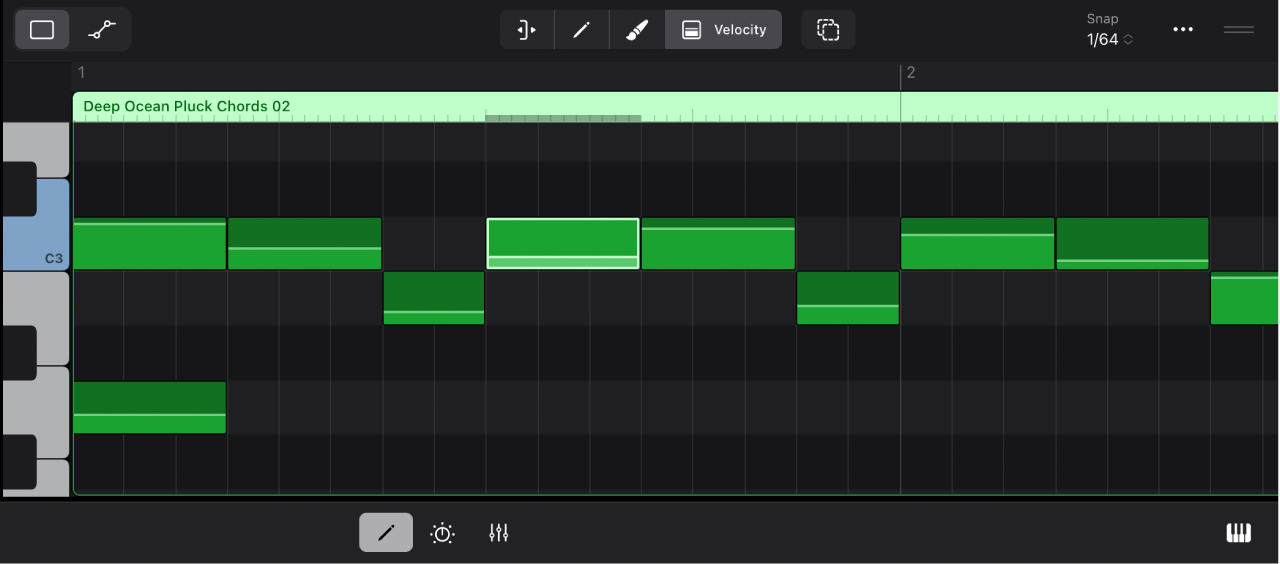
In Logic Pro for iPad, inside the horizontal note bar that represents the MIDI note in the Piano Roll Editor is a horizontal line (visible if you zoom in close enough). The vertical position of the line relative to the overall height of the note bar shows the note’s velocity. You can also display velocity using different colors, by choosing Set Note Color > By Velocity from the More menu ![]() in the Piano Roll Editor menu bar. Colors gradually change from purple to green to red.
in the Piano Roll Editor menu bar. Colors gradually change from purple to green to red.

Color coding makes it easy to see the velocity of individual notes and the overall range of velocities in a MIDI region. As you change the velocity of the notes, their color changes in real time.
Note: Note velocities can be offset during playback by the Velocity parameter and Dynamics parameter in the Region inspector.
Change note velocity graphically
In the Piano Roll Editor menu bar, tap the Velocity button
 .
.Tap a note to select it, or select multiple notes.
Drag one of the selected notes up or down.
The vertical line in the note bar moves up or down accordingly, and a tag appears, showing the velocity value.
When you edit the velocity of multiple notes, the relative differences in their velocity values are retained. If the velocity value of any of the selected notes reaches the minimum or maximum value (1 or 127), none of the notes can be adjusted further.
Change note velocity in the Note inspector
In the Piano Roll Editor menu bar, tap the Trim button
 .
.Tap a note to select it, or select multiple notes.
Tap the Inspector button
 in the view control bar to open the Note inspector.
Tap the Details disclosure arrow to show the Details parameters.
Drag the Velocity value up or down, or tap the Velocity field to open the numeric input dialog and enter a numeric value.
Note: You can change the display of the Velocity field to show values in higher MIDI 2.0 resolution. See View settings.
Download this guide: PDF