Promise VTrak: Configuring for optimal performance
Configure Promise VTrak RAIDs for best performance using the guidelines in this article.
For the Promise VTrak x30 model, the scripted options below are built into the Promise Admin interface. It is not necessary to create and import the configuration scripts.
For the original Promise VTrak model, create and import the desired script, as described below. The scripts are recommended, although you may also use the manual configuration steps provided below.
Xsan-specific configuration scripts configure Revertible Spare Drives. In the event that a drive is replaced, data will be migrated from the Spare Drive to the replacement drive. Performance may be impacted for the duration of the migration procedure.
Configure via script
Create the script file
Determine which script you should use from the following list, then click the linked article to get the text of the script. Follow the instructions in the linked article to save the script, then return to this article.
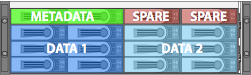
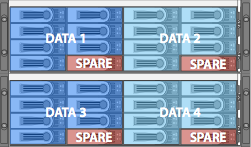
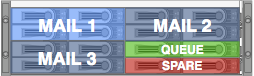
RAID Controller: Xsan (Metadata and Data)
Configures a RAID Controller that will be used as an Xsan volume. Configures arrays to be used as a metadata LUN and two data LUNs. Each Xsan volume must contain one metadata LUN.
RAID Controller: Xsan (Metadata, Journal, and Data)
Configures a RAID Controller that will be used as an Xsan volume. Configures arrays to be used as a metadata LUN, journal LUN, and two data LUNs. Each Xsan volume must contain one metadata LUN.

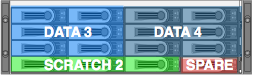
First SAS-connected Expansion Chassis Only: Xsan (Data Only)
Configures the first SAS-connected Expansion Chassis that will be used with a RAID Controller in an Xsan volume. Configures arrays to be used as two data LUNs and one Audio/Scratch LUN. Use to configure additional data LUNs to an Xsan volume that already has a metadata LUN.
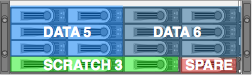
Second SAS-connected Expansion Chassis Only: Xsan (Data Only)
Configures the second SAS-connected Expansion Chassis that will be used with a RAID Controller in an Xsan volume. Configures arrays to be used as two data LUNs and one Audio/Scratch LUN. Use to configure additional data LUNs to an Xsan volume that already has a metadata LUN.
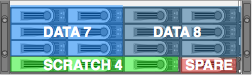
Third SAS-connected Expansion Chassis Only: Xsan (Data Only)
Configures the third SAS-connected Expansion Chassis that will be used with a RAID Controller in an Xsan volume. Configures arrays to be used as two data LUNs and one Audio/Scratch LUN. Use to configure additional data LUNs to an Xsan volume that already has a metadata LUN.
Fouth SAS-connected Expansion Chassis Only: Xsan (Data Only)
Configures the fourth SAS-connected Expansion Chassis that will be used with a RAID Controller in an Xsan volume. Configures arrays to be used as two data LUNs and one Audio/Scratch LUN. Use to configure additional data LUNs to an Xsan volume that already has a metadata LUN.
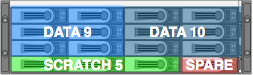
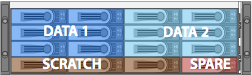
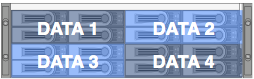
RAID Controller: Xsan (Data Only)
Configures a RAID Controller that will be used as an Xsan volume. Configures arrays to be used as two data LUNs and one Audio/Scratch LUN". Use to configure additional data LUNs to an Xsan volume that already has a metadata LUN.
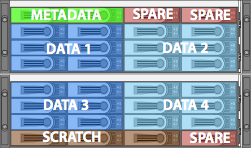
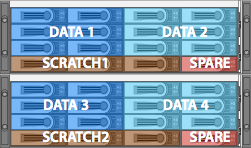
RAID Controllers and SAS-connected Expansion Chassis: Xsan (Metadata and Data)
Configures a RAID Controller and SAS-connected Expansion Chassis that will be used as an Xsan volume. Configures arrays to be used as a metadata LUN, four data LUNs and one Audio/Scratch LUN. Each Xsan volume must contain one metadata LUN.
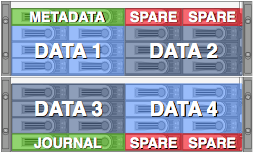
RAID Controllers and SAS-connected Expansion Chassis: Xsan (Metadata, Journal, and Data)
Configures a RAID Controller and SAS-connected Expansion Chassis that will be used as an Xsan volume. Configures arrays to be used as a metadata LUN, a journal LUN, and four data LUNs. Each Xsan volume must contain one metadata LUN.
RAID Controllers and SAS-connected Expansion Chassis: Xsan (Data Only)
Configures a RAID Controller and SAS-connected Expansion Chassis that will be used as an Xsan volume. Configures arrays to be used as as four data LUNs and two Audio/Scratch LUNs. Use to configure additional data LUNs to an Xsan volume that already has a metadata LUN.
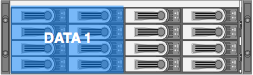
RAID Controllers: Direct Attached
Configures a RAID Controller that will be formatted as a local filesystem such as Mac OS Extended (Journaled) to be accessed by a single computer.
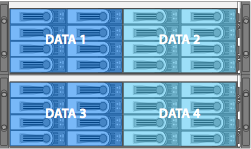
RAID Controllers and SAS-connected Expansion Chassis: Direct Attached
Configures a RAID Controller and SAS-connected Expansion Chassis that will be formatted as a local filesystem such as Mac OS Extended (Journaled) to be accessed by a single computer.
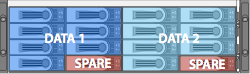
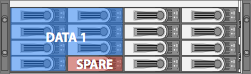
RAID Controllers: Direct Attached with Spares
Configures a RAID Controller that will be formatted as a local filesystem such as Mac OS Extended (Journaled) to be accessed by a single computer. Spare drive is configured to offer higher availability at the expense of performance.
RAID Controllers and SAS-connected Expansion Chassis: Direct Attached with Spares
Configures a RAID Controller and SAS-connected Expansion Chassis that will be formatted as a local filesystem such as Mac OS Extended (Journaled) to be accessed by a single computer. Spare drive is configured to offer higher availability at the expense of performance.
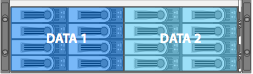
RAID Controllers - 8-Drive Model - Direct Attached
Configures an 8-Drive RAID Controller that will be formatted as a local filesystem such as Mac OS Extended (Journaled) to be accessed by a single computer.
RAID Controllers - 8-Drive Model - Direct Attached with Spares
Configures an 8-Drive RAID Controller that will be formatted as a local filesystem such as Mac OS Extended (Journaled) to be accessed by a single computer. Spare drive is configured to offer higher availability at the expense of performance.
RAID Controllers - Direct Attached configuration script - four RAID 10 logical drives
Configures a RAID Controller that will be formatted as a local filesystem such as Mac OS Extended (Journaled) to be accessed by a single computer. This configuration creates four RAID 10 logical drives for improved performance at the expense of lower overall capacity.
RAID Controllers - Direct Attached configuration script - eight RAID 1 logical drives
Configures a RAID Controller that will be formatted as a local filesystem such as Mac OS Extended (Journaled) to be accessed by a single computer. This configuration creates eight RAID 1 logical drives for improved performance accessing smaller files concurrently on multiple file systems.

RAID Controllers - Direct Attached Mail Store configuration script
Configures a RAID Controller that will be formatted as a local filesystem such as Mac OS Extended (Journaled) to be accessed by a single computer. This configuration is designed for use as a mail store for Mac OS X Server.
Controller Module-Only
If your Promise VTrak's Controller Module has been replaced, apply this script to configure the replacement Controller Module for optimal performance.
Make drives available for configuration
Connect to the VTrak RAID via the WebPAM PROe administration tool. Newer versions of Promise VTrak firmware support Bonjour discovery. If you are unfamiliar with how to locate the Promise RAID on the network, refer to a current version of the Product Manual. If an alert appears in your Web browser, see this article.
Authenticate when prompted. If you are not certain what administrator name and password is assigned to the Promise RAID, refer to the Product Manual.
Note: The scripts assume that there are no existing Disk Arrays or Spare Drives configured on the VTrak RAID. Before importing a script, you should delete all existing Disk Array or Spare Drive configurations. Important: Deleting existing Disk Arrays will destroy all existing data on the Disk Array. Ensure that all data has been backed up to an alternate storage device before proceeding.
To delete existing Disk Arrays
Select Disk Arrays.
Click the Delete tab.
Click (check) the first checkbox under Delete Disk Arrays, which will auto-select all existing arrays in the list.
Click Submit and then enter CONFIRM in the dialog box.
To delete existing Spare Drives
Select Spare Drives.
Click the Delete tab.
Click (check) the first checkbox under Delete Spare Drives, which will auto-select all existing arrays in the list.
Click Submit and then enter CONFIRM in the dialog box
Import the configuration script
Connect to the VTrak RAID via the WebPAM PROe administration tool. Newer versions of Promise VTrak firmware support Bonjour discovery. If you are unfamiliar with how to locate the Promise RAID on the network, refer to a current version of the Product Manual. If an alert appears in your Web browser, see this article.
Authenticate when prompted. If you are not certain what administrator name and password is assigned to the Promise RAID, refer to the Product Manual.
Select Administrative Tools.
Click the Import tab.
Set the Type field to "Configuration Script".
Populate the Local File Name field with the path to the script, or click the Browse button and select the script you saved previously.
Click Submit.
The next page that appears reports if the script was located and if it contains any issues. If there are no error messages, click Next.
This completes the Disk Array and Spare Drive configuration.
Manual configuration
The following are instructions for manually configuring Promise VTrak RAIDs for best performance. You do not need to follow these steps if you used the configuration script method described above.
Connect to the VTrak RAID via the WebPAM PROe administration tool. Newer versions of Promise VTrak firmware support Bonjour discovery. If you are unfamiliar with how to locate the Promise RAID on the network, refer to a current version of the Product Manual. If an alert appears in your Web browser, see this article.
Authenticate when prompted. If you are not certain what administrator name and password is assigned to the Promise RAID, refer to the Product Manual.
Make drives available for configuration
Note: These instructions assume that there are no existing Disk Arrays or Spare Drives configured on the VTrak RAID. Before performing these steps, you should delete all existing Disk Array or Spare Drive configurations.
Important: Deleting existing Disk Arrays will destroy all existing data on the Disk Array. Ensure that all data has been backed up to an alternate storage device before proceeding.
To delete existing Disk Arrays
Select Disk Arrays.
Click the Delete tab.
Click (check) the first checkbox under Delete Disk Arrays, which will auto-select all existing arrays in the list.
Click Submit and then enter CONFIRM in the dialog box.
To delete existing Spare Drives
Select Spare Drives
Click the Delete tab.
Click (check) the first checkbox under Delete Spare Drives, which will auto-select all existing arrays in the list.
Click Submit and then enter CONFIRM in the dialog box.
Configure global settings
Choose Controllers > Controller 1 > Settings.
Check the "Enable LUN Affinity" checkbox.
Check "Adaptive Writeback Cache".
Uncheck (deselect) "Host Cache Flushing".
Check "Forced Read Ahead".
Click Submit.
Repeat these steps for Controller 2.
Configure Disk Arrays
Notes:
Xsan only supports sector values of 512 Bytes.
When creating Disk Arrays, attempt to assign an equal amount of hard drives to each Controller module by alternating each Disk Array’s Preferred Controller ID value between Controller 1 and Controller 2.
All settings not described in the following steps should be left at default values.
The "Stripe" value should be left at 64KB and the "Sector" value should be left at 512 Bytes.
Configuring a Two-Drive Xsan Metadata Disk Array
Select Disk Arrays.
Click the Create tab.
Select "Advanced Configuration".
Click Next.
Assign a Disk Array Alias.
Check Enable PDM and Enable Media Patrol.
Select two disks.
Click Next.
Assign an Alias name.
Select RAID Level 1.
Set Readpolicy to ReadCache.
Set WritePolicy to WriteBack.
Set Preferred Controller ID either 1 or 2.
Click Submit.
Initialize the newly created logical drive.
Configuring a Six-Drive Xsan Data Disk Array
Select Disk Arrays.
Click the Create tab.
Select "Advanced Configuration".
Click Next.
Assign a Disk Array Alias.
Check Enable PDM and Enable Media Patrol.
Select six disks.
Click Next.
Assign an Alias name.
Select RAID Level 5.
Set ReadPolicy to ReadCache.
Set WritePolicy to WriteBack.
Set Preferred Controller ID either 1 or 2.
Click Submit.
Initialize the newly created logical drive.
Note: Setting the ReadPolicy to ReadCache is preferred for most uses. When reading very large, sequential data formats, such as uncompressed high-definition video files, using a ReadPolicy of ReadAhead can improve read performance.
Configuring an Eight-Drive Direct-Attached Disk Array
Select Disk Arrays.
Click the Create tab.
Select "Advanced Configuration".
Click Next.
Assign a Disk Array Alias.
Check Enable PDM and Enable Media Patrol.
Select eight disks.
Click Next.
Assign an Alias name.
Select RAID Level 5.
Set ReadPolicy to ReadCache.
Set WritePolicy to WriteBack.
Set Preferred Controller ID either 1 or 2.
Click Submit.
Initialize the newly created logical drive.
The disk should now be visible in Disk Utility, which can be used to format the drive with a local filesystem such as Mac OS Extended (Journaled).
Configuring Spare Drives
Note: If your workflow requires consistent performance during RAID Drive downtime, it is advised that Spare Drives be configured.
Select Spare Drives.
Click the Create tab.
Set Spare Type to Global if the Spare Drive is available to all Disk Arrays or select Dedicated is the Spare Drive is available to a specific Disk Array.
Check Revertible if you would like data to be migrated from the Spare Drive to a replacement drive. (Performance may be impacted for the duration of the migration procedure.)
Select the Physical Drive(s) that will be configured as Spare Drives.
If the Spare Type is Dedicated, select to which Disk Array the Spare Drive is dedicated.
Click Submit.
To initialize new Logical Drives
Use this procedure when creating new logical drives from physical disks that previously contained other data.
Select Disk Arrays > Logical Drives > "Logical Drive 1" or the number of the logical drive you want to initialize.
Click the triangle next to "Background Activities" and select Initialization.
Check the "Quick Initialization" checkbox unless a full initialization is desired.
Click Submit and then enter CONFIRM in the dialog box.
Note: You may need to reboot your Mac after initializing a logical drive in order to see the correct size of a new logical drive.
Information about products not manufactured by Apple, or independent websites not controlled or tested by Apple, is provided without recommendation or endorsement. Apple assumes no responsibility with regard to the selection, performance, or use of third-party websites or products. Apple makes no representations regarding third-party website accuracy or reliability. Contact the vendor for additional information.