Create and customize Drum Machine Designer kits in Logic Pro for Mac
Choose from the more than 200 kit pieces in the Logic Pro sound library to create custom Drum Machine Designer kits. Or use your own samples.
Create a Drum Machine Designer track, then add sounds to create your kit. Edit and process the sounds in your kit within Drum Machine Designer, add plug-ins, and mix each kit piece individually on its own channel strip in the mixer. Save your custom kit so you can use it in other projects.
Create a track with Drum Machine Designer
You can create a track that uses Drum Machine Designer, then replace individual kit pieces with other drum samples you prefer, or clear the whole kit and start from scratch by adding samples.
In Logic Pro, choose Track > New Software Instrument Track.
In the Library, click Electronic Drum Kit, then choose a kit.
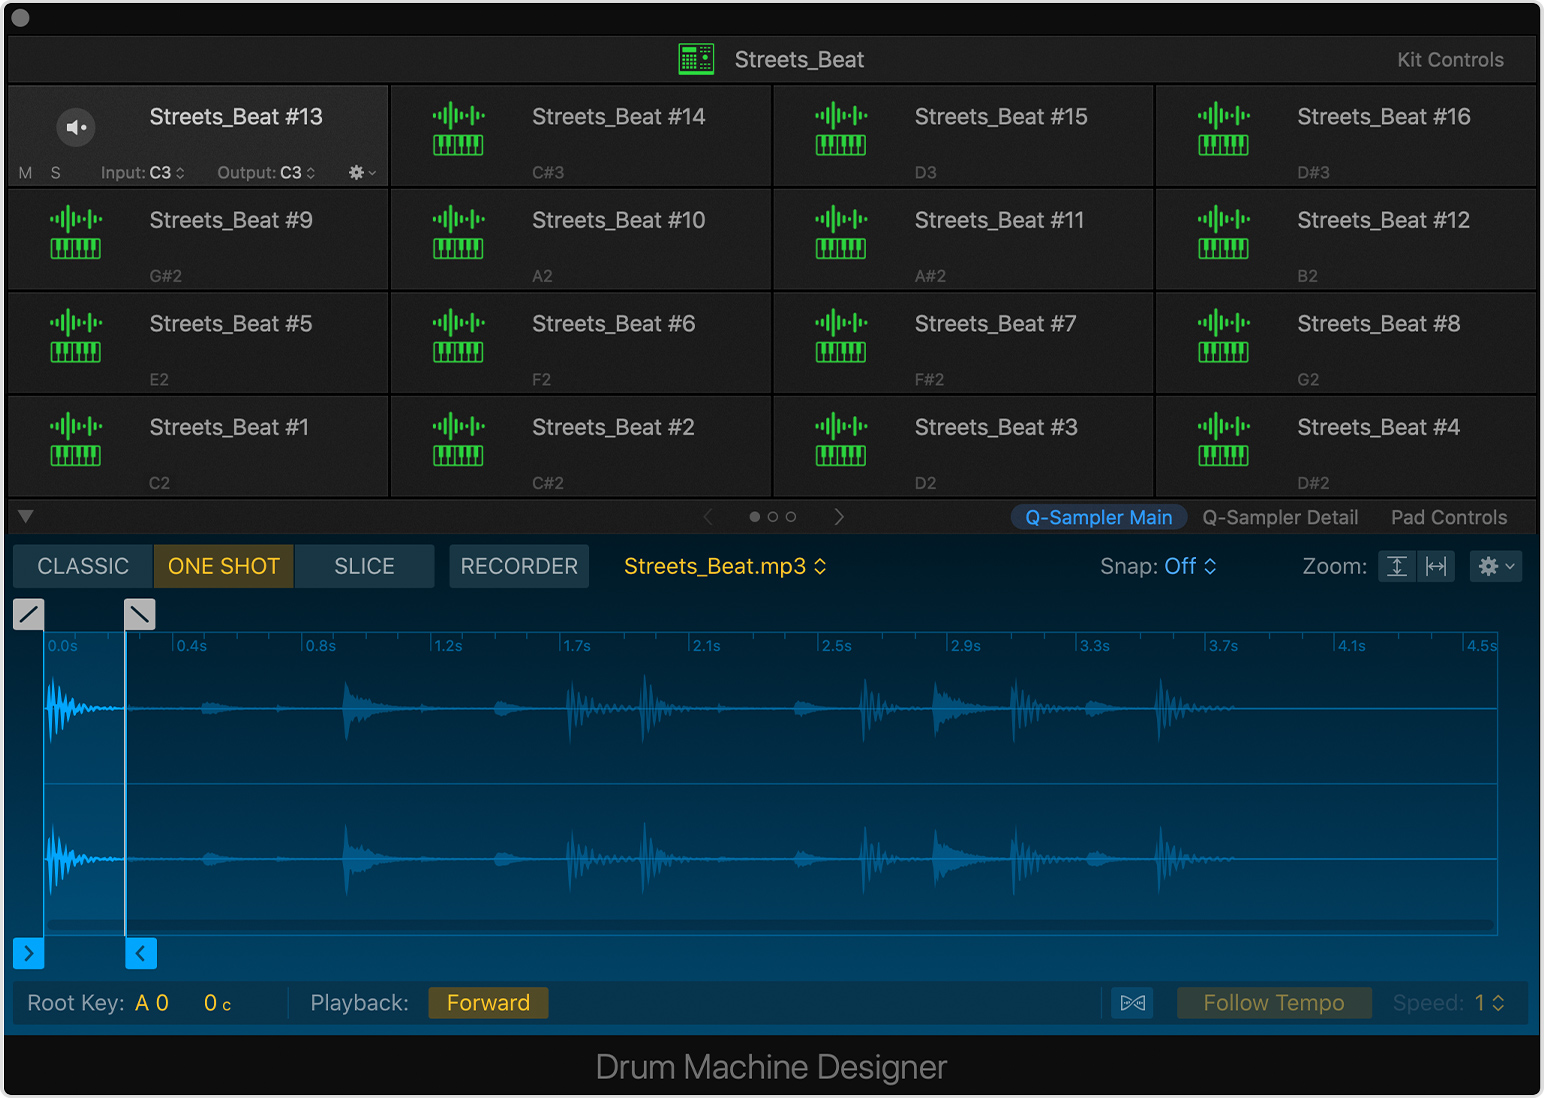
Click DMD in the channel strip Instrument slot to open the Drum Machine Designer window.
In the Drum Machine Designer, each sound in the kit is automatically assigned to a pad in the drum grid, and also has its own channel strip in the mixer, where you can process each kit piece individually.
You can also access Drum Machine Designer when you create a Drummer track that uses Drum Machine Designer as its software instrument, like one of the Electronic drummers.
Drag and drop to create a Drum Machine Designer track
You can also drag samples to the lower part of the track header, below the last track, onto Drum Machine Designer in the pop-up menu to quickly create a custom kit. Drag files from any of these locations:
The Finder
Any of the Logic Pro browsers
Any audio or MIDI region
A marquee sub-selection within an audio region
Add sounds to Drum Machine Designer
You can add a sound to your Drum Machine Designer kit by simply dragging a sample to the track header for the track. The sample is added to an empty pad in the kit. You can also open Drum Machine Designer and add samples in the instrument itself:
In Logic Pro, click DMD in the Instrument slot of a channel strip to open the Drum Machine Designer window.
If you want to start with an empty kit, click the Action pop-up menu
 , then choose Clear All Pads.
You can add sounds to a pad several different ways:
Drag an audio file like a WAV, AIFF, or an MP3 file from the Finder or any of the browsers in Logic Pro, or a region from the Tracks area to a pad. The sound is set for one-shot playback, which you can change within the Drum Machine Designer.
Drag multiple audio files or regions at once—each audio file is automatically assigned to its own pad.
To add sounds from the Logic Pro Library, click the pad, click the Library button in the toolbar, then choose a category and a sound.
To listen to the sounds, click the listen button
 on the pad. You can also play the corresponding key with musical typing or a connected USB or MIDI keyboard.
When you add a sound to an empty pad, a subtrack is created for the pad with its own corresponding channel strip, which you can process individually in the mixer. To rename the pad, double-click the pad name and enter a new name. This also changes the name of the pad in the corresponding channel strip.
Replace a sound assigned to a pad
To replace a sound assigned to a pad, just drag a file to the pad. The sound is set for one-shot playback, and Pad Controls for the pad also update to show the new setting.
To replace with a sound from the Library, click the pad, then choose a new sound from the Library browser. When you replace a sound with a new Library sound, you also change the entire Software Instrument channel strip, including all effects plug-ins.
You can also change the software instrument that is the sound source for a pad. For example, you can use the Drum Synth or a third-party software instrument as the source for a pad:
In Drum Machine Designer, click the pad whose sound you want to replace.
If necessary, click the Inspector button in the toolbar. The channel strip for the selected pad appears to the right of the main Drum Machine Designer channel strip in the Inspector.
Click the Instrument slot in the channel strip for the selected pad, then choose a new instrument and sound.
Assign MIDI notes to pads
Each pad has a MIDI input and output note automatically assigned to it, which you can see when your pointer is over the pad. But you can set each pad's MIDI notes independently. For example, you can assign multiple pads to the same input note to create layered sounds consisting of multiple channel strips with different instruments.
In your Logic Pro project, open the Drum Machine Designer.
On the pad you want to assign, click the Input pop-up menu to set which MIDI note triggers that pad.
To make working with third-party instruments easier, Drum Machine Designer also provides a MIDI note output menu on each pad. The pad transmits this note to the instrument it's triggering, so you can control the note sent to the instrument. For example, if you're using a synth for a kick drum sound, you can send a low-pitched note to play the sound at the pitch you want. Click the output pop-up menu for the pad to set which MIDI note that pad transmits. A pad’s output note determines the pitch with which the pad’s sound will play.
You can also use MIDI learn to assign MIDI notes. Click the pad's Input or Output pop-up menu, click Learn Note, then press the key on your keyboard to assign that MIDI note.
Resample a sound in Drum Machine Designer
With resampling, you can condense layered sounds consisting of multiple pads with the same input note into one pad. You can resample the sample assigned to one pad or all pads with the same MIDI input note as the current pad. Click the action pop-up menu, then choose Resample Pad. The resampled sounds will be placed into the first empty pad of the current kit.
Adjust sounds in Drum Machine Designer
When you add your own audio file or choose a sound from the Library in Drum Machine Designer, you can adjust the sound without having to leave the Drum Machine Designer.
In the Drum Machine Designer, click the pad with the sound you want to edit.
If the sound source for the selected pad is from the Quick Sampler, you can edit the sample within the Drum Machine Designer:
Click Q-Sampler Main to see the sound in the Quick Sampler waveform display, change the sample playback mode, or even record a new sample.
Click Q-Sampler Detail to change the sound of your sample with the Quick Sampler’s two LFO (low-frequency oscillators), Pitch envelope, Filter envelope, and Amplitude envelope.
If the sound source for the selected pad is Drum Synth, click Drum Synth to change sounds, change the tone of the sound, and more.
Click Pad Controls to access Smart Controls for the pad.
To adjust the tone and effect send levels for the entire kit, click Kit Controls.
Adjust individual pads on channel strips
A Drum Machine Designer track is a Track Stack—each pad has its own corresponding subtrack and channel strip holding the instrument and effect plug-ins for this pad. Click the disclosure triangle next to the Drum Machine Designer main track in the track header of the main window, or above the track name in the Mixer. The channel expands to show each Drum Machine Designer pad on its own channel strip, which you can then adjust each pad individually on its own channel strip.
When you select a subtrack channel strip, you can play each sound chromatically on a keyboard.
Save your custom kit
You can save your custom kit as a patch, which you can then access in other projects on your Mac.
Select the kit name pad at the top of the Drum Machine Designer window, where the name of the track appears.
If necessary, click the Library button.
Click Save at the bottom of the Library, enter a name and choose a location for the patch, then click Save.
If you want your custom kit to appear in the User Patches folder in the Library, make sure to save the patch in this location: ~/Music/Audio Music Apps/Patches/Instrument.
You can copy your custom Drum Machine Designer kit to use in Logic Pro another Mac
Play Drum Machine Designer sounds chromatically
When you select the Drum Machine Designer master track in the main window or the mixer, it automatically distributes incoming notes to the subtracks, according to the MIDI input and output note settings of each pad.
But if you select a subtrack, all incoming MIDI notes are passed on directly to the subtrack’s channel strip with its instrument plug-in, which means you can play the sound chromatically and polyphonically. This is great for playing pitched kick drum or hi-hat melodies. Make sure that the instrument plug-in for the particular subtrack has key tracking turned on and is set to polyphonic operation.
Learn More
Information about products not manufactured by Apple, or independent websites not controlled or tested by Apple, is provided without recommendation or endorsement. Apple assumes no responsibility with regard to the selection, performance, or use of third-party websites or products. Apple makes no representations regarding third-party website accuracy or reliability. Contact the vendor for additional information.
