Apple Vision Pro User Guide
- Welcome
- Let others use your Apple Vision Pro
-
- Capture
- Clock
- Encounter Dinosaurs
- Mindfulness
- Numbers
- Pages
- Shazam
- Shortcuts
- Tips
-
- Use built-in privacy and security protections
- Keep your Apple ID secure
-
- Sign in with passkeys
- Sign in with Apple
- Automatically fill in strong passwords
- Change weak or compromised passwords
- View your passwords and related information
- Use shared password groups
- Share passkeys and passwords securely with AirDrop
- Make your passkeys and passwords available on all your devices
- Automatically fill in verification codes
- Sign in with fewer CAPTCHA challenges on Apple Vision Pro
- Manage two-factor authentication for your Apple ID
- Create and manage Hide My Email addresses
- Protect your web browsing with iCloud Private Relay
- Use a private network address
- Use Contact Key Verification on Apple Vision Pro
- Copyright
Add and edit a shape in Keynote on Apple Vision Pro
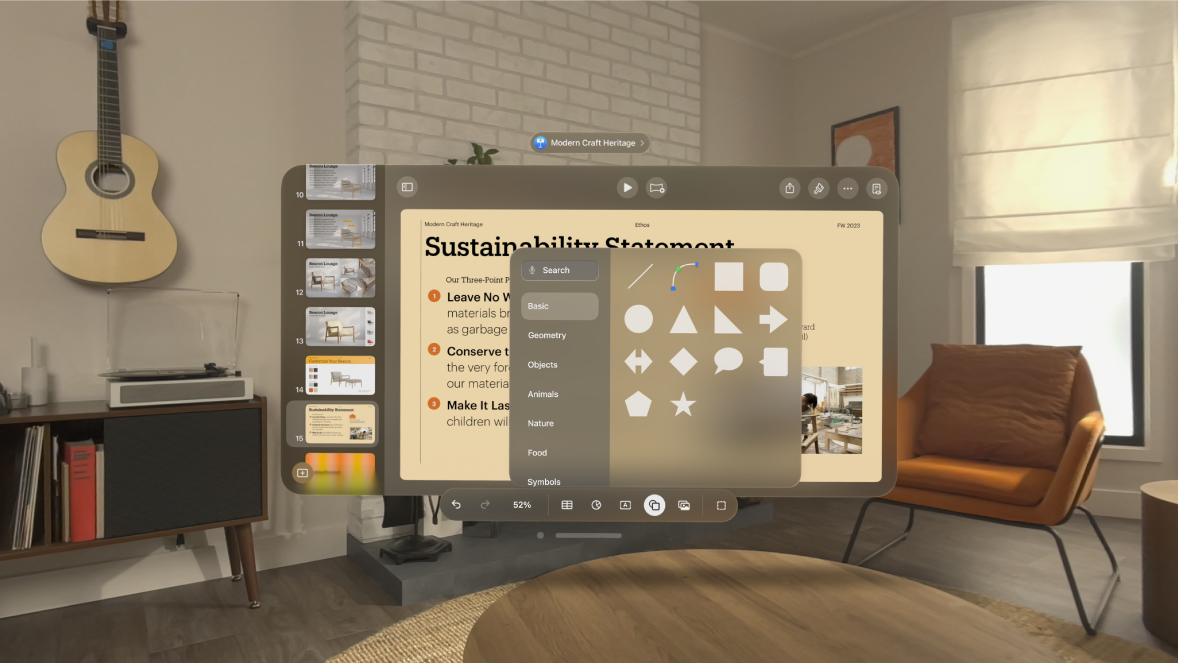
The shapes library contains hundreds of shapes in a variety of categories. After you add a shape to a slide, you can customise the shape in a number of ways. For example, you can change the standard five-point star into a twenty-point starburst and adjust how rounded the corners of a square are. You can also add text inside a shape and fill a shape with colour or an image.

Add a shape
Tap

To search for a shape, type its name in the search field at the top of the shapes library.
Pinch and drag the shape to reposition it on the slide.
Adjust the features of a shape
You can change features of any basic shape (from the Basic category in the shapes library) that has a green dot when it’s selected. For example, you can add more arms to a five-point star.
Note: On Apple Vision Pro, you may need to make the shape larger to see the green dot. You can change the shape back to its original size after you make your changes.
Tap a shape to select it.
Do any of the following:
Reshape the corners of a rounded rectangle: Pinch and drag the green dot toward a corner to sharpen it, or away from a corner to make it rounder.
Change the number of points on a star: Pinch and drag the outer green dot clockwise to add points, or anticlockwise to remove them. A star can have between three and twenty points.
Change the shape of the points on a star: Pinch and drag the inner green dot towards the centre of the star to make the points longer and narrower, or drag away from the centre to make the points shorter and wider.
Change the shape of a call out or speech bubble: Pinch and drag the green dot on the body of the bubble to reshape it. Pinch and drag the green dot at the tip of the point to change its length and position. Pinch and drag the green dot at the base of the point to change its width.
Change the number of sides in a polygon: Pinch and drag the green dot clockwise or anticlockwise to adjust the number of sides.
Adjust the proportions of arrows: Pinch and drag the green dot towards the tip of the arrow to make the arrowhead shallower, or drag the dot towards the side point of the arrow to make the arrow’s trunk thicker.
You can also edit features of a shape by changing their specific values, like the number of points on a star, the corner radius on a rounded rectangle, the width of the tail on a speech bubble and more. Tap

Save a custom shape
Tap a custom shape, tap

The shape is saved in the My Shapes category of the shapes library, which appears only when you have custom shapes. Shapes appear in the library in the order you create them; you can’t change this order.
In the shapes library, pinch and hold the shape you just created, then tap Rename.
Type your own name for the shape.