Install PCIe cards in your Mac Pro (2023)
Learn about the PCIe slots on your Mac Pro (2023) and how to install additional cards.
Card capacity and size
Mac Pro has seven PCIe slots that accept many different types of PCIe cards:
Slot 1: gen 4, up to x16 lanes (double-wide)
Slot 2: gen 4,up to x16 lanes (double-wide)
Slot 3: gen 4, up to x8 lanes (double-wide)
Slot 4: gen 4,up to x8 lanes (double-wide)
Slot 5: gen 4, up to x8 lanes (single-wide)
Slot 6: gen 4,up to x8 lanes (single-wide)
Slot 7: gen 3,up to x4 lanes (single-wide)
Mac Pro comes preinstalled with the Apple I/O card in slot 7, which contains a 3.5 mm headphone jack with support for high-impedence headphones, two HDMI ports, and two USB-A ports. The Apple I/O card can't be installed in another slot, but it can be removed to install another half-length, x4 PCIe card instead. Learn about PCIe cards you can install in your Mac Pro (2023).
The Apple Thunderbolt I/O board has six Thunderbolt 4 ports and is installed in its own dedicated slot.
Check available slots
To check the status of each slot, choose Apple menu > About This Mac, click More Info, then click the Info button![]() in the PCI cards section.
in the PCI cards section.
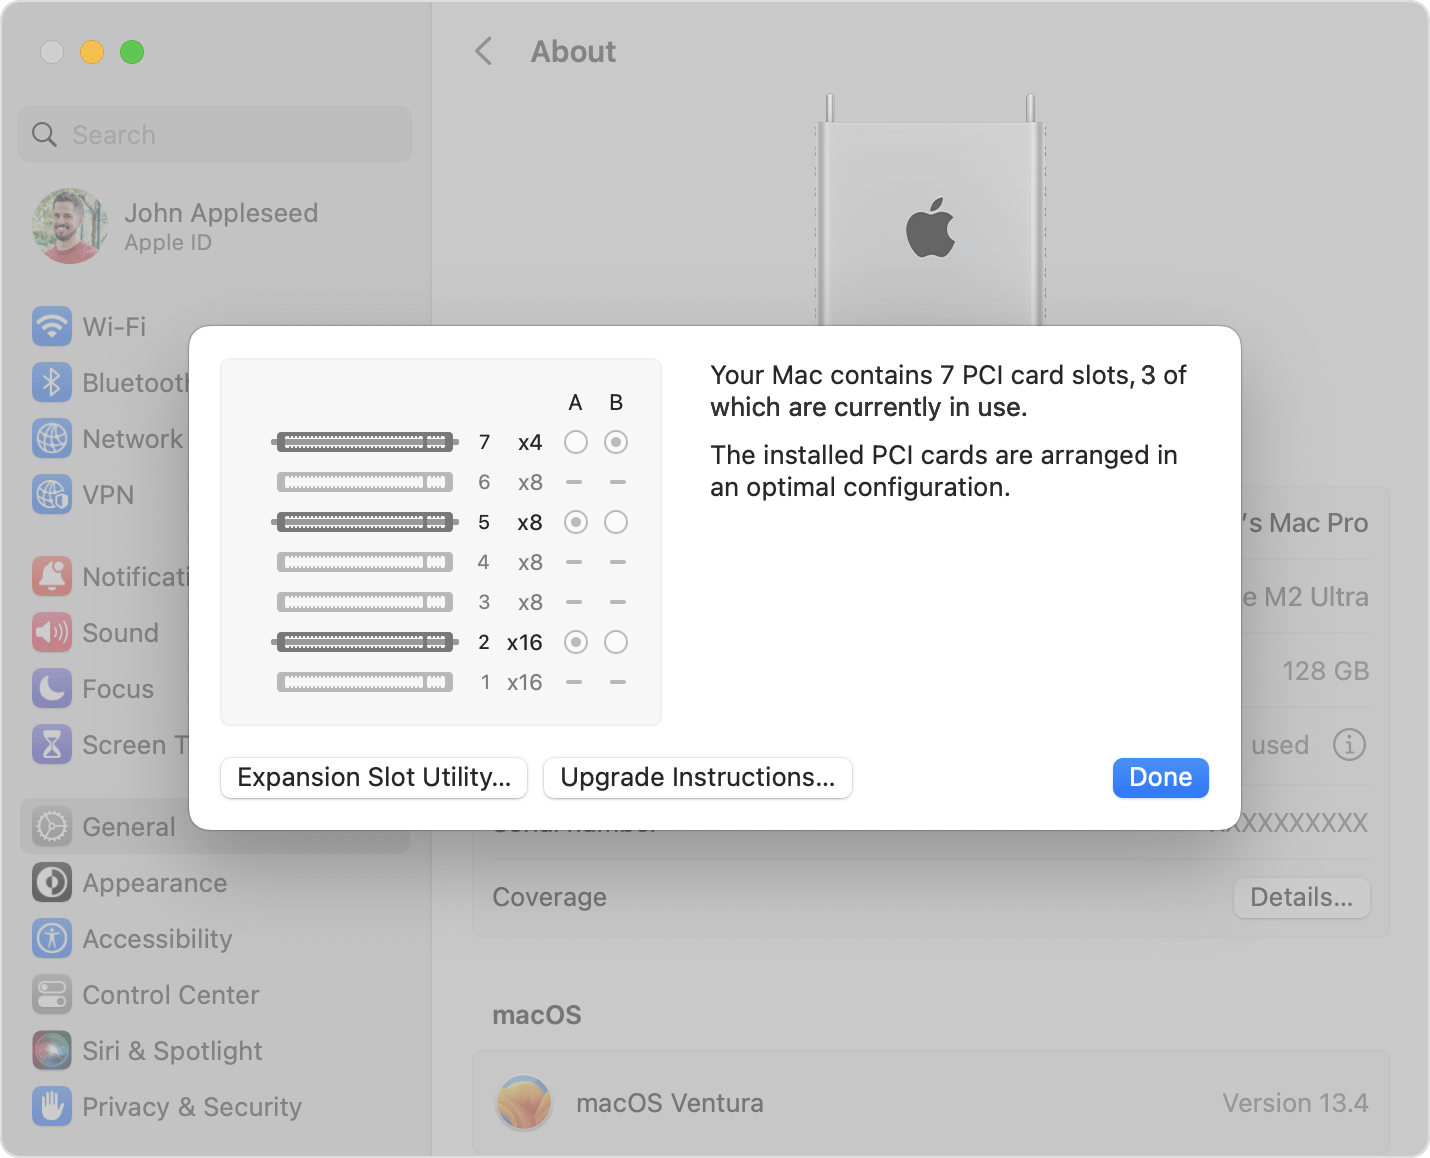
By default, Mac Pro automatically balances bandwidth between all of the cards across the two PCIe pools. You can use Expansion Slot Utility to make manual adjustments to pool allocations.
Installing PCIe cards
Learn how to remove the housing or top cover of your Mac Pro and install a PCIe card.
Remove the housing or top cover
Follow the steps to remove the housing on Mac Pro (2023) or the top cover on Mac Pro (Rack, 2023).
Mac Pro (2023)
Wait approximately 5-10 minutes for the computer to cool down.
Unplug all cables except the power cord from your computer.
Touch the metal housing on the outside of Mac Pro to discharge any static electricity, then unplug the power cord.
Always discharge static before you touch parts or install components inside your Mac Pro. To avoid generating static, don't move around the room until you finish installing the cards and slide the enclosure back onto the computer.
Flip the top latch up, then twist left to unlock the housing.

Lift the housing straight up and off of Mac Pro. Carefully set it aside.
Mac Pro won't turn on when its cover is removed.

Mac Pro (Rack, 2023)
Wait approximately 5-10 minutes for the computer to cool down.
Unplug all cables except the power cord from your computer.
Touch the metal housing on the outside of Mac Pro to discharge any static electricity, then unplug the power cord.
Always discharge static before you touch parts or install components inside your Mac Pro. To avoid generating static, don't move around the room until you finish installing the cards and slide the top cover back onto the computer.
Slide the top cover release latches to the unlocked position, lift the top cover and pull it away from the front plate, then set it aside.

Install a PCIe card
Using a Phillips-head screwdriver, unscrew and remove any brackets and slot covers over the slots where you want to install your card.

Slide the lock to the unlocked position.

Remove your new card from its static-proof bag and hold it by its corners. Don't touch the gold connectors or the components on the card.
Use only PCIe modules that are safety certified (CSA, UL, or equivalent) and specifically state that they are compliant with the industry standard PCIe specification. Use of non-certified compliant modules may not keep different input power sources separated, resulting in a possible burn hazard.
Make sure the card pins are in line with the slot as you insert the card into the PCIe slot.

Slide the lock to the locked position.

Reinstall any side brackets you removed, then tighten the screws on the bracket.

Reinstall the housing or top cover
Follow the steps to reinstall the housing on Mac Pro (2023) or the top cover on Mac Pro (Rack, 2023).
Mac Pro (2023)
Carefully lower the housing over Mac Pro.

After the housing is fully seated, twist the top latch right and flip it down to lock it.
Connect the power cord, display, and any other peripherals.
Mac Pro (Rack, 2023)
Align the edge of the top cover with the slot in the front plate, then firmly press near the release latches and listen for them to click into place.

Connect the power cord, display, and any other peripherals.
Turn on third-party drivers
Some PCIe cards require a driver to enable full functionality of your card in macOS.
Download and install the driver for your PCIe card. If the driver was built for a Mac with an Intel processor, install Rosetta if prompted.
If "System Extension Blocked" appears after you install the driver, click Open System Settings, click Enable System Extensions, authenticate as an administrator, then click Modify Settings.
If the driver uses kernel extensions, change the security settings on your Mac to Reduced Security, then turn on "Allow user management of kernel extensions from identified developers."
Restart your computer, then choose Apple menu > System Settings, then select Privacy & Security.
Click Allow below the Security area to allow the system software from your developer to load.
Authenticate as an administrator, then click Modify Settings.
Authenticate as an administrator, then click Restart to enable the system extension.
Use Expansion Slot Utility
When you install or remove PCIe cards, Mac Pro detects the cards in each slot and allocates bandwidth between the two pools to maximize throughput. Expansion Slot Utility lets you view and change how your cards are allocated.
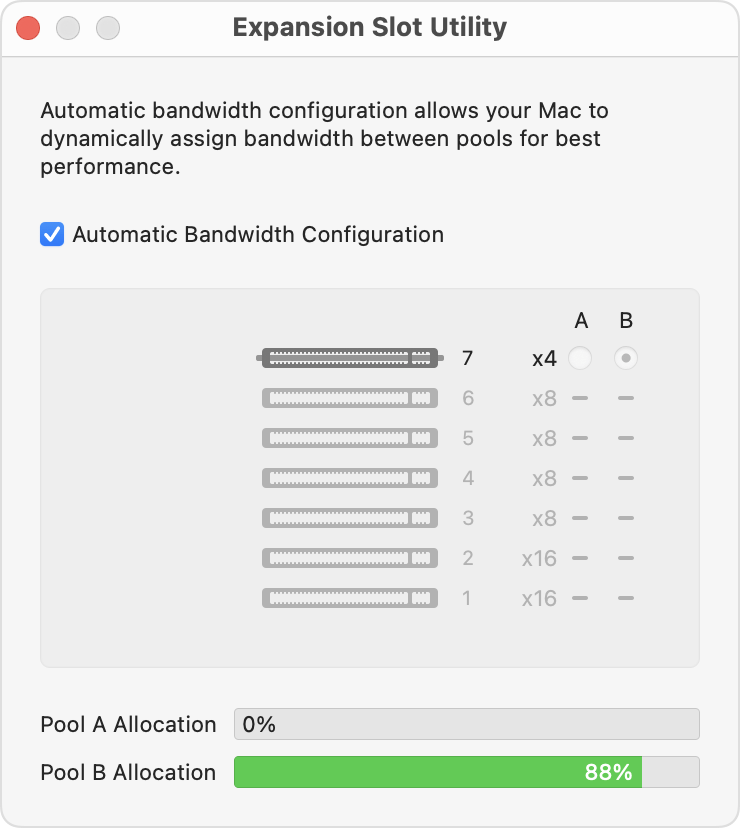
Use Automatic Bandwidth Configuration
By default, your Mac Pro uses Automatic Bandwidth Configuration to automatically manage how the cards are allocated to each of the two pools.
Assign pool allocations manually
If you want to manually assign the pool allocations for your cards, turn off Automatic Bandwith Configuration and choose a pool for each card. For example, you might want to give a single card 100 percent allocation of pool A.
Whenever you make changes to pool allocation, Expansion Slot Utility prompts you to save your changes and restart your Mac before they take effect.
PCIe bandwidth
The M2 Ultra chip provides 32 lanes of PCIe gen 4 to the system, with 8 lanes dedicated to the internal SSD. The M2 Ultra chip connects to the PCIe slots through a PCIe switch and provides 24 lanes of gen 4 bandwidth. Pool A provides a maximum of 16 lanes of gen 4 bandwidth and Pool B provides a maximum of 8 lanes of gen 4 bandwidth.
These built-in components are connected to the system through the PCIe switch and assigned to Pool B:
SATA controller
10Gb Ethernet controllers
Wireless (Wi-Fi, Bluetooth) controller
USB-A port
PCIe Slot 7 (Apple I/O card)
This means that a system will always show a percentage allocated to Pool B, even if no PCIe cards are installed.
Each built-in Thunderbolt port in Mac Pro is managed by its own controller integrated in the M2 Ultra chip and doesn't share bandwidth with the PCIe slots.
If a card isn't recognized
Mac Pro slots support PCIe gen 4 and will automatically negotiate to lower speeds based on card capabilities. Slot 6 also functions as a compatibility slot for PCIe cards that are not compliant with gen 4 specifications. If you insert a card into Slots 1-5 or Slot 7 and it isn't recognized in the system, try inserting the card in Slot 6.
Information about products not manufactured by Apple, or independent websites not controlled or tested by Apple, is provided without recommendation or endorsement. Apple assumes no responsibility with regard to the selection, performance, or use of third-party websites or products. Apple makes no representations regarding third-party website accuracy or reliability. Contact the vendor for additional information.