MainStage User Guide
- Welcome
-
- Overview of Edit mode
-
- Select patches and sets in the Patch List
- Copy, paste, and delete patches
- Reorder and move patches in the Patch List
- Add and rename patches
- Create a patch from several patches
-
- Overview of the Patch Settings Inspector
- Select patch settings in the Patch Library
- Set the time signature for patches
- Change the tempo when you select a patch
- Set program change and bank numbers
- Defer patch changes
- Instantly silence the previous patch
- Change patch icons
- Transpose the pitch of incoming notes for a patch
- Change the tuning for a patch
- Add text notes to a patch
-
- Overview of channel strips
- Add a channel strip
- Change a channel strip setting
- Configure channel strip components
- Show signal flow channel strips
- Hide the metronome channel strip
- Create an alias of a channel strip
- Add a patch bus
- Set channel strip pan or balance positions
- Set channel strip volume levels
- Mute and solo channel strips
- Use multiple instrument outputs
- Use external MIDI instruments
- Reorganize channel strips
- Delete channel strips
-
- Overview of the Channel Strip Inspector
- Choose channel strip settings
- Rename channel strips
- Change channel strip colors
- Change channel strip icons
- Use feedback protection with channel strips
- Set keyboard input for a software instrument channel strip
- Transpose individual software instruments
- Filter MIDI messages
- Scale channel strip velocity
- Set channel strips to ignore Hermode tuning
- Override concert- and set-level key ranges
- Add text notes to a channel strip in the Channel Strip Inspector
- Route audio via send effects
-
- Screen Control Inspector overview
- Replace parameter labels
- Choose custom colors for screen controls
- Change background or grouped screen control appearance
- Set screen controls to show the hardware value
- Set parameter change behavior for screen controls
- Set hardware matching behavior for screen controls
- Reset and compare changes to a patch
- Override concert- and set-level mappings
-
- Overview of mapping screen controls
- Map to channel strip and plug-in parameters
- Map screen controls to actions
- Map a screen control to multiple parameters
- Use screen controls to display PDF document pages
- Edit the saved value for a mapped parameter
- Set drum pads or buttons to use note velocity
- Map screen controls to all channel strips in a patch
- Undo screen control parameter mappings
- Remove screen control mappings
- Work with graphs
- Create controller transforms
- Share patches and sets between concerts
- Record the audio output of a concert
-
- Overview of concerts
- Create a concert
- Open and close concerts
- Save concerts
- How saving affects parameter values
- Clean up concerts
- Consolidate assets in a concert
- Rename the current concert
-
- Overview of the Concert Settings Inspector
- Set MIDI Routing to channel strips
- Transpose incoming note pitch for a concert
- Define the program change message source
- Send unused program changes to channel strips
- Set the time signature for a concert
- Change the tuning for a concert
- Set the pan law for a concert
- Add text notes to a concert
- Control the metronome
- Silence MIDI notes
- Mute audio output
-
- Layout mode overview
-
- Screen control parameter editing overview
- Lift and stamp screen control parameters
- Reset screen control parameters
- Common screen control parameters
- Keyboard screen control parameters
- MIDI activity screen control parameters
- Drum pad screen control parameters
- Waveform screen control parameters
- Selector screen control parameters
- Text screen control parameters
- Background screen control parameters
- How MainStage passes through MIDI messages
- Export and import layouts
- Change the aspect ratio of a layout
-
- Before performing live
- Use Perform mode
- Screen controls in performance
- Tempo changes during performance
- Tips for performing with keyboard controllers
- Tips for performing with guitars and other instruments
- Tune guitars and other instruments with the Tuner
- The Playback plug-in in performance
- Record your performances
- After the performance
- Tips for complex hardware setups
-
- Overview of keyboard shortcuts and command sets
-
- Concerts and layouts keyboard shortcuts
- Patches and sets (Edit mode) keyboard shortcuts
- Editing keyboard shortcuts
- Actions keyboard shortcuts
- Parameter mapping (Edit mode) keyboard shortcuts
- Channel strips (Edit mode) keyboard shortcuts
- Screen controls (Layout mode) keyboard shortcuts
- Perform in Full Screen keyboard shortcuts
- Window and view keyboard shortcuts
- Help and support keyboard shortcuts
-
-
- Use MIDI plug-ins
-
- Arpeggiator overview
- Arpeggiator control parameters
- Note order parameters overview
- Note order variations
- Note order inversions
- Arpeggiator pattern parameters overview
- Use Live mode
- Use Grid mode
- Arpeggiator options parameters
- Arpeggiator keyboard parameters
- Use keyboard parameters
- Assign controllers
- Modifier controls
- Note Repeater controls
- Randomizer controls
-
- Use the Scripter
- Use the Script Editor
- Scripter API overview
- MIDI processing functions overview
- HandleMIDI function
- ProcessMIDI function
- GetParameter function
- SetParameter function
- ParameterChanged function
- Reset function
- JavaScript objects overview
- Use the JavaScript Event object
- Use the JavaScript TimingInfo object
- Use the Trace object
- Use the MIDI event beatPos property
- Use the JavaScript MIDI object
- Create Scripter controls
- Transposer MIDI plug-in controls
-
-
- Alchemy overview
- Alchemy interface overview
- Alchemy Name bar
- Alchemy file locations
-
- Alchemy source overview
- Source master controls
- Import browser
- Source subpage controls
- Source filter controls
- Source filter use tips
- Source elements overview
- Additive element controls
- Additive element effects
- Spectral element controls
- Spectral element effects
- Pitch correction controls
- Formant filter controls
- Granular element controls
- Sampler element controls
- VA element controls
- Source modulations
- Morph controls
- Alchemy master voice section
- Alchemy Extended parameters
-
- Playback plug-in overview
- Add a Playback plug-in
- Playback interface
- Use the Playback waveform display
- Playback transport and function buttons
- Playback information display
- Playback Sync, Snap To, and Play From parameters
- Use the Playback group functions
- Use the Playback Action menu and File field
- Use markers with the Playback plug-in
-
- Sculpture overview
- Sculpture interface
- Global parameters
- Amplitude envelope parameters
- Use the Waveshaper
- Filter parameters
- Output parameters
- Define MIDI controllers
- Extended parameters
-

Audio settings in MainStage
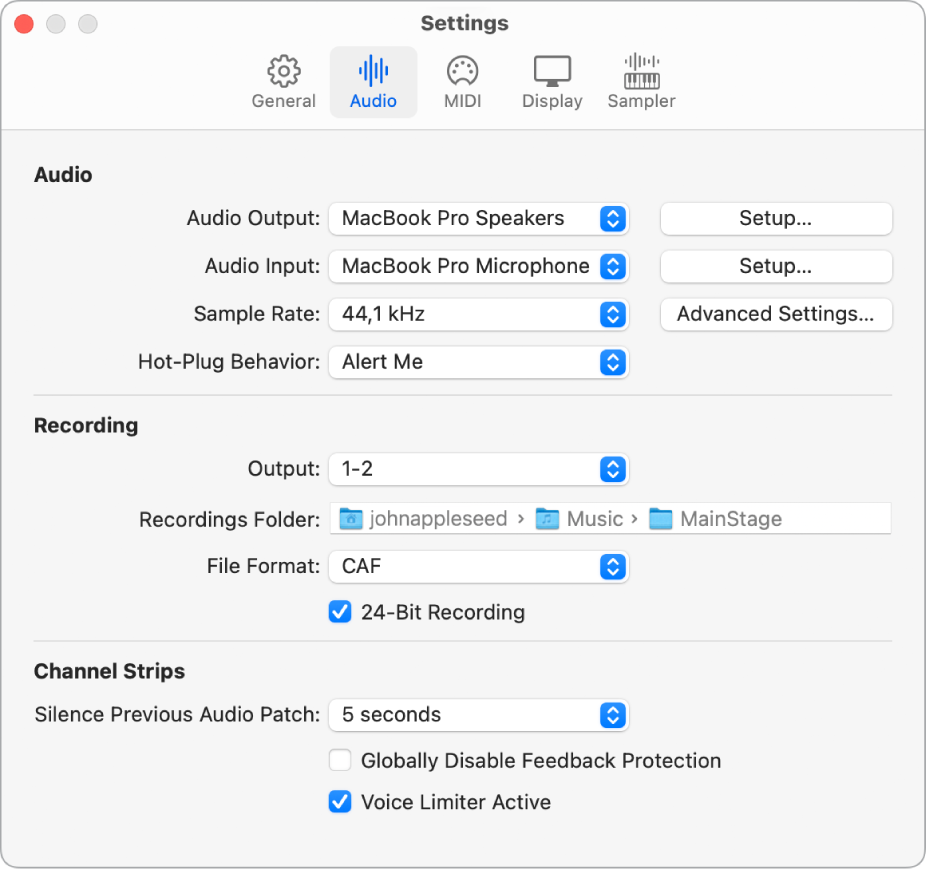
These settings let you set the audio output and input drivers, set the size of the I/O buffer, set the audio sample rate, and choose which note is displayed as middle C.

Audio
Audio Output pop-up menu: Choose the device you want to use to hear the audio output from MainStage.
Audio Input pop-up menu: Choose the device you want to use as the source for audio input. Choose Automatic to use the system setting for audio input (except when the only available input device is the built-in microphone, in which case no input device is selected).
Setup buttons: Click one of the Setup buttons to open the Audio/MIDI Setup window and configure audio output or input.
Sample Rate pop-up menu: Choose the sample rate for audio input. If you are using an audio interface or other audio device with MainStage, the Sample Rate value should be set to the sample rate of your audio device.
Advanced Settings button: Open the Advanced Settings window so you can set the I/O buffer size and driver latency, and view an estimate of the resulting latency.
Hot-Plug Behavior pop-up menu: Choose what action MainStage takes when you hot-plug an audio device while MainStage is open. The choices are:
Alert me: Displays an alert when a device is hot-plugged. The alert includes buttons that let you use or ignore the device.
Automatically Use Device: Switches the audio drivers to allow immediate use of the hot-plugged device for audio input and output.
Do Nothing: Does not switch the audio drivers.
Recording
Output pop-up menu: Choose the audio output to record.
Recordings Folder field: Click the field, then browse to choose the location where recordings are saved. The file path of the chosen location appears in the field.
File Format pop-up menu: Choose the file format for audio recordings. The choices are:
AIFF
CAF
WAVE
24-Bit Recording checkbox: When selected (default), MainStage can record 24-bit files. Otherwise, audio recordings use a resolution of 16-bit.
Channel Strips
Silence Previous Patch pop-up menu: Choose the amount of time sustaining notes and effects tails continue to sound before falling silent when you select a new patch.
The Silence Previous Patch preference applies only to audio and external instrument channel strips, not software instrument channel strips.
Globally Disable Feedback Protection checkbox: When selected, feedback protection is disabled for all audio and external instrument channel strips in all concerts. The Feedback Protection checkbox is also removed from the Attributes tab in the Channel Strip Inspector.
Voice Limiter Active checkbox: When selected, the voice limiter is enabled. The voice limiter avoids audio dropouts at high CPU loads by stopping voices from MainStage software instruments based on the order in which those voices were played. When the CPU load increases to the point that audio dropouts may occur, the voice limiter activates and stops a few of the oldest voices still sounding; if that doesn’t lower the CPU load enough to avoid dropouts, the voice limiter stops all older voices still sounding. In general, the voice limiter should remain enabled.
Advanced Settings
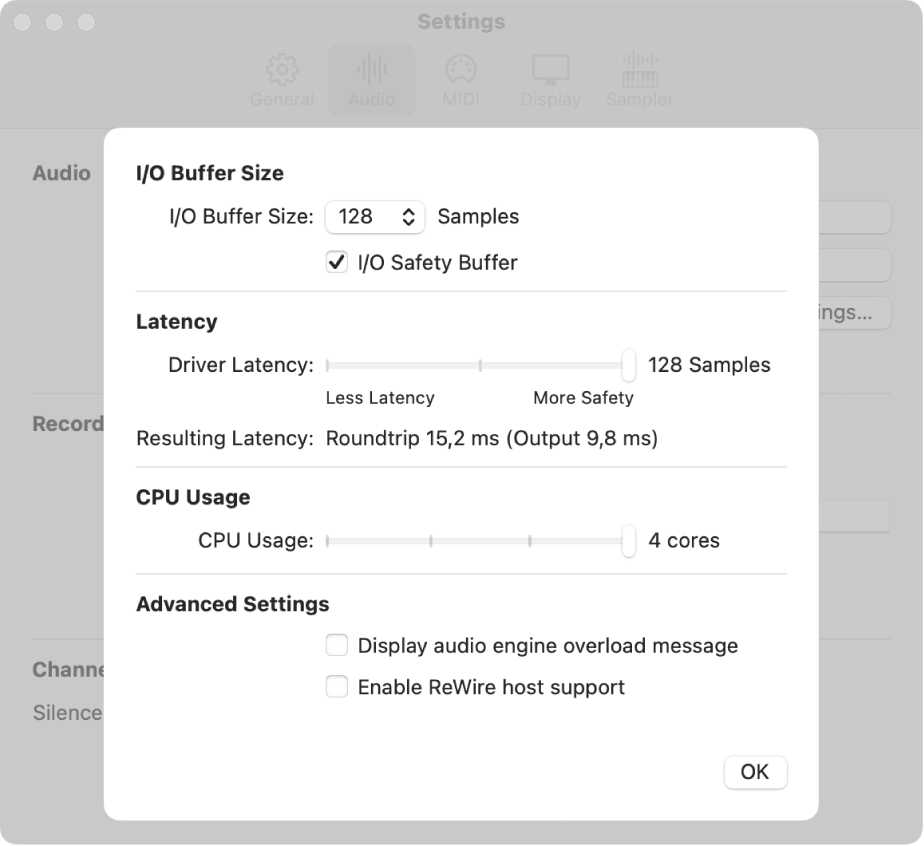
Clicking the Advanced Settings button in the Audio settings pane opens a new window with the following additional settings:

I/O Buffer Size pop-up menu: Choose the size of the buffer for audio input and output in samples. Smaller buffer sizes reduce the amount of latency, but also require more work from the CPU and may result in playback artifacts. You may want to try different settings to find the lowest setting that does not produce any artifacts.
I/O Safety Buffer checkbox: If selected, MainStage uses an additional buffer to process audio output streams, providing a safeguard against crackling noises that may occur when using very low I/O Buffer Size settings. If turning on this preference does not improve things on your system, disable the checkbox and select a larger I/O buffer size setting.
Note: Use of the I/O Safety Buffer preference increases the output latency and therefore the round trip (input plus output) latency.
Driver Latency slider: Drag the slider to set the amount of latency. Drag left to decrease the amount of latency, or drag right to increase the amount of safety (may increase latency).
The latency for the current buffer size is displayed below the Driver Latency slider.
CPU Usage slider: Drag the slider to set the amount of processor power devoted to audio processing. For multi-core processors, this controls the number of cores devoted to audio processing.
Draw pop-up menu: The MainStage interface is drawn using either the open source OpenGL standard, or the Apple-developed Metal standard. Metal can offer performance benefits for the latest generation of Macs, but can cause performance issues with older or less powerful computers. However, Metal also allows offloading drawing to discreet (external) GPUs. Therefore, you can choose whether the interface is drawn using OpenGL, using Metal on discreet GPUs, or Metal (on the built-in GPU), based on your specific equipment.
Download the guides:
MainStage User Guide: Apple Books | PDF
MainStage Instruments: Apple Books | PDF
MainStage Effects: Apple Books | PDF