Logic Pro User Guide for iPad
-
- What is Logic Pro?
- Working areas
- Work with function buttons
- Work with numeric values
-
- Intro to tracks
- Create tracks
- Create tracks using drag and drop
- Choose the default region type for a software instrument track
- Select tracks
- Duplicate tracks
- Reorder tracks
- Rename tracks
- Change track icons
- Change track colors
- Use the tuner on an audio track
- Show the output track in the Tracks area
- Delete tracks
- Edit track parameters
- Start a Logic Pro subscription
- How to get help
-
- Intro to recording
-
- Before recording software instruments
- Record software instruments
- Record additional software instrument takes
- Record to multiple software instrument tracks
- Record multiple MIDI devices to multiple tracks
- Record software instruments and audio simultaneously
- Merge software instrument recordings
- Spot erase software instrument recordings
- Replace software instrument recordings
- Capture your most recent MIDI performance
- Route MIDI internally to software instrument tracks
- Record with Low Latency Monitoring mode
- Use the metronome
- Use the count-in
-
- Intro to arranging
-
- Intro to regions
- Select regions
- Cut, copy, and paste regions
- Move regions
- Remove gaps between regions
- Delay region playback
- Trim regions
- Loop regions
- Repeat regions
- Mute regions
- Split and join regions
- Stretch regions
- Separate a MIDI region by note pitch
- Bounce regions in place
- Change the gain of audio regions
- Create regions in the Tracks area
- Convert a MIDI region to a Session Player region or a pattern region
- Rename regions
- Change the color of regions
- Delete regions
-
- Intro to chords
- Add and delete chords
- Select chords
- Cut, copy, and paste chords
- Move and resize chords
- Loop chords on the Chord track
- Edit chords
- Work with chord groups
- Use chord progressions
- Change the chord rhythm
- Choose which chords a Session Player region follows
- Analyze the key signature of a range of chords
- Create fades on audio regions
- Extract vocal and instrumental stems with Stem Splitter
- Access mixing functions using the Fader
-
- Intro to Step Sequencer
- Use Step Sequencer with Drum Machine Designer
- Record Step Sequencer patterns live
- Step record Step Sequencer patterns
- Load and save patterns
- Modify pattern playback
- Edit steps
- Edit rows
- Edit Step Sequencer pattern, row, and step settings in the inspector
- Customize Step Sequencer
-
- Effect plug-ins overview
-
- Instrument plug-ins overview
-
- ES2 overview
- Interface overview
-
- Modulation overview
- Use the Mod Pad
-
- Vector Envelope overview
- Use Vector Envelope points
- Use Vector Envelope solo and sustain points
- Set Vector Envelope segment times
- Vector Envelope XY pad controls
- Vector Envelope Actions menu
- Vector Envelope loop controls
- Vector Envelope point transition shapes
- Vector Envelope release phase behavior
- Use Vector Envelope time scaling
- Modulation source reference
- Via modulation source reference
-
- Sample Alchemy overview
- Interface overview
- Add source material
- Save a preset
- Edit mode
- Play modes
- Source overview
- Synthesis modes
- Granular controls
- Additive effects
- Additive effect controls
- Spectral effect
- Spectral effect controls
- Filter module
- Low, bandpass, and highpass filters
- Comb PM filter
- Downsampler filter
- FM filter
- Envelope generators
- Mod Matrix
- Modulation routing
- Motion mode
- Trim mode
- More menu
- Sampler
- Studio Piano
- Copyright
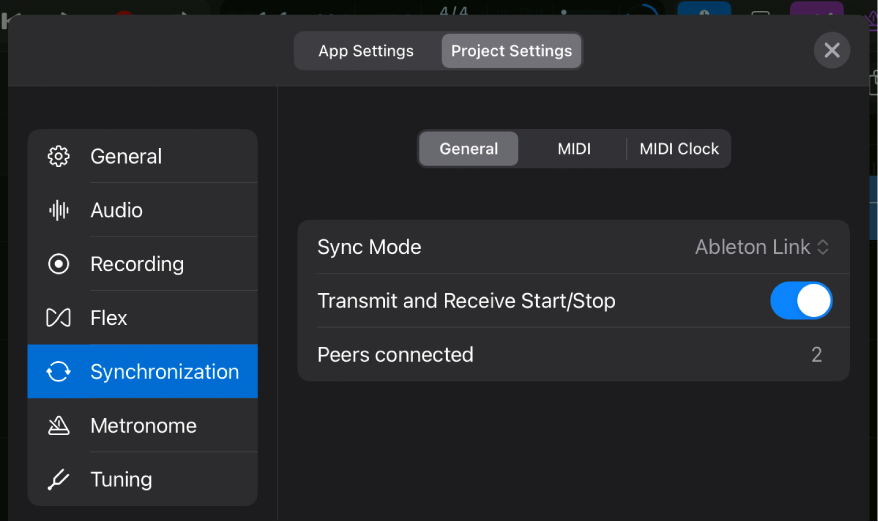
General Synchronization project settings in Logic Pro for iPad

Sync Mode pop-up menu: Defines how the tempo in Logic Pro for iPad syncs with other devices.
Internal: Selects the internal timer of Logic Pro, with Logic Pro transmitting MIDI clock to synchronize external devices.
Ableton Link: Selects Ableton Link mode, which uses a technology that synchronizes the musical beat, tempo, and phase of Logic Pro with multiple applications running on one or more devices on the same network.
Two additional options become available once you choose Ableton Link from the Sync Mode pop-up menu:
Transmit and Receive Start/Stop switch: When turned on, transport start and stop commands are shared between all Link users in a session who have the feature turned on.
The status of this switch is saved as an app setting.
Peers connected display: The number shows how many other devices (on your iPad and on the local network) are participating in the Ableton Link session.
This is the same number inside the circular progress bar shown in the control bar display.
Ableton Link
Choosing Ableton Link in the Sync Mode pop-up menu results in the following changes in your project:
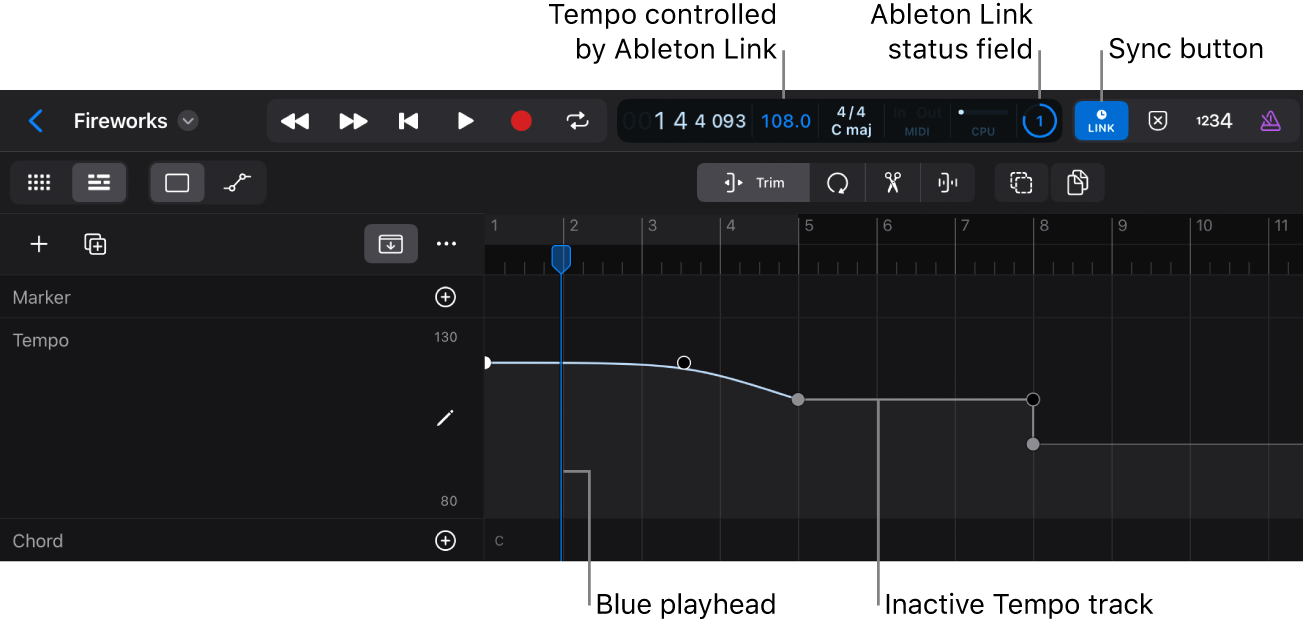
The Sync button
 appears in the control bar next to the display.
You can tap the button to switch the sync mode between Ableton Link (blue button) and Internal (gray button), which is linked to the Sync Mode setting in the General Synchronization project settings.
The Ableton Link status field is added to the right side of the display; it shows a circular progress bar that represents one measure with a full rotation, with the 12 o’clock position indicating the downbeat. The number inside the ring shows the number of other participants in your Ableton Link session.
The tempo digits in the display are blue to indicate that the Ableton Link session controls the project tempo.
The Tempo track in your project is turned off. Tap the Tempo track to open its menu with a new option, Reactivate Tempo Track. See Use the Tempo track with Ableton Link.
The playhead turns blue.

Turn on Ableton Link in the project settings
Tap the More button
 on the right side of the control bar, then tap Settings.
Tap Project Settings, then tap Synchronization.
Tap the Sync Mode pop-up menu and choose Ableton Link.
Tap the Done button or swipe down to close the settings.
The Sync button
 appears in the control bar, indicating by its blue color that Ableton Link is turned on.
Turn on Ableton Link with the Sync button
Tap the More button
 on the right side of the control bar, then tap Customize Control Bar.
Tap Modes, then tap the Sync switch to activate it.
The Sync button
 appears in the control bar.
Tap outside the Customize Control Bar dialog to close it.
Tap the Sync button in the control bar to select it.
The Sync button turns blue to indicate that Ableton Link is on.
Download this guide: PDF